OEM version of the LSI SAS 9211-8i, such as the Dell H200, H310 or IBM M1015 are quite popular for use with FreeNAS. However, they need to be flashed with a regular LSI firmware to disable their RAID capabilities in order to passthrough the drives directly to the OS.
Here’s how I upgraded my Dell PERC H200, which came with Dell’s A10 firmware (equivalent to LSI SAS 2008 P07 firmware), to LSI P20 firmware. The newer version also has the advantage that drives larger than 2TB are supported. Also, re-flashing allowed me to not flash a boot ROM to the card, speeding up the boot process of my server as my boot disk is connected to the Intel AHCI controller on the mainboard.
Please note that this operation is not supported by Dell or LSI, may void your warranty and could potentially damage the controller. So proceed at your own risk.
Step 1: Downloading old firmware
- Download the firmware for the Dell 6Gbps SAS HBA (this is a variant of the H200 with 8 external ports instead of 8 internal ports) and extract 6GBPSAS.FW from SASHBA_Firmware_6GBPS-SAS-HBA_07.03.06.00_A10_ZPE.exe.
- Download the P07 firmware for the LSI SAS 9211-8i and extract the file 2118it.bin from 9211_8i_Package_For_P7_Firmware_BIOS_Upgrade_on_MSDOS_and_Windows.zip.
- Download the P05 UEFI flasher for the LSI SAS 9211-8i and extract the file sas2flash.efi from EFI_Installer_P5.zip.
- Place these three files into a directory named P07 on a FAT32-formatted USB flash drive.
Step 2: Downloading current firmware
- Download the current firmware for the LSI SAS 9211-8i and extract the file 2118it.bin from 9211_8i_Package_P20_IR_IT_Firmware_BIOS_for_MSDOS_Windows.
- Download the current UEFI flasher for the LSI SAS 9211-8i and extract the file sas2flash.efi from Installer_P20_for_UEFI.zip.
- Place these two files into a directory named P20 on the USB flash drive.
Step 3: Downloading UEFI shell
- Download an x86_64 UEFI shell. I had to use the v1 shell because my server would only show error messages (about failed assertions and files not found).
- Rename the shell to BOOTX64.efi and place it into a directory named BOOT inside a directory named EFI on the USB flash drive.
Step 4: Flashing
- UEFI boot your server off the flash drive
- Type map -b to find the flash drive
- Switch to it, e.g. by entering fs1:
- cd P07
- sas2flash.efi -listall should show you your controller
- sas2flash.efi -c 0 -list shows you details on the controller. Note down the SAS address in case something goes wrong and you need to reprogram the SAS address.
- Erase the old firmware and boot ROM: sas2flash.efi -o -e 6
- Write the Dell 6Gbps firmware: sas2flash.efi -o -f 6GBPSAS.FW
- Write the LSI P07 firmware: sas2flash.efi -o -f 2118it.bin
- cd ..\P20
- Write the LSI P20 firmware: sas2flash.efi -o -f 2118it.bin
Notes
At the end of every command (before I rebooted before step 10), I got the message “Failed Reconnecting the EFI Driver. (EFI Error: Not Found)”. It did not seem to affect anything.
Step 7 showed “Erasing Flash Region” and then after a while “ERROR: Erase Flash Operation Failed!”. I simply proceeded and the error did not appear to affect anything.
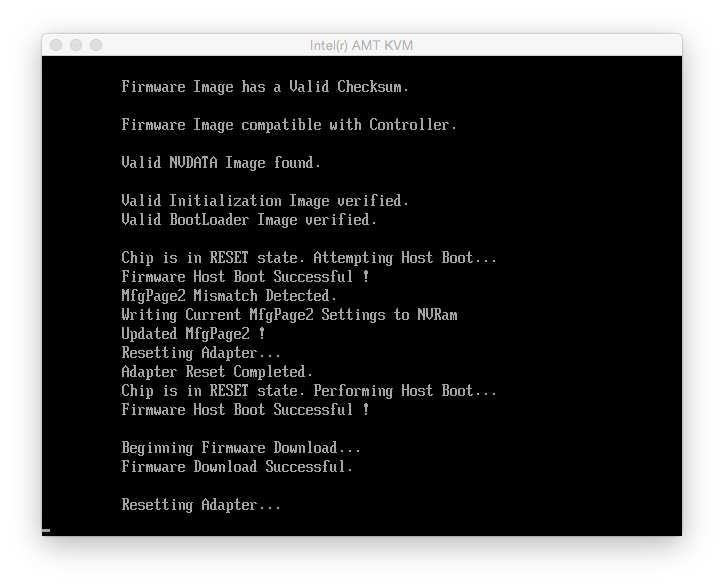
Step 8 looked like this:
and the controller details after the flash looked like this:
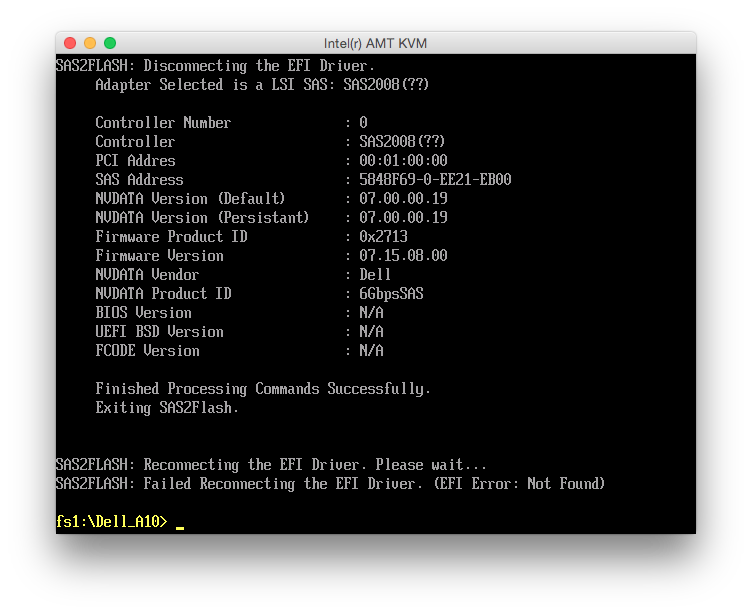
During step 9, I received the message “NVDATA Versions Compatible. NVDATA Product ID and Vendor ID do not match. Would you like to flash anyway [y/n]?”, where I simply hit y and it proceeded flashing. At the end, it said “Firmware Flash Successful! Resetting Adapter… Adapter Reset Failed!”. Looking at the controller details showed lots of errors:
 So at this point, I rebooted the machine. Now the details looked all right:

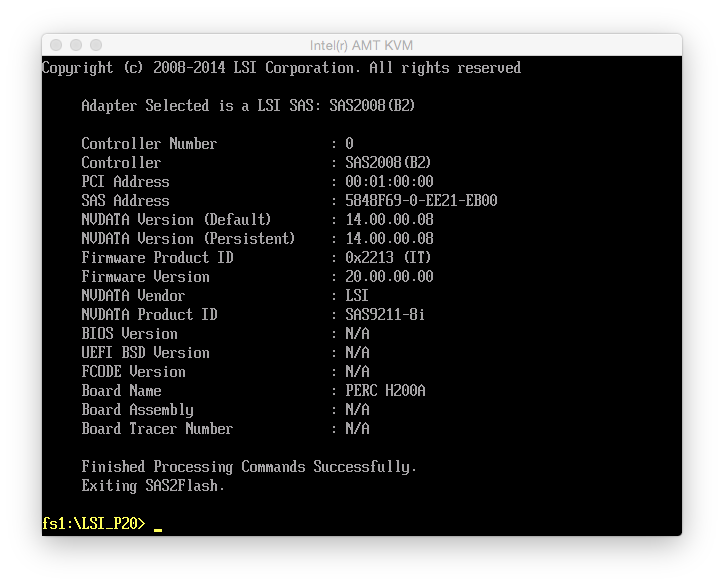
Step 11 worked without a hitch and afterwards the controller details looked like this:
Booting up the server, I now had a Dell H200 that behaved exactly like a LSI SAS 9211-8i. The only difference was that it still reported its name and PCI ID (1028:1f1c) as a Dell 6Gbps SAS Card. FreeNAS didn’t care about that though.
Addendum: Matching firmware and driver versions
I was using this controller with FreeNAS 9.2.1.9 and kept on getting kernel messages like
Nov 30 19:49:55 file02 kernel: (da1:mps0:0:0:0): READ(10). CDB: 28 00 a1 ea 00 58 00 01 00 00 length 131072 SMID 609 terminated ioc 804b scsi 0 state 0 xfer 0
Nov 30 19:49:55 file02 kernel: (da1:mps0:0:0:0): READ(10). CDB: 28 00 a1 e9 ff 58 00 01 00 00
Nov 30 19:49:55 file02 kernel: (da1:mps0:0:0:0): CAM status: SCSI Status Error
Nov 30 19:49:55 file02 kernel: (da1:mps0:0:0:0): SCSI status: Check Condition
Nov 30 19:49:55 file02 kernel: (da1:mps0:0:0:0): SCSI sense: ABORTED COMMAND asc:47,3 (Information unit iuCRC error detected)
Nov 30 19:49:55 file02 kernel: (da1:mps0:0:0:0): Retrying command (per sense data)
It turns out that these are due to a mismatch between firmware and driver version. FreeBSD 9 ships with driver version 16 and FreeBSD 10 includes version 19. Linux currently has version 18. So make sure that in step 11, you always flash the version that matches your operating system’s driver version, don’t blindly go with version P20 or the latest version. On FreeNAS, you can determine the driver version using dmesg | grep “mps0: Firmware”:
mps0: Firmware: 20.00.00.00, Driver: 16.00.00.00-fbsd
In this case, I had no data loss whatsoever and the person who reported this on the FreeBSD mailing list didn’t either, but both LSI and FreeBSD recommend to keep driver and firmware in sync.
Downgrading firmware
As I had to downgrade the firmware, I needed to do sas2flash.efi -o -e 6 before the flashing. Of course, this means that the crossflashing is undone and you’ll have to start over, flashing Dell 6GPBSAS.FW, flashing LSI P07 IT, and finally flashing the version matching your driver.
6GBPSAS.FW and LSI P07 need to be flashed with the LSI P05 sas2flash.efi because later versions will simply refuse when they encounter a NVDATA mismatch. Once that’s done, you can use the latest (P20 at the moment) sas2flash.efi to flash your final firmware version. This also has the advantage that you don’t get these “Adapter Reset Failed” warnings.
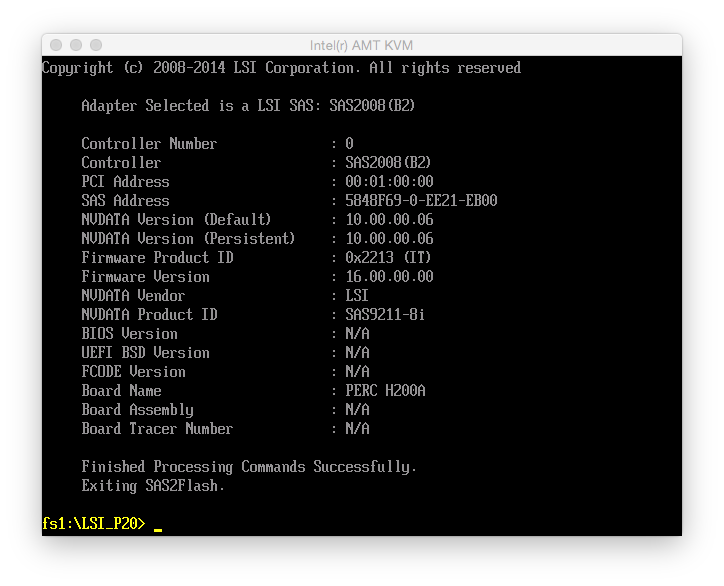
Below is a screenshot of the details of the P16 firmware:
Update 2021: Over the years, LSI was taken over by Broadcom, Broadcom was taken over by Avago, and Avago renamed itself back to Broadcom. As a result, none of the download links above work anymore. The files are still available from Broadcom though: go to https://www.broadcom.com/support/download-search, select “Legacy Products”, “All Legacy Products”, search for 9211-8i.
Hi Michael,
Thanks so much for this, I was getting pretty worried about my FreeNAS install when my old Dell Poweredge T310 with the PERC H200 gave me the “Firmware version 2 does not match driver version 16 for /dev/mps0” in FreeNAS Alert. Then when I upgraded it to the latest that dell would give me that only got me this far: “Firmware version 7 does not match driver version 16 for /dev/mps0” in FreeNAS Alert.
Then I found your post and although it sounded a bit scary I decided to give it a go since I don’t really need the hardware raid capabilities on the card anymore. I followed your directions substituting the P16 version for the P20 as freenas 9.3-stable in my case wanted version 16. The alert is gone now and everything is working smoothly.
Thanks so much for taking the time to put this together and post it, I really appreciate it!
-John
Much like John I came across your post while trying to setup an older R310 with a H200 with FreeNAS. I followed your directions to the letter ( substituting P16 for P20 but using the P20 loader) to match what’s in the latest 9.3 Stable release of FreeNAS with full success. It definitely seemed to be hiccupping and complaining the whole way but it ended up just fine after reboot.
Thanks so much for the writeup!
– Cliff
Thanks for your work, you save my life 🙂
Thanks for putting this up in as succinct form as you have. I just tried the process and all is done exactly as you’ve laid out, however, my results are not what I expected. If you have any suggestions to offer, I’d be grateful. Doing this process on a new PowerEdge T110-ii, fwiw. At step 7, the erasure process produced an error just like you described. Step 8, however, hung at “SAS2FLASH: Disconnecting the EFI driver”. After 20 minutes, felt nothing left to do but force power off, which I did.
Upon reboot, noticed the options to enter the Dell raid configs were not present and the drives listed in the rufus boot USB key were no longer there. Performed steps 5 and 6 again and they both succeeded with the H200 being listed and in detail. Attempted step 7 again (just in case) and it exited cleanly this time (no errors). Step 8 for the Dell firmware resulted in 3 output statements: 1) “No LSI SAS adapters found! Limited Command Set Available!”, 2) “ERROR: Command not allowed without an adapter!” and 3) “ERROR: Couldn’t Create Command -f” and returned to the command prompt. Attempted step 9 this time and it hung again for >20 minutes with no output/return.
I assume I’ve bricked the H200 card, but unsure. If you have any suggestions, I’m all ears.
Thanks for the post and considering assisting on my description.
Terry
I don’t think it’s bricked. The worst thing I’ve heard about is an erased SAS WWN identifier, but I assume you wrote that down before you started and you can re-program it later.
It’s most likely a mainboard issue: sas2flash might not work equally well with all UEFI implementations. Try a different sas2flash version, a different PCIe slot, a different computer, try flashing it from within Windows or Linux, try flashing it on a BIOS-based computer using a DOS disk. On a BIOS-based computer, you should also be able to use the older megarec tool to do a recovery flash. The sas2flash documentation also mentions some situations in which certain methods of flashing might or might not work.
Thank you for this posting. It allowed me to flash P16 IT firmware on my Dell Perc H200. Card came with P15 Dell firmware, which appeared to list card in IT mode, in bios, but there must have been another place where IR is noted because I kept repeatedly getting “Error cannot flash IT firmware over IR firmware” message. After going through LSI P07 IT firmware first, I was able to finally flash P16 IT.
Thanks again!
Thanks for this helpful and informative post.
Unfortunately, it now appears that all former LSI links are dead. Here’s the new locations for the LSI files mentioned in your post :
http://www.avagotech.com/docs-and-downloads/host-bus-adapters/host-bus-adapters-common-files/9211_8i_Package_For_P7_Firmware_BIOS_Upgrade_on_MSDOS_and_Windows.zip
http://www.avagotech.com/docs-and-downloads/host-bus-adapters/host-bus-adapters-common-files/EFI_Installer_P5.zip
http://www.avagotech.com/docs-and-downloads/host-bus-adapters/host-bus-adapters-common-files/sas_sata_6g_p20/9211_8i_Package_P20_IR_IT_Firmware_BIOS_for_MSDOS_Windows.zip
http://www.avagotech.com/docs-and-downloads/host-bus-adapters/host-bus-adapters-common-files/sas_sata_6g_p20/Installer_P20_for_UEFI.zip
Best regards.
Brilliant article. Thank you for this – I am not on IT firmware v 20.00 and all is working fine. Finally conquered all my issues with ZFS under Free BSD v 10.0. By the way – because I am using server board (SuperMicro Dual Xeon X7DT3-F) I which does not support UEFI boot, but nevertheless used DOS (FreeDOS) and the sas2flsh.exe utility there behaves exactly in the same way as the one for Linux (sas2flash.efi). Just to let you guys all know that FreeDOS boot will exactly the same thing. And by the way – I never re-booted even once during the whole flash procedure – erased the firmware and then 3 times flashed the adapter and never got a single error. There was only one warning – when I flash the LSI P07 over the DELL P07, but I ignored it of course :).
I’m hoping someone can help. I followed this guide (great job, btw), but the card won’t boot in my R710 in the motherboard slot. I get the “Invalid card” error. I can boot if I put it in a regular PCIe slot, but then the cables aren’t long enough. I’ve tried everything I can think of to get it back to stock, so it’ll boot again, but nothing seems to work. I’ve flashed the official Dell H200 adapter, integrated, and modular firmwares (all version 7), but I still get the invalid card error. The card seems to be working, of course… it just won’t boot in the original slot.
My only goal was to get a version 20 firmware so FreeNAS 9.3 is happy. Of course, I want passthrough working as well. I would probably just get the longer cables… but I want to be able to use the PCIe slots for SSDs.
Any advice?
I got it all figured out.
First, I was able to finagle some extra slack from the cables behind the backplane… more than enough to reach the controller in the PCIe slot. Though I still wanted to use the integrated slot.
Next, I used a USB DOS disk and the LSI feature pack to get access to all the apps I need to flash (you need both megarec and sas2flash):
Once booted to FreeDOS, I ran the following commands:
#Backup SBR and SPD
1) megarec.exe -readsbr 0 <filename.sbr>
2) megarec.exe -readspd 0 <filename.spd>
3) sas2flsh.exe -listall (to find adapter number… usually “0”)
4) sas2flsh.exe -c 0 -list (to get your SAS address… WRITE IT DOWN)
#Erase firmware
1) megarec.exe -writesbr 0 sbrempty.bin
2) megarec.exe -cleanflash 0
3) REBOOT!
#Flash Dell Firmware for 6GBs SAS Adapter:
1) sas2flsh.exe -o -f 6GBPSAS.FW
2) sas2flsh.exe -o -sasadd 500xxxxxxxxxxxxx (to replace SAS address you wrote down)
#Flash LSI P07 Firmware:
1) sas2flsh.exe -o -f 2118P07IT.BIN
2) sas2flsh.exe -o -sasadd 500xxxxxxxxxxxxx (to replace SAS address you wrote down)
#Flash LSI P20 Firmware:
1) sas2flsh.exe -o -f 2118P20IT.BIN
2) sas2flsh.exe -o -sasadd 500xxxxxxxxxxxxx (to replace SAS address you wrote down)
#Check to make sure your correct SAS address is present:
1) sas2flsh.exe -listall (to find adapter number… usually “0”)
2) sas2flsh.exe -c 0 -list (ensure it’s your address, and not all zeros)
3) reboot and profit
I’m not sure if you have to flash the SBR and SPD back. I didn’t, and I don’t have a boot ROM. It just flies right through that part of POST.
I was even able to put the card in the the normal integrated slot… keeping my regular PCIe slots free. 🙂
Dude great write-up! You hit all the little bits that others tend to leave out, like the correct versions of the LSI sas2flash.efi. Thank you for allowing me to keep some of my hair on my head!!!
Would like to leave thanks for this great guide. I’ll confirm this works, as is, with a Perc H310.
The key bit some other guides on the internet omit is that you need the older, P05 firmware version, of sas2flash.efi in order to be able to complete this.
Thanks again!
Thanks for this, the only post with the clear firmware versions that will make this work.
You have helped many, well done.
Guys,
May be someone can help. I am getting a large amount of SCSI CAM errors when I do large data transfers or backup data using rsync – e.g.:
(da2:mps0:0:5:0): WRITE(16). CDB: 8a 00 00 00 00 01 15 c5 f7 80 00 00 01 00 00 00 length 131072 SMID 124 terminated ioc 804b scsi 0 state c xfer 0
(da2:mps0:0:5:0): WRITE(16). CDB: 8a 00 00 00 00 01 15 d0 6c 40 00 00 00 80 00 00 length 65536 SMID 630 terminated ioc 804b scsi 0 state c xfer 0
(da2:mps0:0:5:0): WRITE(16). CDB: 8a 00 00 00 00 01 15 d0 4b c0 00 00 00 80 00 00 length 65536 SMID 731 terminated ioc 804b scsi 0 state c xfer 0
(da2:mps0:0:5:0): WRITE(16). CDB: 8a 00 00 00 00 01 15 d0 6d c0 00 00 00 80 00 00 length 65536 SMID 373 terminated ioc 804b scsi 0 state c xfer 0
(da2:mps0:0:5:0): WRITE(16). CDB: 8a 00 00 00 00 01 15 d0 6e c0 00 00 00 80 00 00 length 65536 SMID 504 terminated ioc 804b scsi 0 state c xfer 0
(da2:mps0:0:5:0): WRITE(16). CDB: 8a 00 00 00 00 01 15 d0 62 c0 00 00 00 80 00 00 length 65536 SMID 308 terminated ioc 804b scsi 0 state c xfer 0
(da2:mps0:0:5:0): WRITE(16). CDB: 8a 00 00 00 00 01 15 d0 4f 40 00 00 00 80 00 00 length 65536 SMID 498 terminated ioc 804b scsi 0 state c xfer 0
(da2:mps0:0:5:0): WRITE(16). CDB: 8a 00 00 00 00 01 15 d0 4a c0 00 00 00 80 00 00 length 65536 SMID 249 terminated ioc 804b scsi 0 state c xfer 0
(da2:mps0:0:5:0): WRITE(16). CDB: 8a 00 00 00 00 01 15 d0 4f c0 00 00 00 80 00 00 length 65536 SMID 862 terminated ioc 804b scsi 0 state c xfer 0
(da2:mps0:0:5:0): WRITE(16). CDB: 8a 00 00 00 00 01 15 d0 6e 40 00 00 00 80 00 00 length 65536 SMID 893 terminated ioc 804b scsi 0 state c xfer 0
(da2:mps0:0:5:0): WRITE(16). CDB: 8a 00 00 00 00 01 15 d0 56 c0 00 00 00 80 00 00 length 65536 SMID 859 terminated ioc 804b scsi 0 state c xfer 0
(da2:mps0:0:5:0): WRITE(16). CDB: 8a 00 00 00 00 01 15 d0 6c 40 00 00 00 80 00 00
(da2:mps0:0:5:0): CAM status: SCSI Status Error
(da2:mps0:0:5:0): SCSI status: Check Condition
(da2:mps0:0:5:0): SCSI sense: UNIT ATTENTION asc:29,0 (Power on, reset, or bus device reset occurred)
(da2:mps0:0:5:0): Retrying command (per sense data)
I have checked and my drives work at 600 MByte (SATA-3):
da0: 600.000MB/s transfers
da0: Command Queueing enabled
da0: 5723166MB (11721045168 512 byte sectors: 255H 63S/T 729601C)
da0: quirks=0x8
da1: 600.000MB/s transfers
da1: Command Queueing enabled
da1: 5723166MB (11721045168 512 byte sectors: 255H 63S/T 729601C)
da1: quirks=0x8
da2: 600.000MB/s transfers
da2: Command Queueing enabled
da2: 5723166MB (11721045168 512 byte sectors: 255H 63S/T 729601C)
da2: quirks=0x8
Also my driver is correct as far as I can see:
nasvas1: ~ # dmesg | grep “mps0: Firmware”
mps0: Firmware: 20.00.04.00, Driver: 20.00.00.00-fbsd
What am I doing wrong? The disks are almost new 6 TB WD REDs. No SMART errors on them at all!
Controller is the a PERC H200 which is cross flashed to LSI-9211-8i in IT mode
Can this be a bad cable or am I missing something here? The errors am I am getting are only on the 3rd drive in the ZFS array – /de/da2.
This thing is driving my crazy from about 2 weeks – any help will be highly appreciated!
For anyone else using an old server (like a PowerEdge 2900) that doesn’t support UEFI boot, I was able to use Rufus (http://rufus.akeo.ie ) to make a USB boot disk and use the sas2flsh.exe executable from each of the firmware packages (in the “sas2flash_dos_rel” folder) instead of sas2flash.efi. Everything worked perfectly fine substituting sas2flsh.exe in each of the commands.
Thanks for the guide!
Man, I think I messed up.
Everything went well, except for whatever reason it will say “No Image” under “x86-BIOS”.
Because there is no image, I will not get the controller in the POST screen?
Is there a solution for this? 🙁
I was just giving this a go to see how it worked on a Dell PowerEdge R410.
Thank you in advance.
Regards
Do you mean like the “BIOS Version: N/A” in my screenshot? I didn’t flash the boot image because my boot disk is attached to mainboard SATA. You should be able to additionally flash the BIOS boot image with the
-bflag of sas2flash.Thanks man. 🙂
Anyways, I managed to get it back working again, after getting the original firmware/bios from the Dell site.
But, obviously I am going to try this again. Not much that can go wrong, at least after this experience! 😛
Thanks.
This article helped me for my normal LSI crossflashing endeavor and I ran into some different issues so Ill share for others to benefit from. My company buys these all the time and crossflashes them to the IT firmware for our freenas sans but they dont have issues, so the one I grabbed did. I had the Error cannot flash IT firmware over IR firmware error like others have. My corrective action was to download a few different versions to find either a firmware or sas2flsh that would allow this type of overwriting.
I loaded up the links above onto my dos flash drive giving me versions P7 and 2 versions of P20 (20.00.07.00 and 20.00.04.00) which I do know people are complaining about bricking (or other, didnt read into it) issues with 20.00.00.00 so I didnt bother with that one.
Erasing with P20(7) gave me the IR/IT error so any attempt I loaded the IR firmware so the card had SOMETHING so I wouldnt brick it. (this was part of my trial and error portion, I think I flashed this thing 6-8 times). I ended up erasing with P7 but trying to load P7 gave me an error which I believe could have been correctable nvdata mfg page 2 error by using the -sbr switch. not sure but I didnt attempt.
I changed over to the P20(4) directory and tried to load the IT firmware using that exe and .bin on the erased card and it worked. I then changed directories to the P20(7) and then erased then loaded the IT firmware successfully.
I would like to flash my H310 to LSI IR firmware as my Dell T20 has issues with card when using raid 1, it bluescreens. How do I do this, can anyone help?
I figured out how to get my H200 to work in the integrated slot in an R510. I wrestled with it for many hours of frustration, so I thought I’d post for other to enjoy… I downloaded the latest sas2flsh.exe, mptsas2.rom and the 2118 bios. Did it all using freeDOS in another machine (not the R510).
https://www.broadcom.com/products/storage/host-bus-adapters/sas-9211-8i#downloads
#Backup SBR and SPD
1) sas2flsh.exe -listall (to find adapter number… usually “0”)
2) sas2flsh.exe -c 0 -list (to get your SAS address… WRITE IT DOWN)
3) megarec.exe -readsbr 0 <filename.sbr>
4) megarec.exe -readspd 0 <filename.spd>
#Remove everything….
1) Sas2flsh.exe –o –e 6
#Erase firmware
1) megarec.exe -writesbr 0 sbrempty.bin
2) megarec.exe -cleanflash 0
3) REBOOT!
#Flash Dell Firmware for 6GBs SAS Adapter:
1) sas2flsh.exe -o -f 6GBPSAS.FW (I downloaded the latest from Dell)
2) sas2flsh.exe -o -sasadd 5xxxxxxxxxxxxxxx (to replace SAS address you wrote down)
#Flash LSI P07 Firmware: YOU MUST use an older version of sas2flsh or it will not let you overwrite an IR version with an IT version
1) sas2flshold.exe -o -f 2118P07IT.BIN
2) sas2flshold.exe -o -sasadd 5xxxxxxxxxxxxxxx (to replace SAS address you wrote down)
#Flash LSI P20 Firmware:
1) sas2flsh.exe -o -f 2118P20IT.BIN –b mptsas2.rom (you must flash the card bios too!!!! IMPORTANT for the R510)
2) sas2flsh.exe -o -sasadd 5xxxxxxxxxxxxxxx (to replace SAS address you wrote down)
#Check to make sure your correct SAS address is present:
1) sas2flsh.exe -listall (to find adapter number… usually “0”)
2) sas2flsh.exe -c 0 -list (ensure it’s your address, and not all zeros)
3) reboot and enjoy
I know this is old, but I’ll give it a go:
When I put my H200 with the default IP firmware in the “storage slot” my R710 fails to boot. Putting it in one of the other PCI-E ports, it works fine.
Is there a way to get any H200 to work in the storage slot in an R710, with IP firmware?
Thanks.
try google “smbus tape pin b5 b6”
I also would like to use the dedicated slot in my R710, did anyone succeed? Thanks 🙂
Great guide!
And thanks for the comments that helped me to flash in a legacy BIOS (not UEFI)!
I needed to restart once to complete step 8.
If you need to boot from the card in BIOS. Extract the file mtpsas2.rom from 9211_8i_Package_P20_IR_IT_Firmware_BIOS_for_MSDOS_Windows.zip folder sasbuis_rel .
Flash it separately as a last step with:
sas2flsh.exe -o –b mptsas2.rom
or with the other file in step 11:
sas2flsh.exe -o -f 2118P20IT.BIN –b mptsas2.rom
Really great guide and also great work to a few other people! Thank you. Managed to flash the H200 in a single pass also without any reboots and without any errors at all using a freedos USB stick in a PowerEdge R610. You should also include the BIOS flashing.
Thanks for putting this guide together. Do you think this card Promise Technology SuperTrak TX8760T is the same chipset and capable of the crossflash. Ebay seller described it as same as LSI 9211-8I DELL H200 H310 IBM M1015 but I can find no on-line evidence.
It was a gamble but I planned to update my non-freenas Intel server from the the LSI raid it was using but it uses an expander to make 2 SAS ports support 6 drives. It is picky which raid card it supports so now ‘d like to get this odd ball card to work if possible.
Looking at https://github.com/torvalds/linux/blob/v5.1/drivers/scsi/stex.c#L1517, I think this is a Promise in-house developed chip.
[in English below]
Hallo,
ich bin offensichtlich einige Jahre zu spät dran, meinen frisch erworbenen H200 in den IT-Mode zu flashen – die Links von Broadcom sind alle tot, auch die neueren von “Jase Thew” aus den Kommentaren. Broadcom hostet auf seiner Seite wohl nur noch die der neueren Modelle…
Frage:
Hat jemand noch die nötigen Firmwaredateien da und könnte sie mir (und eventuell anderen Nutzern) irgendwo hochladen?
___
[The same from the translator: ]
Hello,
I’m obviously a few years late in flashing my freshly acquired H200 into IT mode – Broadcom’s links are all dead, including the newer ones from “Jase Thew” in the comments. I guess Broadcom only hosts the ones for the newer models on their site….
Question:
Does anyone still have the necessary firmware files and could upload them somewhere for me (and possibly other users)?
Regards
tommi
Die Downloads gibt es bei Broadcom unter “Legacy Products”. Ich habe meinen Blogpost entsprechend ergänzt.