Yearly Archives: 2014

PHP 5: ldap_search never returns when searching Active Directory

I recently moved a PHP web application from a server running PHP 5.3 on Mac OS X 10.6 to a newer one with PHP 5.4 on Mac OS X 10.9. This caused the following code sample, run against an Active Directory server, to hang at the ldap_search() call:

$conn = ldap_connect('ldaps://' . $LDAPSERVER);
ldap_set_option($conn, LDAP_OPT_PROTOCOL_VERSION, 3);
$bind = @ldap_bind($conn, $LDAPUSER, $LDAPPW);
$result = ldap_search($conn, $LDAPSEARCHBASE, '(&(samaccountname=' . $searchuser . '))');
$info = ldap_get_entries($conn, $result);
ldap_close($conn);

Wiresharking the connection between web server and LDAP server (after replacing ldaps:// with ldap://) showed:

bindRequest(1) "$LDAPUSER" simplebindResponse(1) success searchRequest82) "$LDAPSEARCHBASE" wholeSubtree
searchResEntry(2) "CN=$searchuser,...,$LDAPSEARCHBASE" | searchResRef(2) | searchResDone(2) success [1 result]
bindRequest(4) "" simple
bindResponse(4) success
searchRequest(3) "DC=DomainDnsZones,$LDAPSEARCHBASE" wholeSubtree
searchResDone(3) operationsError (000004DC: LdapErr: DSID-0C0906E8, comment: In order to perform this operation a successful bind must be complete on the connection., data0,

So it’s binding, receiving a success response, searching and then receiving a response and a referrer to DC=DomainDnsZones,$LDAPSEARCHBASE. Next, it opens a new TCP connection and follows the referrer, but does an anonymous bind.

The solution is simple: just add

ldap_set_option($conn, LDAP_OPT_REFERRALS, FALSE);

after line 2. If for some reason you actually need to follow the referrer, have a look at ldap_set_rebind_proc, which lets you specify a callback which then does the authentication upon rebind.

Update August 2015: Same goes when using Net_LDAP3, which is used e.g. by Roundcube’s LDAP integration. Here you need to add the following:

$config['ldap_public']['public'] = array(
[...]
 'referrals' => false,
);

Crossflashing Dell PERC H200 to LSI 9211-8i

OEM version of the LSI SAS 9211-8i, such as the Dell H200, H310 or IBM M1015 are quite popular for use with FreeNAS. However, they need to be flashed with a regular LSI firmware to disable their RAID capabilities in order to passthrough the drives directly to the OS.

Here’s how I upgraded my Dell PERC H200, which came with Dell’s A10 firmware (equivalent to LSI SAS 2008 P07 firmware), to LSI P20 firmware. The newer version also has the advantage that drives larger than 2TB are supported. Also, re-flashing allowed me to not flash a boot ROM to the card, speeding up the boot process of my server as my boot disk is connected to the Intel AHCI controller on the mainboard.

Please note that this operation is not supported by Dell or LSI, may void your warranty and could potentially damage the controller. So proceed at your own risk.

Step 1: Downloading old firmware

  1. Download the firmware for the Dell 6Gbps SAS HBA (this is a variant of the H200 with 8 external ports instead of 8 internal ports) and extract 6GBPSAS.FW from SASHBA_Firmware_6GBPS-SAS-HBA_07.03.06.00_A10_ZPE.exe.
  2. Download the P07 firmware for the LSI SAS 9211-8i and extract the file 2118it.bin from 9211_8i_Package_For_P7_Firmware_BIOS_Upgrade_on_MSDOS_and_Windows.zip.
  3. Download the P05 UEFI flasher for the LSI SAS 9211-8i and extract the file sas2flash.efi from EFI_Installer_P5.zip.
  4. Place these three files into a directory named P07 on a FAT32-formatted USB flash drive.

Step 2: Downloading current firmware

  1. Download the current firmware for the LSI SAS 9211-8i and extract the file 2118it.bin from 9211_8i_Package_P20_IR_IT_Firmware_BIOS_for_MSDOS_Windows.
  2. Download the current UEFI flasher for the LSI SAS 9211-8i and extract the file sas2flash.efi from Installer_P20_for_UEFI.zip.
  3. Place these two files into a directory named P20 on the USB flash drive.

Step 3: Downloading UEFI shell

  1. Download an x86_64 UEFI shell. I had to use the v1 shell because my server would only show error messages (about failed assertions and files not found).
  2. Rename the shell to BOOTX64.efi and place it into a directory named BOOT inside a directory named EFI on the USB flash drive.

Step 4: Flashing

  1. UEFI boot your server off the flash drive
  2. Type map -b to find the flash drive
  3. Switch to it, e.g. by entering fs1:
  4. cd P07
  5. sas2flash.efi -listall should show you your controller
  6. sas2flash.efi -c 0 -list shows you details on the controller. Note down the SAS address in case something goes wrong and you need to reprogram the SAS address.
  7. Erase the old firmware and boot ROM: sas2flash.efi -o -e 6
  8. Write the Dell 6Gbps firmware: sas2flash.efi -o -f 6GBPSAS.FW
  9. Write the LSI P07 firmware: sas2flash.efi -o -f 2118it.bin
  10. cd ..\P20
  11. Write the LSI P20 firmware: sas2flash.efi -o -f 2118it.bin

Notes

At the end of every command (before I rebooted before step 10), I got the message “Failed Reconnecting the EFI Driver. (EFI Error: Not Found)”. It did not seem to affect anything.

Step 7 showed “Erasing Flash Region” and then after a while “ERROR: Erase Flash Operation Failed!”. I simply proceeded and the error did not appear to affect anything.

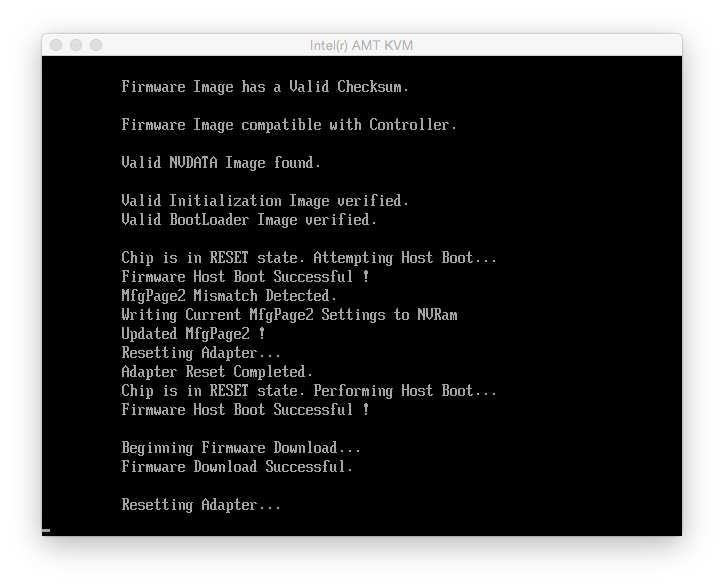
Step 8 looked like this:

Screen Shot 2014-11-29 at 10.02.09

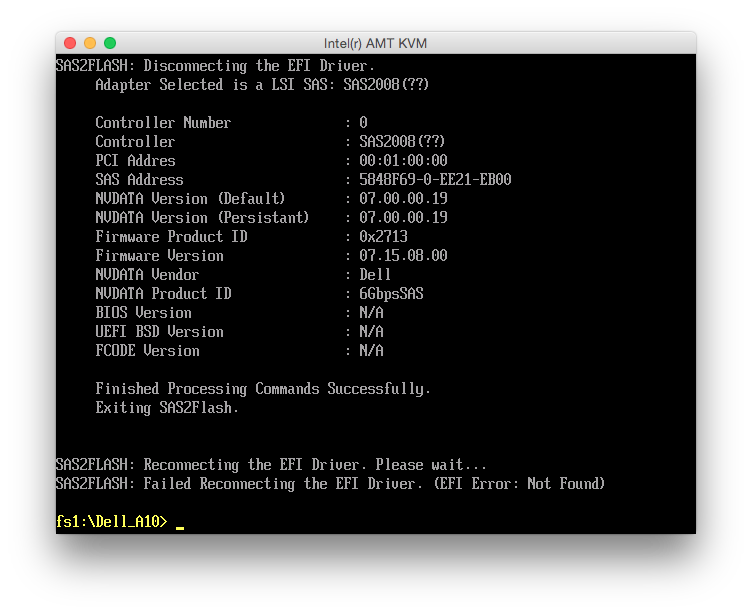
and the controller details after the flash looked like this:

Screen Shot 2014-11-29 at 10.03.04

During step 9, I received the message “NVDATA Versions Compatible. NVDATA Product ID and Vendor ID do not match. Would you like to flash anyway [y/n]?”, where I simply hit y and it proceeded flashing. At the end, it said “Firmware Flash Successful! Resetting Adapter… Adapter Reset Failed!”. Looking at the controller details showed lots of errors:

Screen Shot 2014-11-29 at 10.06.34
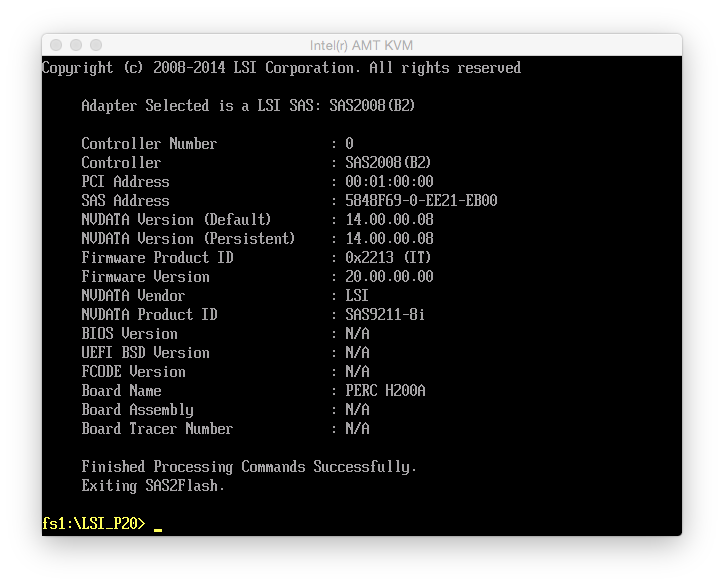
So at this point, I rebooted the machine. Now the details looked all right:

Screen Shot 2014-11-29 at 10.09.54

Step 11 worked without a hitch and afterwards the controller details looked like this:

Screen Shot 2014-11-29 at 10.11.38


Booting up the server, I now had a Dell H200 that behaved exactly like a LSI SAS 9211-8i. The only difference was that it still reported its name and PCI ID (1028:1f1c) as a Dell 6Gbps SAS Card. FreeNAS didn’t care about that though.

Addendum: Matching firmware and driver versions

I was using this controller with FreeNAS 9.2.1.9 and kept on getting kernel messages like

Nov 30 19:49:55 file02 kernel: (da1:mps0:0:0:0): READ(10). CDB: 28 00 a1 ea 00 58 00 01 00 00 length 131072 SMID 609 terminated ioc 804b scsi 0 state 0 xfer 0
Nov 30 19:49:55 file02 kernel: (da1:mps0:0:0:0): READ(10). CDB: 28 00 a1 e9 ff 58 00 01 00 00 
Nov 30 19:49:55 file02 kernel: (da1:mps0:0:0:0): CAM status: SCSI Status Error
Nov 30 19:49:55 file02 kernel: (da1:mps0:0:0:0): SCSI status: Check Condition
Nov 30 19:49:55 file02 kernel: (da1:mps0:0:0:0): SCSI sense: ABORTED COMMAND asc:47,3 (Information unit iuCRC error detected)
Nov 30 19:49:55 file02 kernel: (da1:mps0:0:0:0): Retrying command (per sense data)

It turns out that these are due to a mismatch between firmware and driver version. FreeBSD 9 ships with driver version 16 and FreeBSD 10 includes version 19. Linux currently has version 18. So make sure that in step 11, you always flash the version that matches your operating system’s driver version, don’t blindly go with version P20 or the latest version. On FreeNAS, you can determine the driver version using dmesg | grep “mps0: Firmware”:

mps0: Firmware: 20.00.00.00, Driver: 16.00.00.00-fbsd

In this case, I had no data loss whatsoever and the person who reported this on the FreeBSD mailing list didn’t either, but both LSI and FreeBSD recommend to keep driver and firmware in sync.

Downgrading firmware

As I had to downgrade the firmware, I needed to do sas2flash.efi -o -e 6 before the flashing. Of course, this means that the crossflashing is undone and you’ll have to start over, flashing Dell 6GPBSAS.FW, flashing LSI P07 IT, and finally flashing the version matching your driver.

6GBPSAS.FW and LSI P07 need to be flashed with the LSI P05 sas2flash.efi because later versions will simply refuse when they encounter a NVDATA mismatch. Once that’s done, you can use the latest (P20 at the moment) sas2flash.efi to flash your final firmware version. This also has the advantage that you don’t get these “Adapter Reset Failed” warnings.

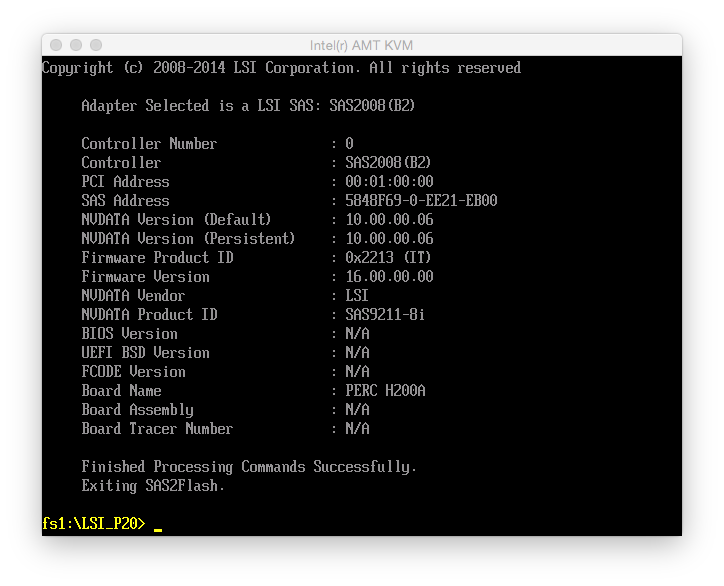
Below is a screenshot of the details of the P16 firmware:

Screen Shot 2014-12-03 at 09.11.40

Update 2021: Over the years, LSI was taken over by Broadcom, Broadcom was taken over by Avago, and Avago renamed itself back to Broadcom. As a result, none of the download links above work anymore. The files are still available from Broadcom though: go to https://www.broadcom.com/support/download-search, select “Legacy Products”, “All Legacy Products”, search for 9211-8i.

Asterisk 11 und Sipgate Basic

Für ältere Asterisk-Versionen hat Sipgate in seinen FAQs passende Einträge für die sip.conf aufgeführt. Unter Asterisk 11 hat sich leider die NAT-Behandlung etwas verändert (nat=yes gibt es nicht mehr), deswegen hier meine funktionierende Konfiguration (SIPID durch die Kundennummer und SIPPWD durch das SIP-Passwort ersetzen):

[sipgate-SIPID]
type=friend
insecure=invite
nat=force_rport
username=SIPID
fromuser=SIPID
fromdomain=sipgate.de
secret=SIPPWD
host=sipgate.de
qualify=yes
canreinvite=no
dtmfmode=rfc2833
context=sipgate-in
callbackextension=SIPID
outboundproxy=sipgate.de
trustrpid=yes
sendrpid=no

In der [global]-Section habe ich außerdem

disallow=all
allow=g722
allow=alaw
allow=ulaw

Erläuterungen zu den Einstellungen, die potentiell problematisch sind:

  • nat: wenn hier was anderes steht, werden eingehende Anrufe nicht immer signalisiert. Unter Asterisk 1.8 und früher ging nat=yes.
  • qualify: sendet regelmäßig SIP-Pakete, um in der NAT-Tabelle des Routers zu bleiben. Wenn das nicht aktiviert ist,w erden eingehende Anrufe nicht immer signalisiert.
  • canreinvite: muss deaktiviert sein, weil sonst der UDP-Port für RTP nach der Anrufannahme noch geändert werden kann. Der Router hat den Port dann nicht in seiner NAT-Tabelle und verwirft die Pakete, dementsprechend wird kein Ton übertragen.
  • callbackextension: hiermit spart man sich eine Zeile wie register => SIPID:SIPPWD@sipgate.de/SIPID in der [global]-Sektion. Wichtig: die lokale Extension (das ist der Wert von callbackextension bzw. der nach dem Schrägstrich in der register-Zeile) muss unbedingt gleich der SIPID sein. Wenn er das nicht ist, wird der erste eingehende Anruf nach einer Wartezeit von ca. 30 Minuten oder mehr zwar signalisiert, aber der Anrufer bekommt auch nach dem Annehmen weiterhin das Freizeichen (ein iPhone im Vodafone-Netz zeigte bei mir nach einige Sekunden nach dem Annehmen dann “Anruf fehlgeschlagen” an) und der Angerufene bekommt keinen Ton. Ich hatte ursprünglich nur register => SIPID:SIPPWD@sipgate.de (entspricht callbackextension=s), was auch ging — nur andere Zahlen, z.B. die eigene Telefonnummer, verursachen das Problem.
  • trustrpid: Bei Sipgate-internen Anrufen steht bei eingehenden Anrufen im From-Feld des SIP-Headers nicht immer die Nummer des Anrufers, sondern z.B. dessen Kundennummer. In dem Fall wird die korrekte Nummer im Feld P-Asserted-Identity mitgesendet und mit dieser Option wird sie später ins From-Feld kopiert.
  • sendrpid: Falls man im Dialplan die CONNECTEDLINE-Funktion benutzt, um bei ausgehenden Anrufen Text im Display des Telefons anzuzeigen (und dafür in [global] den Wert sendrpid=pai gesetzt hat), sollte man es für Sipgate hier deaktivieren.

Mit der obigen Konfiguration landen eingehende Sipgate-Anrufe im Dialplan unter SIPID@sipgate-in. Ausgehende Anrufe bekommt man im Dialplan mit

[outgoing]
exten => _0049X.,1,Goto(0${EXTEN:4},1)
exten => _+49X.,1,Goto(0${EXTEN:3},1)
exten => _+XXX.,1,Goto(00${EXTEN:1},1)
exten => _XXX.,1,Set(CALLERID(number)=SIPID)
same => n,Set(CALLERID(name)=49123456789)
same => n,Dial(SIP/${EXTEN}@sipgate-SIPID,,rWT)

wobei 49123456789 die gewünschte Absenderrufnummer ist, wenn im Sipgate-Account bei Absenderrufnummer “setzt das Endgerät” ausgewählt ist. Für die Standardnummer kann man diese Zeile auch weglassen.

Eingehende Anrufe gehen so (angenommen, man hat ein internes SIP-Endgerät mit der Nummer 20 angelegt):

[sipgate-in]
exten => SIPID,1,Dial(SIP/20)

Asterisk: Change number in To header

A long time ago, I wrote about changing the callee ID as seen by the caller using CONNECTEDLINE.
Changing the caller ID as seen by the callee is also pretty obvious using CALLERID.
That leaves two more constellations: changing the caller ID as seen by the caller (which doesn’t make sense because a phone typically doesn’t display its own number on outgoing calls)., and changing the callee ID as seen by the callee, which I’ll talk about here now.

The reason you might want to do this is because you have multiple PSTN phone numbers that ring the same SIP phone. The obvious way to solve this would be to use

exten => _X.,n,SipAddHeader(To: "123456" <sip:123456@server>)
exten => _X.,n,Dial(SIP/${EXTEN})

, but that doesn’t work because SipAddHeader doesn’t overwrite existing headers, it only adds new ones. The Snom forum mentions a hack using the Diversion header, assuming your phone does indeed display that. A much nicer way is the following:

exten => _X.,n,Dial(SIP/${EXTEN}!123456)

. The number after the exclamation mark is simply what Asterisk uses as the local part when it composes the To URI. This features is not well-documented, but from the code I guess it was introduced in Asterisk 1.6. Asterisk 1.8’s (and higher) chan_sip.c gives a short explanation:

 *  SIP Dial string syntax:
 *       SIP/devicename
 *  or   SIP/username@domain (SIP uri)
 * or   SIP/username[:password[:md5secret[:authname[:transport]]]]@host[:port]
 * or   SIP/devicename/extension
 *  or   SIP/devicename/extension/IPorHost
 * or   SIP/username@domain//IPorHost
 * and there is an optional [!dnid] argument you can append to alter the
 *  To: header.

Wifi with WPA/WPA2 mixed mode encryption on Snom phones

When you try to connect a Snom phone to a Wifi network, make sure the network isn’t running in mixed WPA/WPA2 mode. The phone will see the network anyway, but fail to connect at boot. Disabling WPA in favor of WPA2-exclusive operation might be a good idea because WPA’s TKIP encryption isn’t that great and WPA2’s AES is much better. Also, every device sold in the past 8 years supports WPA2, so it’s unlikely you still have anything on your network that doesn’t support it.

Sipura SPA-3000 spontaneous reboots, reason 0x737208f4

I have a 10-year-old Sipura SPA-3000 VoIP phone adapter (SIP to FXS phone) which at some point started rebooting once an hour, even during calls. After enabling remote syslog, I saw that these reboots happen with no prior indication, and after the reboot, I see the following message:

Jun 16 21:15:16 192.0.2.2 logger: <134>System started: ip@192.168.0.101, reboot reason:H737208f4

These hexadecimal reboot reasons don’t appear to be documented anywhere, the only list I could find appears to refer newer models and doesn’t contain 0x737208f4.

After some trying, I figured out that if I disable DHCP, the reboots don’t happen anymore. My DHCP always assigned the same IP to the device, so I really see no reason why it would have to reboot.


CUPS-to-CUPS printing with server-side processing and page_log

Printer sharing on Windows is easy: the client receives the driver from the server, presents the driver GUI and passes on an intermediate format along with the options selected in the driver to the server, which then renders the print job for the printer (usually into PostScript).

In the Unix (Mac OS X in my case, but Linux would be the same) world, CUPS is commonly used for printing. It’s very powerful, but I find the documentation severely lacks details about the exact way something is implemented in the code. Luckily, the code is open-source and Michael Sweet, the developer of CUPS who now works at Apple and still maintains CUPS, managed to create a very structured piece of software with code that’s reasonably easy to understand.

If you just add a CUPS server’s print queue as a new printer on a CUPS client, it will work fine, but you might run into some inconveniences:

Problems

  1. The job might get run through a vendor-supplied filter twice, once on the server and once on the client. This usually works fine, but the print job might significantly increase in size (observed on an HP LaserJet).

  2. The page_log on the server might not contain the number of pages and copies a job consisted of and list 1 for both instead.

  3. The page_log on the server might not contain things like page format, duplex status or attributes you manually added to PrintLogFormat.

Reasons

  1. This happens if the PPD both on the client and on the server contains a line starting with *cupsFilter, which links to a vendor-supplied filter. Such a filter usually produces a MIME type of application/postscript.

  2. This happens if the job does not get run through the pstops filter by CUPS. CUPS bypasses that filter if the client submits the job with a MIME type of application/vnd.cups-postscript, i.e. it was already run through pstops on the client.

  3. This is either caused by the same things as (1) or (2), but I’m not sure which one.

Solution

Simply add the following lines to the PPD on the client. That way, it passes the job straight to the server for server-side processing.

*cupsFilter: "application/pdf 0 -"
*cupsFilter: "image/* 0 -"
*cupsFilter: "application/postscript 0 -"
*cupsFilter: "application/vnd.cups-postscript 0 -"
*cupsFilter: "application/vnd.cups-command 0 -"

By the way, if you use Mac OS X and let the “Add Printer” wizard automatically add a print queue from a remote CUPS server discovered via Bonjour, this is exactly what it does.

Notes

If you append something like %{SelectColor} to your PageLogFormat because that’s the attribute your printer uses to determine whether it should print in color or grayscale and you’d like to log that, please note that the default value (either as specified by the PPD or as specified by you via lpadmin -d printername -d SelectColor=Grayscale or via the CUPS web interface’s “Set Printer Defaults”) will never be written to the page_log. Only deviations from the default value will be logged. The defaults set on the server-side CUPS do not matter here, this is determined by the client-side CUPS.

Per the filter(7) documentation (italic comments were added by me):

Options passed on the command-line typically do not include the default choices the printer’s PPD file. […] use the ppdMarkDefaults [which sets all options to the defaults specified inside the PPD] and cupsMarkOptions [which sets the options to the values specified in the driver GUI] functions in the CUPS library to use the correct mapping, and ppdFindMarkedChoice [which reads from the options array composed from the defaults and the selected options] to get the user-selected choice.

WordPress Plugins

After I recently set up a blog for a friend, I thought I’d post a list of plugins I use on the various WordPress instances I run for various people and myself.

  • Simple Custom CSS. Allows you to add custom CSS to your blog without having to modify theme files. This makes it easy to update themes in the future without breaking your customizations.
  • Include plus Shortcodes Everywhere. This allows you to create a Text Widget that displays a static page from your blog using a tag like [include id="15"].
  • Category Order. Allows you to reorder the list of categories in the sidebar.
  • KB Easy PicasaWeb. Converts Picasa links into embedded photo galleries.
  • WP Events Calendar. Gives you a simple calendar widget into which you can manually enter events.
  • Jetpack. Enables some useful features like infinite scrolling, custom CSS, sharing links, and mobile theme.
  • Akismet. A must-have spam filter if you allow comments on your blog.
  • Contact Form 7 plus Really Simple CAPTCHA. Highly flexible contact form including CAPTCHAs.
  • WP Permalauts. A must-have if you blog in a language that has accented letters or umlauts. It converts those letters to the non-accented ones in permalinks.
  • WP Hide Post. Lets you selectively hide posts from categories, front page, etc. while they remain accessible through other ways and direct links.
  • BackWPup. Does full backups of your WordPress data and database to a tarball on the server or your Dropbox. Can run on a schedule to automate the backups.

A theme that I quite like is Sunspot. You can display the featured image, title and lead text of two posts next to each other and customize how many posts you want per page in total. It also has enough space for widgets in its sidebars and is responsive. The downloadable version does not currently do infinite scrolling, but I believe hosted WordPress.com has such a version.

Calling the parent constructor in PHP 5

Say you write a PHP class that needs to call the parent constructor. At first sight, this is simple:
function __construct()
{
parent::__construct();
}

Say you want to pass some arguments to the parent constructor:
function __construct($arg1, $arg2)
{
parent::__construct($arg1, $arg2);
}

Now what do you do if you have default arguments?
function __construct($arg1 = NULL, $arg2 = NULL)
{
if ($arg1 == NULL && $arg2 == NULL) parent::__construct();
elseif ($arg2 == NULL) parent::__construct($arg1);
else parent::__construct($arg1, $arg2);
}

Not pretty, especially if you have many possible arguments. The obvious generalization would be
function __construct()
{
call_user_func_array(array('parent','__construct'), func_get_args());
}

However, this actually fails for two reasons on PHP below version 5.3: func_get_args() cannot be used as a function argument, and call_user_func_array does not treat parent correctly.
So here’s the entire constructor I ended up with that does absolutely nothing but calling the parent function:
function __construct()
{
$args = func_get_args();
if (version_compare(PHP_VERSION, '5.3.0') >= 0)
{
call_user_func_array(array('parent','__construct'), $args);
}
else
{
$refl = new ReflectionObject($this);
$method = $refl->getParentClass()->getConstructor();
$method->invokeArgs($this, $args);
}
}

Seriously, you have to use reflections for this seemingly simple task?!

VMware ESXi 5.5.0 panics when using Intel AMT VNC

For compatibility with a new guest OS, I upgraded my ESXi  to 5.5 today. During reboot, it crashes after a few seconds (it briefly flashes a message about starting up PCI passthrough on the yellow ESXi boot screen). The purple screen of death (PSOD) I get looks like this:

VMware ESXi 5.5.0 [Releasebuild-1474528 x86_64]
#PF Exception 14 in world 32797:helper1-2 IP 0x4180046f7319 addr 0x410818781760
PTEs:0x10011e023;0x1080d7063;0x0;
cr0=0x8001003d cr2=0x410818781760 cr3=0xb6cd0000 cr4=0x216c
frame=0x41238075dd60 ip=0x4180046f7319 err=0 rflags=0x10206
rax=0x410818781760 rbx=0x41238075deb0 rcx=0x0
rdx=0x0 rbp=0x41238075de50 rsi=0x41238075deb0
rdi=0x1878176 r8=0x0 r9=0x2
r10=0x417fc47b9528 r11=0x41238075df10 r12=0x1878176
r13=0x1878176000 r14=0x41089f07a400 r15=0x6
*PCPU2:32797/heler1-2
PCPU  0: SSSHS
Code start: 0x418004600000 VMK uptime: 0:00:00:05.201
0x41238075de50:[0x4180046f7319]BackMap_Lookup@vmkernel#nover+0x35 stack: 0xffffffff00000000
0x41238075df00:[0x418004669483]IOMMUDoReportFault@vmkernel#nover+0x133 stack: 0x60000010
0x41238075df30:[0x418004669667]IOMMUProcessFaults@vmkernel#nover+0x1f stack:0x0
0x41238075dfd0:[0x418004660f8a]helpFunc@vmkernel#nover+0x6b6 stack: 0x0
0x41238075dff0:[0x418004853372]CpuSched_StartWorld@vmkernel#nover+0xf1 stack:0x0
base fs=0x0 gs=0x418040800000 Kgs=0x0

When rebooting the machine now, it reverts to my previous version, ESXi 5.1-914609.

A bit of playing around revealed: This only happens if I am connected to the Intel AMT VNC server. If I connect after ESXi has booted up, it crashes a fraction of a second after I connect to VNC. Go figure! Apparently it’s not such a good idea to have a VNC server inside the GPU, Intel…

Before I figured this out, I booted up the old ESXi 5.1.0-914609 and even upgraded it to ESXi 5.1.0-1483097.  Looking at dmesg revealed loads of weird errors while connected to the VNC server:

2014-02-13T11:23:15.145Z cpu0:3980)WARNING: IOMMUIntel: 2351: IOMMU Unit #0: R/W=R, Device 00:02.0 Faulting addr = 0x3f9bd6a000 Fault Reason = 0x0c -> Reserved fields set in PTE actively set for Read or Write.
2014-02-13T11:23:15.145Z cpu0:3980)WARNING: IOMMUIntel: 2371: IOMMU context entry dump for 00:02.0 Ctx-Hi = 0x101 Ctx-Lo = 0x10d681003

lspci | grep ’00:02.0 ‘ shows that this is the integrated Intel GPU (which I’m obviously not doing PCI Passthrough on).

So

  • ESXi 5.5 panics when using Intel AMT VNC
  • ESXi 5.1 handles Intel AMT VNC semi-gracefully and only spams the kernel log with dozens of messages per second
  • ESXi 5.0 worked fine (if I remember correctly)

I have no idea what VMware is doing there. From all I can tell, out-of-band management like Intel AMT should be completely invisible to the OS.

Note that this is on a Sandy Bridge generation machine with an Intel C206 chipset and a Xeon E3-1225. The Q67 chipset is almost identical to the C206, so I expect it to occur there as well. Newer chipsets hopefully behave better, perhaps even newer firmware versions help.

Update November 2014: I just upgraded to the latest version, ESXi 5.5u2-2143827, and it’s working again. I still get the dmesg spam, but the PSODs are gone. These are the kernel messages I’m seeing now while connected via Intel AMT VNC:

2014-11-29T11:17:25.516Z cpu0:32796)WARNING: IOMMUIntel: 2493: IOMMU context entry dump for 0000:00:02.0 Ctx-Hi = 0x101 Ctx-Lo = 0x10ec22001
2014-11-29T11:17:25.516Z cpu0:32796)WARNING: IOMMU: 1652: IOMMU Fault detected for 0000:00:02.0 (unnamed) IOaddr: 0x5dc5aa000 Mask: 0xc Domain: 0x41089f1eb400
2014-11-29T11:17:25.516Z cpu0:32796)WARNING: IOMMUIntel: 2436:  DMAR Fault IOMMU Unit #0: R/W=R, Device 0000:00:02.0 Faulting addr = 0x5dc5aa000 Fault Reason = 0x0c -> Reserved fields set in PTE actively set for Read or Write.

So basically, Intel AMT VNC is now usable again.

Update August 2015: ESXi 6.0 still spams the logs, no change over ESXi 5.5.