Category Archives: Virtualization

Filtering outgoing traffic with VirtualBox’s NAT interface

Hypervisors like VMware Workstation, VMWare Fusion or VirtualBox usually offer three kinds of network interfaces: bridged (to a network on the host), NAT (sharing an IP address with the host via network address translation) and host-only (a connection exclusively between host and guest).

VMWare, at least on Linux, realizes NAT entirely in the kernel, using standard IP forwarding and setting up a DHCP server on the host that gives addresses to the guest. VirtualBox, on the other hand, handles NAT entirely in user-space, meaning all packets entering and leaving the VM really seem to be going to and from a process named VBoxHeadless or similar.

If you want to limit what kinds of connections a guest system can make, VMware lets you do that quite easily by adding rules to the FORWARD chain:

sudo iptables -I FORWARD -i vmnet8 -j ACCEPT -d github.com
sudo iptables -I FORWARD -i vmnet8 -j REJECT

Unfortunately, things are a lot more difficult with VirtualBox. Since there is no dedicated interface, you need to filter based on process. iptables can’t do that directly, but you can use cgroups to add the necessary marks to the packets:

sudo mkdir /sys/fs/cgroup/net_cls/virtualbox
echo 86 | sudo tee /sys/fs/cgroup/net_cls/virtualbox/net_cls.classid
sudo iptables -N VIRTUALBOX
sudo iptables -I OUTPUT -j VIRTUALBOX -m cgroup --cgroup 86
sudo iptables -I VIRTUALBOX -j ACCEPT -d github.com
sudo iptables -I VIRTUALBOX -j REJECT

Of course, you now need to create the VirtualBox process inside that cgroup. One way is

sudo apt-get install cgroup-tools
sudo cgexec -g net_cls:virtualbox vboxmanage startvm WindowsXP --type=headless

or you can use a wrapper script instead of vboxmanage:

#!/bin/sh -e
CGROUP_NAME=virtualbox
CGROUP_ID=86

if [ ! -d /sys/fs/cgroup/net_cls/$CGROUP_NAME/ ]; then
  mkdir /sys/fs/cgroup/net_cls/$CGROUP_NAME
  echo $CGROUP_ID > /sys/fs/cgroup/net_cls/$CGROUP_NAME/net_cls.classid
fi

/bin/echo $$ > /sys/fs/cgroup/net_cls/$CGROUP_NAME/tasks

exec /usr/bin/vboxmanage "$@"
Wiring Fibre Channel for Arbitrated Loop

We have a small Fibre Channel SAN with three servers, a switch and a dual-controller RAID enclosure. With only a single switch, we obviously couldn’t connect all servers redundantly to the RAID system. That meant, for example, that firmware updates to it could only be applied after shutting down the servers. Buying a second switch was hard to justify for this simple setup, so we decided to hook the switch up to the first RAID controller and wire a loop off the second RAID controller. Each server would have one port connected to the switch and another one to the loop.

Back in the old days, Fibre Channel hubs existed for exactly this purpose, but nowadays you simply can’t get them anymore. However, in a redundant setup, you don’t need a hub, you can simply run cables appropriately, i.e. in a daisy-chain fashion. The only downside of not having a hub, the loop going down if one server goes down, is irrelevant here because you have a second path via the switch. For technical details on the loop topology, you can have a look at documentation available from EMC.

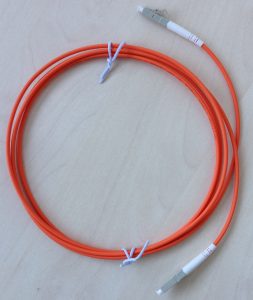
To wire your servers and RAID controllers in a fashion resembling a hub (only without the automatic bypass if a server goes down), you need simplex patch cables. These consist of a single fibre (instead of two, like you are used to) and have a connector that looks like half of a regular LC connector. You can get them in the same qualities as regular (duplex) patch cables and in single- and multi-mode as needed. They look like this:

These cables are somewhat exotic, so your usual cable dealer might not have them, but they exist and are available from specialized fiber cable dealers. As you are wiring in a daisy-chain fashion, you need one simplex cable per node you want to connect.

Once you have the necessary cables, you wire everything by connecting a cable from the output side of the FC port on the first device and connecting it to the input side of the FC port on the second device. The second device’s output side connects to the third device’s input side and so on, until you have made a full loop by connecting the last device’s output side to the first device’s input side, like this:

How can you tell the output side from the input side? Some transceivers have little arrows or have labels “TX” (output) and “RX” (input). If yours don’t, you can recognize the output side by the red laser light coming from it. To protect your eyes, never look directly into the laser light. Never connect two output sides together, otherwise you may damage the laser diodes in both of them. Therefore, be careful and always double-check.

That’s it, you’re done. All servers on the loop should immediately see the LUNs exported to the by the RAID controller.

In my setup however, further troubleshooting was required. The loop simply did not come up. As it turns out, someone had set the ports on one FC HBA to point-to-point-only and 2 Gbit/s mode. After switching both these settings to their default automatic mode, the loop went up and data started flowing. My HBAs are QLogic QLE2462 (4 Gbit/s generation) and QLE2562 (8 Gbit/s generation), and they automatically negotiated the fastest common speed they could handle, which is 4 Gbit/s. Configuring these parameters on the HBA usually requires hitting a key at the HBA’s pre-boot screen to enter the configuration menu and doing it there, or via vendor-specific software. I didn’t have access to the pre-boot configuration menu and was running VMware ESXi 6.0 on the servers. The QConvergeConsole for my QLogic adapters luckily is also available for VMware. It is not as easy to install as on Windows or Linux, unfortunately. You first install a CIM provider via the command line on the ESXi host, reboot the host and then install a plugin into VMware vCenter server.

ARP and multicast packets lost with OpenVPN in tap mode

After upgrading our OpenVPN server VM from Debian 7 to Debian 8 (moving us from OpenVPN 2.2 to OpenVPN 2.3 and Linux kernel 3.2 to Linux kernel 3.16) and upgrading our virtualization from VMware ESXi 5.5 to ESXi 6.0 and moving the VM to a different host, the VPN got really unreliable: the VPN connection itself worked fine, but any connections established across the VPN were very slow to get established. Once they were established, everything worked fine and you could even create new connections to the same host across the VPN and they would be established quickly.

I wasn’t sure which one of the many changes caused the issue, but luckily Wireshark quickly revealed the problem: As we are using OpenVPN in layer 2 mode (i.e. with tap interfaces), ARP packets are quite important. While I could see the ARP requests making it across the interface bridge from tap0 to eth0, I saw the ARP replies going into eth0 and not making it to tap0. The server-side fix is easy, just disable the MAC table on the bridge completely and simply lets all packets pass:

brctl setageing br0 0

Now that ARP was working, I noticed that VPN clients also did not get IPv6 addresses. Evidently, the ICMPv6 multicasts weren’t making it across the bridge either. To fix that, enable multicast snooping on the bridge:

echo 1 > /sys/devices/virtual/net/br0/bridge/multicast_querier

Update March 2016: A recent kernel update in Debian Jessie appears to have changed the multicast bridging behavior. I now need to disable multicast snooping:

echo 0 > /sys/devices/virtual/net/br0/bridge/multicast_querier

VMware ESXi 5.5.0 panics when using Intel AMT VNC

For compatibility with a new guest OS, I upgraded my ESXi  to 5.5 today. During reboot, it crashes after a few seconds (it briefly flashes a message about starting up PCI passthrough on the yellow ESXi boot screen). The purple screen of death (PSOD) I get looks like this:

VMware ESXi 5.5.0 [Releasebuild-1474528 x86_64]
#PF Exception 14 in world 32797:helper1-2 IP 0x4180046f7319 addr 0x410818781760
PTEs:0x10011e023;0x1080d7063;0x0;
cr0=0x8001003d cr2=0x410818781760 cr3=0xb6cd0000 cr4=0x216c
frame=0x41238075dd60 ip=0x4180046f7319 err=0 rflags=0x10206
rax=0x410818781760 rbx=0x41238075deb0 rcx=0x0
rdx=0x0 rbp=0x41238075de50 rsi=0x41238075deb0
rdi=0x1878176 r8=0x0 r9=0x2
r10=0x417fc47b9528 r11=0x41238075df10 r12=0x1878176
r13=0x1878176000 r14=0x41089f07a400 r15=0x6
*PCPU2:32797/heler1-2
PCPU  0: SSSHS
Code start: 0x418004600000 VMK uptime: 0:00:00:05.201
0x41238075de50:[0x4180046f7319]BackMap_Lookup@vmkernel#nover+0x35 stack: 0xffffffff00000000
0x41238075df00:[0x418004669483]IOMMUDoReportFault@vmkernel#nover+0x133 stack: 0x60000010
0x41238075df30:[0x418004669667]IOMMUProcessFaults@vmkernel#nover+0x1f stack:0x0
0x41238075dfd0:[0x418004660f8a]helpFunc@vmkernel#nover+0x6b6 stack: 0x0
0x41238075dff0:[0x418004853372]CpuSched_StartWorld@vmkernel#nover+0xf1 stack:0x0
base fs=0x0 gs=0x418040800000 Kgs=0x0

When rebooting the machine now, it reverts to my previous version, ESXi 5.1-914609.

A bit of playing around revealed: This only happens if I am connected to the Intel AMT VNC server. If I connect after ESXi has booted up, it crashes a fraction of a second after I connect to VNC. Go figure! Apparently it’s not such a good idea to have a VNC server inside the GPU, Intel…

Before I figured this out, I booted up the old ESXi 5.1.0-914609 and even upgraded it to ESXi 5.1.0-1483097.  Looking at dmesg revealed loads of weird errors while connected to the VNC server:

2014-02-13T11:23:15.145Z cpu0:3980)WARNING: IOMMUIntel: 2351: IOMMU Unit #0: R/W=R, Device 00:02.0 Faulting addr = 0x3f9bd6a000 Fault Reason = 0x0c -> Reserved fields set in PTE actively set for Read or Write.
2014-02-13T11:23:15.145Z cpu0:3980)WARNING: IOMMUIntel: 2371: IOMMU context entry dump for 00:02.0 Ctx-Hi = 0x101 Ctx-Lo = 0x10d681003

lspci | grep ’00:02.0 ‘ shows that this is the integrated Intel GPU (which I’m obviously not doing PCI Passthrough on).

So

  • ESXi 5.5 panics when using Intel AMT VNC
  • ESXi 5.1 handles Intel AMT VNC semi-gracefully and only spams the kernel log with dozens of messages per second
  • ESXi 5.0 worked fine (if I remember correctly)

I have no idea what VMware is doing there. From all I can tell, out-of-band management like Intel AMT should be completely invisible to the OS.

Note that this is on a Sandy Bridge generation machine with an Intel C206 chipset and a Xeon E3-1225. The Q67 chipset is almost identical to the C206, so I expect it to occur there as well. Newer chipsets hopefully behave better, perhaps even newer firmware versions help.

Update November 2014: I just upgraded to the latest version, ESXi 5.5u2-2143827, and it’s working again. I still get the dmesg spam, but the PSODs are gone. These are the kernel messages I’m seeing now while connected via Intel AMT VNC:

2014-11-29T11:17:25.516Z cpu0:32796)WARNING: IOMMUIntel: 2493: IOMMU context entry dump for 0000:00:02.0 Ctx-Hi = 0x101 Ctx-Lo = 0x10ec22001
2014-11-29T11:17:25.516Z cpu0:32796)WARNING: IOMMU: 1652: IOMMU Fault detected for 0000:00:02.0 (unnamed) IOaddr: 0x5dc5aa000 Mask: 0xc Domain: 0x41089f1eb400
2014-11-29T11:17:25.516Z cpu0:32796)WARNING: IOMMUIntel: 2436:  DMAR Fault IOMMU Unit #0: R/W=R, Device 0000:00:02.0 Faulting addr = 0x5dc5aa000 Fault Reason = 0x0c -> Reserved fields set in PTE actively set for Read or Write.

So basically, Intel AMT VNC is now usable again.

Update August 2015: ESXi 6.0 still spams the logs, no change over ESXi 5.5.

VMWare ESXi 5.1.0 breaks PCI Passthrough (Update: fixed in ESXi510-201212001)

After I upgraded to VMWare ESXi 5.1.0, my server crashed with a purple screen of death as soon as I fired up a VM that was using a passed-through PCI device (1244:0e00, an AVM GmbH Fritz!Card PCI v2.0 ISDN (rev 01)).I have been running the original version of ESXi 5.0.0 for a year and everything worked fine. In fact, I have never ever seen such a purple screen of death.

VMware ESXi 5.1.0 [Releasebuild-799733 x86_64]
#PF Exception 14 in world 4077:vmx IP 0x418039cf095c addr 0xl4
cr0=0x80010031 cr2=0x14 cr3=0x15c0d6000 cr4=0x42768
Frame=0x41221fb5bc00 ip=0x418039cf095c err=0 rflags=0x10202
rax=0x0 rbx=0x10 rcx=0x417ff9f084d0
rdx=0x41000168e5b0 rbp=0x41221fb5bcd8 rsi=0x41000168ee90
rdi=0x417ff9f084d0 r8=0x0 r9=0x1
r10=0x3ffd81972a9 r11=0x0 r12=0x41221fb5bd58
r13=0x41000168e350 r14=0xB r15=0x0
*PCPU3:4077/vmx
PCPU B: UUVU
Code start: 0x418039a00000 VMK uptime: 0:00:06:21.499
0x41221fb5bcd8:[0x418039cf095c]PCI_GetExtCapIdx@vmkernel#nover+0x2b stack: 0x41221fb5bd38
0x41221fb5bd48:[0x418039abadd2]VMKPCIPassthru_GetPCIInfo@vmkernel#nover+0x335 stack: 0x29000030e001
0x41221fb5beb8:[0x418B39ea2c51]UW64VMKSyscallUnpackPCIPassthruGetPCIInfo@<None>#<None>+0x28 stack:
0x41221fb5bef8:[0x4l8039e79791]User_LinuxSyscallHandler@<None>#<None>+0x17c stack: 0x418039a4cc70
0x41221fb5bf18:[0x4l8039aa82be]User_LinuxSyscallHandler@vmkernel#nover+0x19 stack: 0x3ffd8197490
0x41221fb5bf28:[0x418039b10064]gate_entry@vmkernel#nover+0x63 stack: 0x10b
base fs=0x0 gs=0x418040c00000 Kgs=0x0
Coredump to disk. Slot 1 of 1.
Finalized dump header (9/9) DiskDunp: Successful.
Debugger waiting(world 4077) -- no port for remote debugger. "Escape" For local debugger.

Turns out that is a bug in ESXi. Luckily, downgrading an ESXi is simple enough: just hit Shift-R at the boot prompt and tell it to revert to the previous version.

Update: Patch ESXi510-201212401-BG in version ESXi510-201212001 (build 914609), released on December 20th, fixes the PCI passthrough issue (PR924167) according to KB2039030.

Converting Xen Linux VMs to VMWare

A year ago I wrote about how to convert from Xen to VMWare (which is a similar process to a Xen virtual-to-physical or V2P conversion). Now I found a much simpler solution, thanks to http://www.zomo.co.uk/2012/04/moving-disks-from-xen-to-kvm/ .

In this example, I’m using LVM disks, but the process is no different from using Xen disk images.

  1. Install Debian Wheezy into a VMWare virtual machine. Attach a secondary virtual disk (it will be called /dev/sdc from now on) that’s sized about 500 MB larger than your Xen DomU (just to be safe). Fire up the VM. All subsequent commands will be run from inside that VM.
  2. Check whether your DomU disk has a partition table: ssh root@xen fdisk -l /dev/xenvg/4f89402b-8587-4139-8447-1da6d0571733.disk0. If it does, proceed to step 3. If it does not, proceed to step 4.
  3. Clone the Xen DomU onto the secondary virtual disk via SSH: ssh root@xen dd bs=1048576 if=/dev/xenvg/4f89402b-8587-4139-8447-1da6d0571733.disk0 | dd bs=1048576 of=/dev/sdc. Proceed to step 7.
  4. Zero out the beginning of the target disk: dd if=/dev/zero of=/dev/sdc bs=1048576 count=16
  5. Partition it and add a primary partition 8 MB into the disk: fdisk /dev/sdc, o Enter w Enter, fdisk /dev/sdc, n Enter p Enter 1 Enter 16384 Enter Enter, w Enter
  6. Clone the Xen DomU onto the secondary virtual disk’s first partition via SSH: ssh root@lara dd bs=1048576 if=/dev/xenvg/4f89402b-8587-4139-8447-1da6d0571733.disk0 | dd bs=1048576 of=/dev/sdc1
  7. reboot
  8. Mount the disk: mount -t ext3 /dev/sdc1 /mnt; cd /mnt
  9. Fix fstab: nano etc/fstab: change root disk from to /dev/sda1
  10. Fix the virtual console: nano etc/inittab: replace hvc0 with tty1
  11. Chroot into the disk: mount -t proc none /mnt/proc; mount -t sysfs none /mnt/sys; mount -o bind /dev /mnt/dev; chroot /mnt /bin/bash
  12. Fix mtab so the Grub installer works: grep -v rootfs /proc/mounts > /etc/mtab
  13. Install Grub: apt-get install grub2. When the installer asks to which disks to install, deselect all disks.
  14. Install Grub to MBR: grub-install –force /dev/sdc
  15. Update Grub configuration: update-grub
  16. Leave the chroot: exit; umount /mnt/* /mnt
  17. shutdown

Now you can detach the secondary virtual disk and create a new VM with it. If everything worked correctly, it will boot up.

Mount ext3 VMDK in VMWare Fusion using VMDKMounter

VMWare Fusion 3 comes with a tool called VMDKMounter.app. It allowed you to simply double-click NTFS or FAT32 VMDKs and they would be mounted on your desktop.

VMWare Fusion 4 dropped this tool, but you can download version 3.1.3 and extract /Library/Application Support/VMware Fusion/VMDKMounter.app from the package using Pacifist (just make sure that VMDKMounter.app/Contents/MacOS/vmware-vmdkMounterTool has the sticky bit set and is owned by root:wheel after you extract it).

Next, install OSXFUSE (the successor to MacFUSE) and fuse-ext2 if you don’t already have them installed.

VMDKMounter attempts to mount EXT2 using /System/Library/Filesystems/ext2.fs/Contents/Resources/mount_ext2, so we need to create two symlinks:

cd /System/Library/Filesystems
sudo ln -s fuse-ext2.fs ext2.fs
cd ext2.fs/Contents/Resources
sudo ln -s ../../mount_fuse-ext2 mount_ext2

Now we’re all set, you can simply open a VMDK by double-clicking it, or you can right-click a VMWare VM and open it with VMDKMounter.app and automatically have all its VMDKs mounted.

If you are receiving an NTFS-3G error message when mounting a non-NTFS VMDK: that’s perfectly normal, so you can just click OK. The error message is due to VMDKMounter simply trying a bunch of file system mounters until it finds one that doesn’t fail. As far as I can tell, it tries (in that order) ntfs, msdos, ntfs-3g, hfs, ext2, ext3.

How-To: Converting Xen Linux VMs to VMWare ESXi

I have a couple Linux VMs I created on Xen using xen-create-image (as such, they are using pygrub and have one virtual disk file per partition). Now I want to migrate those over to a VMWare ESXi box. To convert your raw Xen disk images to VMWare vmdk files, do this:

1. In VMWare Fusion or Workstation, do a basic install of Debian Squeeze onto a flat-file (not split into 2GB segments and preallocated) VMDK that is slightly larger than your virtual Xen disk with a separate VMDK for swap.
2. Downgrade it to Grub 1 using apt-get install grub-legacy, grub-install /dev/sda, update-grub (as Grub 2 is not compatible with /boot/grub/menu.lst files as generated by xen-create-image).
3. Shut down and make a copy of the VMDK.
4. Boot the VM back up and re-install Grub2 using apt-get install grub.
5. Edit /boot/grub/grub.cfg and replace root=UUID=xxxxxxxxxx in the linux lines with root=/dev/sda1
6. Shut down the VM and attach the VMDK you copied in step 3 as an additional disk (this will be the target disk for our conversion).
7. Boot it up and make sure that you’re getting a Grub2 screen (i.e. it is not booting from the copied VMDK).
8. Using mount, check that your root disk is sda1 (which usually should be the first disk, not the copied disk). Using ls /dev/sd*, make sure it sees the target disk as sdc.
9. dd if=/path/to/xen/vm/disk.img of=/dev/sdc1 bs=1048576
10. mount /dev/sdc1 /mnt; cd /mnt
11. nano etc/fstab: replace swap disk /dev/xvda1 with /dev/sdb1 and root disk /dev/xvda2 with /dev/sda1
12. nano etc/inittab: replace hvc0 with tty1
13. nano boot/grub/menu.lst: replace /dev/xvda2 with /dev/sda1
14. umount /mnt
15. Attach the new virtual disk to a VM and boot a rescue system. There, drop to a shell on /dev/sda1 and apt-get update, apt-get install grub
16. Reboot
17. Done!

Xen 4.0 and Citrix WHQL PV drivers for Windows

Xen 4.0 is supposed to be able to use Citrix’s WHQL certified Windows paravirtualization drivers. Their advantage over the GPLPV drivers is that they are code-signed, meaning they run on 64-bit Windows without disabling some of Windows’ security features.

UPDATE 2011-10-17: Signed GPLPV drivers are now available. I have not yet tested them, but I assume the fix below is no longer necessary.

While the Citrix drivers included in XenServer 5.5 work (after making a single registry tweak), the more recent ones included in e.g. Xen Cloud Platform 1.0 do not work right away:

If you install the XCP drivers, make that registry tweak and reboot the DomU, you’ll notice messages like XENUTIL: WARNING: CloseFrontend: timed out in XenbusWaitForBackendStateChange: /local/domain/0/backend/console/[id]/0 in state INITIALISING; retry. in your /var/log/xen/qemu-dm-*.log and Windows just gets stuck during boot and keeps spinning forever. To get it back to work, you’ll need to
xenstore-rm /local/domain/0/backend/console/[id]
xenstore-rm /local/domain/0/backend/vfb/[id]

after starting the VM (thanks to Keith Coleman‘s mailing list post!).

To automatically run these commands upon DomU start, create a script named /usr/lib/xen/bin/qemu-dm-citrixpv with the following contents
#!/bin/sh

xenstore-rm /local/domain/0/backend/console/$2
xenstore-rm /local/domain/0/backend/vfb/$2

sh -c "sleep 10; xenstore-rm /local/domain/0/backend/console/$2; xenstore-rm /local/domain/0/backend/vfb/$2" &

exec /usr/lib/xen/bin/qemu-dm $*
and chmod +x it.

Then, edit your DomU config file and modify the device_model line and point it to your new script:
device_model = '/usr/lib/xen/bin/qemu-dm-citrixpv'

Now your Windows Server 2008 R2 x64 HVM-DomU is all set!