Category Archives: Networking

OpenWRT on AVM Fritz!Box 3370

I was looking for a new DSL modem and router as I am switching from cable to VDSL2. I was eyeing the Ubiquiti EdgeRouter series for a while because they have a big feature set at a reasonable price. I was a bit reluctant about the X series as they seem to be a bit troubled by their small flash memory and the Lite doesn’t have an SFP slot, which would have been nice for the fibre-to-the-home future. Also, both the X and the Lite have been available for quite a few years now, so I’m not sure how long they would have remained in firmware support. The 4 is much more expensive however, and I’d still need a VDSL2 modem, which seems to cost around 100€ (e.g. Draytek Vigor 130 or Allnet ALL-BM200VDSL2V).

Of course, I could have gotten an off-the-shelf router with an integrated modem, like the AVM Fritz!Box series that’s very popular in Germany and probably paid less in total (standalone VDSL2 modems are rather expensive because not many people want/need them). I had a Fritz!Box on cable for the past few years and am not particularly happy with the quality of their firmware though. The hardware is great, however.

So I decided to go with OpenWRT. The only built-in DSL modems it supports are Lantiq chips, so it had to be one from that list. I wanted something that has at least 64 MB of flash memory (so I could install some extra packages) and Gigabit Ethernet on all four ports. Luckily, OpenWRT recently got full support for the AVM Fritz!Box 3370. AVM announced that model back in 2010 and dropped official support for it in 2015, so they are available for ~25€ on eBay nowadays. Other models that would have been nice but are not currently supported by OpenWRT are the 3390 (simultaneous dual-band WiFi), and 3490/7490 (USB 3.0, 802.11ac, 512 MB flash memory and 256 MB RAM; the 7490 additionally has phone ports which can’t be used with OpenWRT). The ZyXEL P-2812HNU-F1 and P-2812HNU-F3 are quite similar to the AVM 3370, but they are not as readily available on eBay and tend to cost about twice as much.

OpenWRT doesn’t provide too much information on how to install, but it’s quite straight-forward. First, you need to check if your device is at least revision 2 and that it doesn’t have a certain bad bootloader version that makes installation more difficult. Go to http://192.168.178.1/support.lua on the original firmware, log in and click “Support-Daten erstellen”. In the resulting file, you should see something like the following at the top:

HWRevision      175
HWSubRevision   5
ProductID       Fritz_Box_3370
[...]
urlader-version 2475

Also, we need to know what kind of flash memory chip the device has. Scroll down to ##### BEGIN SECTION dmesg and look for something like

[ 1.450000] [HSNAND] Hardware-ECC activated
[ 1.450000] NAND device: Manufacturer ID: 0x2c, Chip ID: 0xf1 (Micron NAND 128MiB 3,3V 8-bit)

Download the files corresponding to your flash chip. Set your IP address statically to 192.168.178.20/24 and reboot the router. When the ethernet interface comes up after a few seconds, ftp 192.168.178.1 and upload the firmware as documented by OpenWRT:

quote USER adam2
quote PASS adam2
binary
debug
passive
quote SETENV linux_fs_start 0
quote MEDIA FLSH
put openwrt-lantiq-xrx200-avm_fritz3370-rev2-micron-squashfs-eva-kernel.bin mtd1
put openwrt-lantiq-xrx200-avm_fritz3370-rev2-micron-squashfs-eva-filesystem.bin mtd0
quote REBOOT

OpenWRT is now ready at 192.168.1.1 after a few minutes.

Note that Fritz!Box 3370 support is not in the 18.06 release version, only in the current snapshot builds. This means that the luci web interface is not pre-installed and you should only install new packages within the first few days after flashing (so you don’t pick up newer packages incompatible with your firmware).

After using the 3370 for a little while, unfortunately I noticed that it doesn’t handle more than around 60 Mbit/s. So be warned that it might not exhaust a 100 Mbit/s down, 50 Mbit/s up line. This seems to be due to a slightly underpowered CPU.

USB WLAN adapter for Snom D7x5 VoIP phones

Snom lists a number of supported USB WLAN chipsets and occasionally adds new ones in newer firmwares. I had a BIGtec BIG120, but it died recently (it would overheat after a few days’ use and then fail to see any networks beyond channel 1 until it cooled down). Most of the devices listed by Snom are ancient; my BIG120 is no longer available in the market. Firmware 8.9.3.60 added some new supported WiFi chips, but Snom’s list of supported devices is rather short. There are two additional troubles with USB WiFi adapters: Manufacturers often release new revisions under the same name but with a different chip, so you have to be careful to buy just the right one. And while the phone (or other Linux device) might support that specific chip, its driver needs to actually contain the USB ID of the specific USB adapter. You can find information about revisions and about USB IDs of all kinds of devices at WikiDevi.

Here is a list of all the USB IDs supported by the Snom D715 (and probably all D7X5 and D3X5 phones) that I extracted from firmware 8.9.3.80. I didn’t include the Ralink RT3070/RT2070 that were already supported by the older Snom 7×0 and 8xx series as they are difficult to find nowadays, so unless you have one of the older phones, don’t bother with them.

8192cu.ko

04BB:094C
04BB:0950
04F2:AFF7
04F2:AFF8
04F2:AFF9
04F2:AFFA
04F2:AFFB
04F2:AFFC
050D:1004
050D:1102
050D:2102
050D:2103
0586:341F
06F8:E033
06F8:E035
0789:016D
07AA:0056
07B8:8178
07B8:8189
0846:9021
0846:9041
0846:F001
0B05:17AB
0B05:17BA
0BDA:018A
0BDA:0A8A
0BDA:17C0
0BDA:1E1E
0BDA:2E2E
0BDA:317F
0BDA:5088
0BDA:8170
0BDA:8176
0BDA:8177
0BDA:8178
0BDA:817A
0BDA:817B
0BDA:817C
0BDA:817D
0BDA:817E
0BDA:817F
0BDA:8186
0BDA:818A
0BDA:8191
0BDA:8191
0BDA:8754
0DF6:0052
0DF6:005C
0DF6:0061
0DF6:0070
0E66:0019
0E66:0020
0EB0:9071
103C:1629
1058:0631
13D3:3357
13D3:3358
13D3:3359
2001:3307
2001:3308
2001:3309
2001:330A
2001:330B
2019:1201
2019:4902
2019:AB2A
2019:AB2B
2019:AB2E
2019:ED17
20F4:624D
20F4:648B
2357:0100
4855:0090
4855:0091
4856:0091
7392:7811
7392:7822
CDAB:8010
CDAB:8011

8192eu.ko

0BDA:818B
0BDA:818C
2001:3319
2357:0107
2357:0108
2357:0109

mt7601Usta.ko

148F:6370
148F:7601
148F:7650

rt5572sta.ko

0411:00E8
043E:7A12
043E:7A13
043E:7A22
043E:7A32
043E:7A32
043E:7A42
0471:200F
0471:20DD
0471:2104
0471:2126
0471:2180
0471:2181
0471:2182
04BB:0944
04BB:0945
04BB:0947
04BB:0948
04DA:1800
04DA:1801
04DA:23F6
04E8:2018
050D:8053
050D:805C
050D:815C
050D:815C
057C:8501
0586:3416
0586:341A
0586:341E
0586:343E
0789:0162
0789:0163
0789:0164
0789:0166
07AA:002F
07AA:003C
07AA:003F
07B8:2770
07B8:2870
07B8:3070
07B8:3071
07B8:3072
07D1:3C09
07D1:3C0A
07D1:3C0D
07D1:3C0E
07D1:3C0F
07D1:3C11
07D1:3C16
07D1:3C17
07FA:7712
083A:6618
083A:7511
083A:7512
083A:7522
083A:8522
083A:A618
083A:A701
083A:A702
083A:A703
083A:B511
083A:B511
083A:B522
0846:9012
0930:0A07
0B05:1731
0B05:1732
0B05:1742
0B05:1784
0CDE:0022
0CDE:0025
0DB0:3820
0DB0:3821
0DB0:3822
0DB0:3870
0DB0:3871
0DB0:6899
0DB0:6899
0DB0:821A
0DB0:822A
0DB0:822B
0DB0:822C
0DB0:870A
0DB0:871A
0DB0:871B
0DB0:871C
0DB0:899A
0DF6:0017
0DF6:002B
0DF6:002C
0DF6:002D
0DF6:0039
0DF6:003E
0DF6:003F
0DF6:0041
0DF6:0042
0DF6:0042
0DF6:0047
0DF6:0048
0DF6:0050
0DF6:005F
0DF6:0065
0DF6:0066
0DF6:0067
0DF6:0068
0E66:0001
0E66:0003
0E66:0021
100D:9031
1044:800B
1044:800D
129B:1828
13B1:002F
13D3:3247
13D3:3273
13D3:3305
13D3:3307
13D3:3321
13D3:3329
13D3:3329
13D3:3365
1482:3C09
148F:2770
148F:2870
148F:3070
148F:3071
148F:3072
148F:3370
148F:3572
148F:3573
148F:5370
148F:5372
148F:5572
14B2:3C06
14B2:3C07
14B2:3C09
14B2:3C12
14B2:3C23
14B2:3C25
14B2:3C27
14B2:3C28
157E:300E
15A9:0006
15C5:0008
167B:4001
1690:0740
1690:0740
1690:0744
1690:0761
1690:0764
1737:0070
1737:0071
1737:0078
1737:0079
1740:9701
1740:9702
1740:9703
1740:9705
1740:9706
1740:9707
1740:9708
1740:9709
1740:9801
177F:0302
1875:7733
18C5:0012
1A32:0304
1D4D:000C
1D4D:000E
1D4D:0011
1EDA:2012
1EDA:2012
1EDA:2210
1EDA:2310
2001:3C15
2001:3C19
2001:3C1A
2001:3C1B
2001:3C1C
2001:3C1D
2019:5201
2019:AB25
2019:ED06
2019:ED19
203D:1480
203D:14A9
20B8:8888
5A57:0280
5A57:0282
5A57:0282
5A57:0283
5A57:0284
5A57:5257
7392:4085
7392:7711
7392:7717
7392:7718
7392:7733

My choice fell on the ASUS USB-N10 Nano, which is on the list as 0B05:17BA. It is available for 10 Euro, is so small that it fits into the side USB port without protruding from behind the phone, works stable and does not produce a lot of heat.

Disabling “secured” IPv6 addresses is macOS 10.12 Sierra

On older macOS versions, every network interface would have one IPv6 address autogenerated from its MAC address, easily identified by the characteristic “ff:fe” bytes in the middle of the host part:
$ ifconfig en0
[...]
ether 10:dd:b1:9f:6b:ba
inet6 fe80::12dd:b1ff:fe9f:6bba%en0 prefixlen 64 scopeid 0x4
inet6 2001:7c0:2012:4a:12dd:b1ff:fe9f:6bba prefixlen 64 autoconf
[...]

Since macOS 10.12 however, these were replaced with randomly-generated “secured” addresses:
$ ifconfig en0
[...]
ether 10:dd:b1:9b:d0:67
inet6 fe80::46:3b36:146:9857%en0 prefixlen 64 secured scopeid 0x4
inet6 2001:7c0:2012:4a:4e6:f1d1:dd90:c6b4 prefixlen 64 autoconf secured
[...]

Very little is known about these, besides a single mailing list post that discovered them. If you are running a server, you’ll want your IPv6 address to be deterministic so you can register it in DNS. Therefore, we need to revert to pre-10.12 behavior:

$ echo net.inet6.send.opmode=0 >> /etc/sysctl.conf
$ reboot

If you look at the source code of the XNU kernel (Search for the IN6_IFF_SECURED flag) and the IPConfiguration service in macOS 10.11 (the 10.12 source code hasn’t been released yet), you can see that the new behavior was already there, just not enabled by default like it is now. Also, we now know that the change wasn’t made to reflect RFC 7217 (Semantically Opaque Interface Identifiers) behavior, but rather implements RFC 3972 (Cryptographically Generated Addresses).

Using a BIND DNS server in an Active Directory Environment

Years ago, I posted a script that allowed ISC DHCPd to update a Microsoft DNS server with dynamic records for DHCP clients. I haven’t used that method in a long time and there is a much simpler method: use ISC DHCPd together with the BIND DNS server like everybody else does, and only delegate the _mscds and _sites zones from the BIND server to the Microsoft DNS servers:

_msdcs.example.com. 86400 IN NS dc01.example.com.
_msdcs.example.com. 86400 IN NS dc02.example.com.
_sites.example.com. 86400 IN NS dc01.example.com.
_sites.example.com. 86400 IN NS dc02.example.com.

Then on all your machines, use the BIND server as DNS server (typically set via DHCP option 23). For Windows Domain matters, only records below _msdcs and _sites are ever looked up.

I believe you should even be able to point your domain controllers to the BIND DNS server — they should be able to follow the NS record so that whenever they try to update their own records, they do so on the Microsoft DNS server. As it turns out, the RFC 2136 DNS UPDATE method is used when domain controllers try to register their own records, so you’ll see error messages in your logs if you point your domain controllers to the BIND DNS server (on a Microsoft DC, these would refer to NETLOGON and dynamic DNS registrations, while on a Samba DC they would be about samba_dnsupdate). If you are running Samba 4.5 or higher, you should ensure that samba_dnsupdate is called with the –use-samba-tool flag, which can probably be done by setting the option below in your /etc/samba/smb.conf. If you are running an older Samba version or any Windows Server version, you need to resort to using your domain controllers’ IP addresses as DNS servers on on all domain controllers (Samba: put them into /etc/resolv.conf, Windows: set them in the network interface properties).

dns update command = /usr/sbin/samba_dnsupdate --use-samba-tool

For compatibility with Unix clients (including Mac OS X), you’ll want to add a couple of CNAME records for the SRV records:

_ldap._tcp.example.com. 86400 IN CNAME _ldap._tcp.dc._msdcs.example.com.
_gc._tcp.example.com. 86400 IN CNAME _ldap._tcp.gc._msdcs.example.com.
_kerberos._tcp.example.com. 86400 IN CNAME _kerberos._tcp.dc._msdcs.example.com.
_kerberos._udp.example.com. 86400 IN CNAME _kerberos._tcp.dc._msdcs.example.com.
_kpasswd._tcp.example.com. 3600 IN SRV 0 100 464 dc01.example.com
_kpasswd._tcp.example.com. 3600 IN SRV 0 100 464 dc02.example.com
_kpasswd._udp.example.com. 3600 IN SRV 0 100 464 dc01.example.com
_kpasswd._udp.example.com. 3600 IN SRV 0 100 464 dc02.example.com

The _kpasswd records unfortunately can’t be CNAMEs because they don’t exist in the _msdcs branch, so you manually need to keep them up-to-date when you add and remove domain controllers.

Snom VoIP phones: OpenVPN and multicast audio

Snom voice-over-IP phones have a built-in OpenVPN client, and they can also have audio transmitted to them via multicast. However, in my case a phone logged into OpenVPN did not play back audio received from the local ethernet network

I had multicast reception configured correctly on the phone:

multicast_listen=on
mc_address=239.255.255.245:5555

(Remember that you need to push the Apply button at the bottom of the page and then the Save button at the top of the page for the setting to actually take effect.)

To diagnose the problem, you can use multicast pings. Running

ping -I eth0 -t 2 239.255.255.245

on the local network showed no reactions from the phone. However, running

ping -I tun2 -t 2 239.255.255.245

on the VPN server showed responses from the phone. So clearly the phone wanted to do multicast exclusively via VPN. The cause of this was the following line in my OpenVPN config on the server:

push "redirect-gateway def1"

The obvious solution was to replace this line with routes that excluded the multicast IP addresses:

push "route 0.0.0.0 128.0.0.0"
push "route 128.0.0.0 192.0.0.0"
push "route 192.0.0.0 224.0.0.0"

While this worked, the phone wouldn’t complete booting up the next time I power-cycled it. So I switched back to the old OpenVPN config and instead turned on multicast routing on the VPN server:

apt-get install smcroute
echo 'mgroup from eth0 group 239.255.255.245' >> /etc/smcroute.conf
echo 'mroute from eth0 group 239.255.255.245 to tun0 tun1 tun2' >> /etc/smcroute.conf
service smcroute restart

Multicast audio now works and it even goes across the VPN.

Below you can find some commands that use FFMPEG to send the multicast audio:

ffmpeg -re -i song.mp3 -filter_complex 'aresample=16000,asetnsamples=n=160' -acodec g722 -ac 1 -vn -f rtp udp://239.255.255.245:5555
ffmpeg -re -i song.mp3 -filter_complex 'aresample=8000,asetnsamples=n=160' -acodec pcm_mulaw -ac 1 -vn -f rtp udp://239.255.255.245:5555
ffmpeg -re -i song.mp3 -filter_complex 'aresample=8000,asetnsamples=n=160' -acodec pcm_alaw -ac 1 -vn -f rtp udp://239.255.255.245:5555

Interestingly, you don’t even need to set the rtp_codec_type setting — the phone automatically determines the codec from the stream. I wasn’t able to get the Opus codec working though, the phone just makes crackling noises when I tried.

PHP 5: ldap_search never returns when searching Active Directory

I recently moved a PHP web application from a server running PHP 5.3 on Mac OS X 10.6 to a newer one with PHP 5.4 on Mac OS X 10.9. This caused the following code sample, run against an Active Directory server, to hang at the ldap_search() call:

$conn = ldap_connect('ldaps://' . $LDAPSERVER);
ldap_set_option($conn, LDAP_OPT_PROTOCOL_VERSION, 3);
$bind = @ldap_bind($conn, $LDAPUSER, $LDAPPW);
$result = ldap_search($conn, $LDAPSEARCHBASE, '(&(samaccountname=' . $searchuser . '))');
$info = ldap_get_entries($conn, $result);
ldap_close($conn);

Wiresharking the connection between web server and LDAP server (after replacing ldaps:// with ldap://) showed:

bindRequest(1) "$LDAPUSER" simplebindResponse(1) success searchRequest82) "$LDAPSEARCHBASE" wholeSubtree
searchResEntry(2) "CN=$searchuser,...,$LDAPSEARCHBASE" | searchResRef(2) | searchResDone(2) success [1 result]
bindRequest(4) "" simple
bindResponse(4) success
searchRequest(3) "DC=DomainDnsZones,$LDAPSEARCHBASE" wholeSubtree
searchResDone(3) operationsError (000004DC: LdapErr: DSID-0C0906E8, comment: In order to perform this operation a successful bind must be complete on the connection., data0,

So it’s binding, receiving a success response, searching and then receiving a response and a referrer to DC=DomainDnsZones,$LDAPSEARCHBASE. Next, it opens a new TCP connection and follows the referrer, but does an anonymous bind.

The solution is simple: just add

ldap_set_option($conn, LDAP_OPT_REFERRALS, FALSE);

after line 2. If for some reason you actually need to follow the referrer, have a look at ldap_set_rebind_proc, which lets you specify a callback which then does the authentication upon rebind.

Update August 2015: Same goes when using Net_LDAP3, which is used e.g. by Roundcube’s LDAP integration. Here you need to add the following:

$config['ldap_public']['public'] = array(
[...]
 'referrals' => false,
);

VMware ESXi 5.5.0 panics when using Intel AMT VNC

For compatibility with a new guest OS, I upgraded my ESXi  to 5.5 today. During reboot, it crashes after a few seconds (it briefly flashes a message about starting up PCI passthrough on the yellow ESXi boot screen). The purple screen of death (PSOD) I get looks like this:

VMware ESXi 5.5.0 [Releasebuild-1474528 x86_64]
#PF Exception 14 in world 32797:helper1-2 IP 0x4180046f7319 addr 0x410818781760
PTEs:0x10011e023;0x1080d7063;0x0;
cr0=0x8001003d cr2=0x410818781760 cr3=0xb6cd0000 cr4=0x216c
frame=0x41238075dd60 ip=0x4180046f7319 err=0 rflags=0x10206
rax=0x410818781760 rbx=0x41238075deb0 rcx=0x0
rdx=0x0 rbp=0x41238075de50 rsi=0x41238075deb0
rdi=0x1878176 r8=0x0 r9=0x2
r10=0x417fc47b9528 r11=0x41238075df10 r12=0x1878176
r13=0x1878176000 r14=0x41089f07a400 r15=0x6
*PCPU2:32797/heler1-2
PCPU  0: SSSHS
Code start: 0x418004600000 VMK uptime: 0:00:00:05.201
0x41238075de50:[0x4180046f7319]BackMap_Lookup@vmkernel#nover+0x35 stack: 0xffffffff00000000
0x41238075df00:[0x418004669483]IOMMUDoReportFault@vmkernel#nover+0x133 stack: 0x60000010
0x41238075df30:[0x418004669667]IOMMUProcessFaults@vmkernel#nover+0x1f stack:0x0
0x41238075dfd0:[0x418004660f8a]helpFunc@vmkernel#nover+0x6b6 stack: 0x0
0x41238075dff0:[0x418004853372]CpuSched_StartWorld@vmkernel#nover+0xf1 stack:0x0
base fs=0x0 gs=0x418040800000 Kgs=0x0

When rebooting the machine now, it reverts to my previous version, ESXi 5.1-914609.

A bit of playing around revealed: This only happens if I am connected to the Intel AMT VNC server. If I connect after ESXi has booted up, it crashes a fraction of a second after I connect to VNC. Go figure! Apparently it’s not such a good idea to have a VNC server inside the GPU, Intel…

Before I figured this out, I booted up the old ESXi 5.1.0-914609 and even upgraded it to ESXi 5.1.0-1483097.  Looking at dmesg revealed loads of weird errors while connected to the VNC server:

2014-02-13T11:23:15.145Z cpu0:3980)WARNING: IOMMUIntel: 2351: IOMMU Unit #0: R/W=R, Device 00:02.0 Faulting addr = 0x3f9bd6a000 Fault Reason = 0x0c -> Reserved fields set in PTE actively set for Read or Write.
2014-02-13T11:23:15.145Z cpu0:3980)WARNING: IOMMUIntel: 2371: IOMMU context entry dump for 00:02.0 Ctx-Hi = 0x101 Ctx-Lo = 0x10d681003

lspci | grep ’00:02.0 ‘ shows that this is the integrated Intel GPU (which I’m obviously not doing PCI Passthrough on).

So

  • ESXi 5.5 panics when using Intel AMT VNC
  • ESXi 5.1 handles Intel AMT VNC semi-gracefully and only spams the kernel log with dozens of messages per second
  • ESXi 5.0 worked fine (if I remember correctly)

I have no idea what VMware is doing there. From all I can tell, out-of-band management like Intel AMT should be completely invisible to the OS.

Note that this is on a Sandy Bridge generation machine with an Intel C206 chipset and a Xeon E3-1225. The Q67 chipset is almost identical to the C206, so I expect it to occur there as well. Newer chipsets hopefully behave better, perhaps even newer firmware versions help.

Update November 2014: I just upgraded to the latest version, ESXi 5.5u2-2143827, and it’s working again. I still get the dmesg spam, but the PSODs are gone. These are the kernel messages I’m seeing now while connected via Intel AMT VNC:

2014-11-29T11:17:25.516Z cpu0:32796)WARNING: IOMMUIntel: 2493: IOMMU context entry dump for 0000:00:02.0 Ctx-Hi = 0x101 Ctx-Lo = 0x10ec22001
2014-11-29T11:17:25.516Z cpu0:32796)WARNING: IOMMU: 1652: IOMMU Fault detected for 0000:00:02.0 (unnamed) IOaddr: 0x5dc5aa000 Mask: 0xc Domain: 0x41089f1eb400
2014-11-29T11:17:25.516Z cpu0:32796)WARNING: IOMMUIntel: 2436:  DMAR Fault IOMMU Unit #0: R/W=R, Device 0000:00:02.0 Faulting addr = 0x5dc5aa000 Fault Reason = 0x0c -> Reserved fields set in PTE actively set for Read or Write.

So basically, Intel AMT VNC is now usable again.

Update August 2015: ESXi 6.0 still spams the logs, no change over ESXi 5.5.

OpenWRT on TP-Link TL-WDR3600: enabling Wifi channel 12+13 and higher power on 5 GHz

A few months ago I recommended the TP-Link TL-WDR3600 as an OpenWRT router. I did complain that it unnecessarily limits me to 50 mW in the 5 GHz. After I discovered that it also prevents me from using channel 12 and 13 (which are only available in Europe an Japan, but not in the US), I looked around for a solution.

The in-kernel regulatory database is not the issue. Running iw reg get on the router shows:

country DE:
 (2400 - 2483 @ 40), (N/A, 20)
 (5150 - 5250 @ 40), (N/A, 20), NO-OUTDOOR
 (5250 - 5350 @ 40), (N/A, 20), NO-OUTDOOR, DFS
 (5470 - 5725 @ 40), (N/A, 27), DFS

Some googling around reveals that the ath9k wireless chips have a bit in EEPROM that may be set to either US or worldwide. Apparently, there is a law in the US or an FCC regulation that requires all Wifi devices shipped to determine on the hardware level (in this case, in the driver) whether the desired frequency and power level is allowed.

Unfortunately, TP-Link simply sets the bit to US mode on all devices shipped worldwide. The stock firmware simply ignores it and offers frequency and power choice based on the selected country code. OpenWRT however (as would a stock Linux kernel) respects the bit and applies a logic AND over the selected regulatory domain and the US regulatory domain.

If you run iw phy phyX info, you can see the result:

* 2412 MHz [1] (20.0 dBm)
* 2417 MHz [2] (20.0 dBm)
* 2422 MHz [3] (20.0 dBm)
* 2427 MHz [4] (20.0 dBm)
* 2432 MHz [5] (20.0 dBm)
* 2437 MHz [6] (20.0 dBm)
* 2442 MHz [7] (20.0 dBm)
* 2447 MHz [8] (20.0 dBm)
* 2452 MHz [9] (20.0 dBm)
* 2457 MHz [10] (20.0 dBm)
* 2462 MHz [11] (20.0 dBm)
* 2467 MHz [12] (disabled)
* 2472 MHz [13] (disabled)
* 2484 MHz [14] (disabled)
* 5180 MHz [36] (17.0 dBm)
* 5200 MHz [40] (17.0 dBm)
* 5220 MHz [44] (17.0 dBm)
* 5240 MHz [48] (17.0 dBm)
* 5260 MHz [52] (20.0 dBm) (passive scanning, no IBSS, radar detection)
* 5280 MHz [56] (20.0 dBm) (passive scanning, no IBSS, radar detection)
* 5300 MHz [60] (20.0 dBm) (passive scanning, no IBSS, radar detection)
* 5320 MHz [64] (20.0 dBm) (passive scanning, no IBSS, radar detection)
* 5500 MHz [100] (20.0 dBm) (passive scanning, no IBSS, radar detection)
* 5520 MHz [104] (20.0 dBm) (passive scanning, no IBSS, radar detection)
* 5540 MHz [108] (20.0 dBm) (passive scanning, no IBSS, radar detection)
* 5560 MHz [112] (20.0 dBm) (passive scanning, no IBSS, radar detection)
* 5580 MHz [116] (20.0 dBm) (passive scanning, no IBSS, radar detection)
* 5600 MHz [120] (disabled)
* 5620 MHz [124] (disabled)
* 5640 MHz [128] (disabled)
* 5660 MHz [132] (20.0 dBm) (passive scanning, no IBSS, radar detection)
* 5680 MHz [136] (20.0 dBm) (passive scanning, no IBSS, radar detection)
* 5700 MHz [140] (20.0 dBm) (passive scanning, no IBSS, radar detection)
* 5745 MHz [149] (disabled)
* 5765 MHz [153] (disabled)
* 5785 MHz [157] (disabled)
* 5805 MHz [161] (disabled)
* 5825 MHz [165] (disabled)

Some earlier fixes that no longer work with the current OpenWRT involved editing the US regulatory domain in the userland regulatory database. Nowadays that’s part of the kernel itself and no longer easily possible.

Luckily, someone created a binary patch called reghack that replaces the in-driver US regulations with unrestricted ones by (as far as I can tell from the source code) permitting both 2400-2483 and  5140-5860 MHz with 40 MHz wide channels at up to 30 dBm and without any restriction flags. Only channel 14 still seems to be unavailable, but that’s not a big deal as it is only available in Japan for use with 802.11b (that 14-year-old protocol that did a maximum of 11 Mbit/s). Applying the patch is simple (it is downloadable in both source code and binary form), though I needed to perform a cold reboot after the reboot.

In Germany (country code DE), this gives me the following channel map:

* 2412 MHz [1] (20.0 dBm)
* 2417 MHz [2] (20.0 dBm)
* 2422 MHz [3] (20.0 dBm)
* 2427 MHz [4] (20.0 dBm)
* 2432 MHz [5] (20.0 dBm)
* 2437 MHz [6] (20.0 dBm)
* 2442 MHz [7] (20.0 dBm)
* 2447 MHz [8] (20.0 dBm)
* 2452 MHz [9] (20.0 dBm)
* 2457 MHz [10] (20.0 dBm)
* 2462 MHz [11] (20.0 dBm)
* 2467 MHz [12] (20.0 dBm)
* 2472 MHz [13] (20.0 dBm)
* 2484 MHz [14] (disabled)
* 5180 MHz [36] (20.0 dBm)
* 5200 MHz [40] (20.0 dBm)
* 5220 MHz [44] (20.0 dBm)
* 5240 MHz [48] (20.0 dBm)
* 5260 MHz [52] (20.0 dBm) (radar detection)
* 5280 MHz [56] (20.0 dBm) (radar detection)
* 5300 MHz [60] (20.0 dBm) (radar detection)
* 5320 MHz [64] (20.0 dBm) (radar detection)
* 5500 MHz [100] (27.0 dBm) (radar detection)
* 5520 MHz [104] (27.0 dBm) (radar detection)
* 5540 MHz [108] (27.0 dBm) (radar detection)
* 5560 MHz [112] (27.0 dBm) (radar detection)
* 5580 MHz [116] (27.0 dBm) (radar detection)
* 5600 MHz [120] (27.0 dBm) (radar detection)
* 5620 MHz [124] (27.0 dBm) (radar detection)
* 5640 MHz [128] (27.0 dBm) (radar detection)
* 5660 MHz [132] (27.0 dBm) (radar detection)
* 5680 MHz [136] (27.0 dBm) (radar detection)
* 5700 MHz [140] (27.0 dBm) (radar detection)
* 5745 MHz [149] (disabled)
* 5765 MHz [153] (disabled)
* 5785 MHz [157] (disabled)
* 5805 MHz [161] (disabled)
* 5825 MHz [165] (disabled)

Note that this is still not entirely what is permitted in Germany: 5150-5250 and 5250-5350 MHz may go up to 200 mW and 5470-5725 even up to 1 W. Since radar detection is not currently supported on the OpenWRT, the latter two ranges are not usable anyway. I’d have liked to turn up transmission power to 200 mW, but as it turns out, TP-Link saved a few cents on the 5 GHz power amplifier, which doesn’t even do more than 63 mW…

Warning: Before you change channels and transmission power on your Wifi devices, check with the regulation authority what is legally allowed in your location. The hardware is capable of things that can interfere with radar etc. and you should never set it to a country code other than your current location. Even then, you might be able to choose options that are not legal to operate.

For Germany, the Bundesnetzagentur has the official frequency allocation documents on their website: 2.4 GHz and 5 GHz. Other European countries should have similar authorities and similar allocations. If you’re in the US, don’t even bother applying these changes as the FCC does not permit anything beyond what OpenWRT is already capable by itself.

Using Intel AMT’s VNC server

Newer Intel Chipsets with vPro/Intel AMT, such as the Q57, Q67 and C206 (as long as they’re paired with a Core i5/i7 or Xeon with integrated graphics), have a feature called Remote KVM.

To use it, press Ctrl-P at the BIOS splash screen to get to the MEBx menu, set a password (minimum 8 characters, mixed case, numbers and special characters are enforced), configure the network settings (they can even match the OS’s IP address), enable Remote KVM and disable User Opt-In.

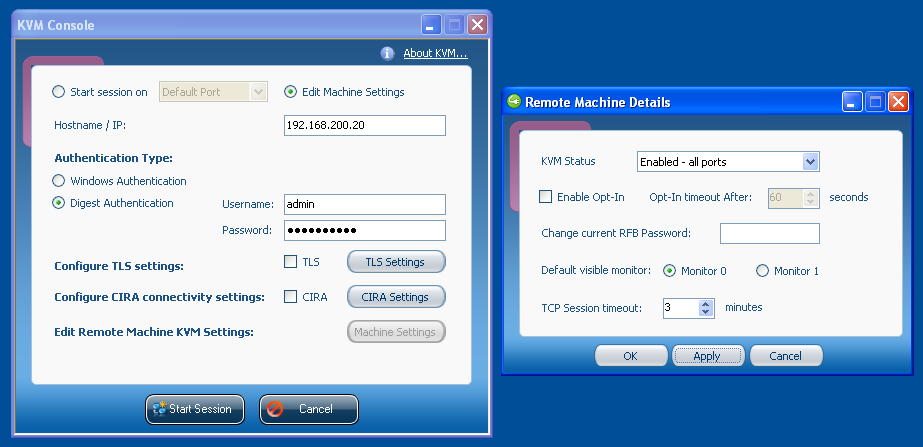
Next, download the Intel AMT SDK, extract the ZIP and open .\Windows\Intel_AMT\Bin\KVM\KVMControlApplication.exe . There, you can enable KVM as seen in the following screenshot:

KVM Status can either be set to “redirection ports” (meaning it will only be accessible to VNC clients that specifically support Intel AMT, such as RealVNC Viewer Plus or Intel’s KVM Console, the former of which costs $100, the latter of which constantly overlays a RealVNC logo on the screen), to “default port” (meaning it will be accessible on TCP port 5900 to any VNC client), or to “all ports” (which is the combination of both).
If you enable VNC access, you will also need to set an RFB Password. As I found out the hard way (Intel actually has it hidden in their documentation as well), it gets truncated at 8 characters and at the same time has the same security requirements as the general AMT password.
If you disabled User Opt-In in the MEBx menu, you can disable it here as well.

So that’s it, now you can use almost any VNC client you like (RealVNC and Chicken of the VNC work fine, while Apple Remote Desktop appears to cause the VNC server to freeze) and control the machine just as if you were sitting in front of it.
Two things I noticed: On my machine, the BIOS splash screen was not visible during a KVM connection (not even on a directly-attached screen), so to get to the BIOS I needed to blindly hit the corresponding key. Also, it is not possible to enter the MEBx menu during a KVM connection (probably for some obscure security reasons): if you hit the corresponding key, it immediately exits and continues normal bot; if you establish a KVM connection while in MEBx, you get disconnected immediately.

After about half an hour of playing with Intel AMT, I have to say it’s really cool. If you’re buying/building a home server, you should definitely consider getting a mainboard with Intel AMT 6.0 or later: You get server-grade remote management capabilities for a very small premium, which are very useful if you ever lock yourself out while remotely connected to the server.