Category Archives: JIRA

Migrating JIRA to osTicket

We were running JIRA as a ticket system for tech support and as a knowledge base. While this works, it’s not ideal, so we’ve decided to switch to osTicket. Of course, we wanted to migrate all issues, comments, attachments and issue links. JIRA has a good REST API, and osTicket has a rather simple database schema, so I’ve created a PHP script to do the migration, which you can obtain at https://gist.github.com/mkuron/3e1c92f9c4e993c65857.

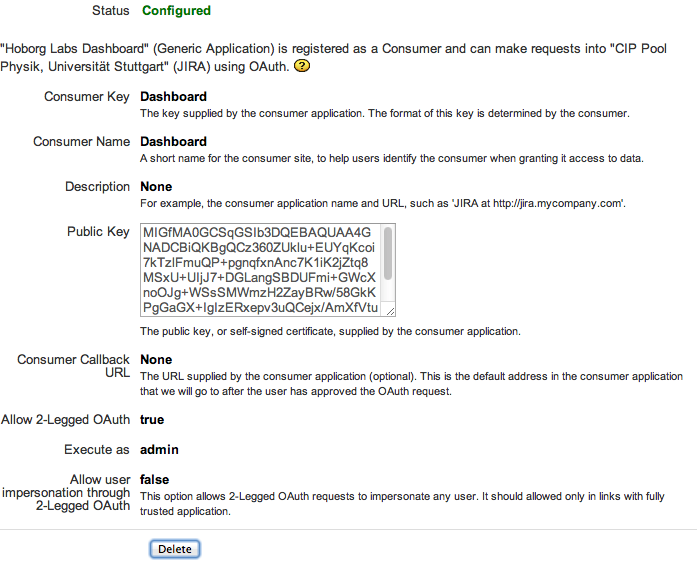
This script is not meant as a black-box solution. It can only get you started in creating your own migration script, as every JIRA setup is different. Before you start, create all staff accounts in osTicket and make sure they have the same user name as in JIRA. Then, set up OAuth for JIRA as explained here: Two-legged OAuth between PHP and JIRA. Add your MySQL password and the mail domain you use to identify staff accounts to the scripts (if you don’t have a common mail domain for staff accounts, you’ll need to edit the logic to identify staff accounts based on group membership). Specify your tech support project key and give the map of knowledge base project keys to osTicket KB category IDs. Run the scripts on the command-line and copy the resulting attachments folder to your osTicket server (note that you’ll need the Attachments on Filesystem plugin and configure it to use the attachments folder).

The scripts are rerun-safe and transactional. If you want, you can remove the jira_id columns from the ost_faq, ost_ticket_thread and ost_file tables after you finish the migration.

To ensure that links continue working as much as possible, add the following redirects to your web server config:

# Redirect JIRA issues
RedirectMatch permanent ^/jira/browse/(TECH-[0-9]+) /osticket/jira-redir.php?key=$1
# Redirect all other JIRA pages
RedirectMatch permanent ^/jira/ /osticket
# prevent access to attachments folder
RedirectMatch ^/osticket/attachments/ /osticket/file.php

Put the following file into your osTicket folder and call it jira-redir.php:

<?php
require_once 'bootstrap.php';
require_once INCLUDE_DIR . 'ost-config.php';
if (substr(DBHOST,0,1) == ':')
 $mysqli = new mysqli("localhost", DBUSER, DBPASS, DBNAME, 3306, substr(DBHOST, 1));
else
 $mysqli = new mysqli(DBHOST, DBUSER, DBPASS, DBNAME);

$stmt = $mysqli->prepare('SELECT ticket_id FROM ' . TABLE_PREFIX . 'ticket WHERE number=?');
$stmt->bind_param("s", $_GET['key']);
$stmt->execute();
$stmt->bind_result($ticket_id);
$stmt->fetch();
$stmt->close();

$url = 'http://';
if ($_SERVER['HTTPS'])
 $url = 'https://';
$url .= $_SERVER['HTTP_HOST'];
$url .= dirname($_SERVER['SCRIPT_NAME']);
$url .= '/scp/tickets.php?id=';
$url .= $ticket_id;
header("Location: " . $url, true, 301);
?>

Two-legged OAuth between PHP and JIRA

If you want to use the JIRA REST API without storing plain-text passwords in your application, you need to use OAuth. If you want the application to directly talk to JIRA without binding it to a JIRA user account, you need to use 2-legged OAuth. JIRA requires RSA keys for 2-legged OAuth. Zend_OAuth supports RSA-signed requests, but this is somewhat undocumented. Also, the Java OAuth library used by JIRA appears to have a bug that requires the field oauth_token in the Authorization header to be present but blank for 2-legged authentication (if it’s not present, it raises uncaught exceptions…). Lastly, you have to use the exact server name that JIRA thinks it has. Finding out all this took me quite a while, so here is the full code:

PHP Code

require_once 'Zend/Oauth.php';
require_once 'Zend/Oauth/Consumer.php';
require_once 'Zend/Crypt/Rsa/Key/Private.php';
require_once 'Zend/Crypt/Rsa/Key/Public.php';
$jql = 'project = KB';
$max = 50;
$server = 'https://www.example.com/jira/'; // this must not be http://localhost:8080. It must match the proxyName, proxyPort and Context configured in ./conf/server.xml in JIRA. Otherwise you get signature_invalid exceptions
$query = array('jql' => $jql, 'startAt' => '0', 'maxResults' => $max, 'fields' => 'summary,assignee,duedate,priority')
$privkey = new Zend_Crypt_Rsa_Key_Private('jira.pem');
$pubkey = new Zend_Crypt_Rsa_Key_Public('jira.pub');
$consumer = 'samplescript';
$query['oauth_token'] = ''; // otherwise you get uncaught net.oauth.OAuthProblemException: signature_invalid exceptions
$oauth_config = array(
 'consumerKey' => $consumer,
 'rsaPrivateKey' => $privkey,
 'rsaPublicKey' => $pubkey,
 'signatureMethod' => 'RSA-SHA1',
 'siteUrl' => $server . '/plugins/servlet/oauth',
 'requestScheme' => Zend_Oauth::REQUEST_SCHEME_QUERYSTRING,
 );
$oauth = new Zend_Oauth_Consumer($oauth_config);
$oauth->setSignatureMethod('RSA-SHA1');
$oauth->setRsaPrivateKey($privkey);
$oauth->setRsaPublicKey($pubkey);
$token = new Zend_Oauth_Token_Access(); // 2-legged authentication doesn't use tokens, but this is the only way to get a HTTP Client that sets the proper Authorization headers
$oauth->setToken($token);
$client = $token->getHttpClient($oauth_config, $url);
$client->setUri(sprintf('%s/search', $url));
$client->setMethod(Zend_Http_Client::GET);
$client->setParameterGet($query);
$json = json_decode($client->request()->getBody());
print_r($json);

Generating the keys

openssl genrsa -out jira.pem 1024
openssl rsa -in jira.pem -pubout -out jira.pub

Registering them with JIRA

Go to the JIRA Administration, click Plugins, then Application Links.

Click Add Application Link, enter your server URL, enter the name of your application and select Generic Application.

Now configure it: got to Incoming Authentication, set a Consumer Key (I used samplescript above), set a name and paste the contents of jira.pub into the box. Now check 

JIRA OAuth configuration