Category Archives: Mac

Dell WD19TBS review

Four years ago, I reviewed the Dell WD15 USB-C docking station for use with a MacBook Pro. It worked reasonably well, but not all of the USB ports worked and high resolutions didn’t work over DisplayPort. Also, over time it has become a bit unstable for me, requiring the USB-C cable to occasionally be unplugged and replugged, or even requiring the dock to be power-cycled. The latter is also necessary when switching between a Dell and a MacBook, which can be a bit annoying. I also noticed that the WD15’s firmware cannot be upgraded unless you use a Dell laptop from around 2017 — newer ones will try and fail, while non-Dell laptops won’t even run the updater.

Dell’s current docking solution is the WD19. It is available in three variants: the WD19S connects via USB-C, the WD19TBS connects via Thunderbolt or USB-C, and the WD19DCS connects to certain high-end Dell laptops via two USB-C cables. Conveniently, the WD19TBS is certified for use with Macs too. The WD19/WD19TB/WD19DC (without the “S” at the end) are identical, but do not have an audio output.

This review is going to be really short. The WD19 eliminates all the WD15’s flaws that I complained about. Dell provides good documentation that tells you what works via USB-C and what requires Thunderbolt, which resolutions you can get on how many video outputs, etc., so I am not going to repeat that here (the executive summary is that there are no surprises here).

The WD19 has one downside though: it has a fan. Mine turns on and spins up to relatively loud levels every couple hours for a few minutes, which I find quite annoying. Another WD19 I have used never spins up. I don’t really think the fan is even needed for regular usage unless you have a laptop that draws more than 80W of power. So if you’re feeling adventurous and want to void the warranty, open up the WD19 and disconnect the fan. Dell laptops will occasionally display a BIOS warning about a failed fan, but other than that it works fine and completely silent.

Firmware updates no longer require Windows or even a Dell laptop. You can apply them via fwupd on Linux too.

Novation Launchkey 61 MK3 and MainStage 3.5

Santa got me a Novation Launchkey 61 MK3 this year. I learned playing piano as a kid on a Yamaha PSR-340 and have been wanting to get back into music for a while now. These days, good low-priced MIDI keyboards and great-sounding virtual instruments are available for low prices, so the up-front investment is much smaller than back then.

I wanted a MIDI keyboard with a display and a couple of buttons and faders so I could select and control virtual pianos, synths, and organs on my computer. I also wanted integration of the controls with Apple Logic Pro. Some older MIDI devices used binary plugins for this purpose (which get installed into /Library/Application Support/MIDI Device Plug-ins), but with Apple recently having switched from Intel to its own custom Arm processors and many manufacturers not providing updates in a timely manner, the better way going forward is using Lua scripts.

Browsing through the Thomann store, I found that my criteria are met by the Akai MPK 261, Nektar Panorama P6, Novation Launchkey 61 MK3, and Roland A-800 Pro. (The Nektar Panorama T6 might also be okay once the manufacturer delivers the update promised. Same might go for the Novation SL MKIII if it gets an update.) The Nektar Panorama P series only has a binary plugin for Logic Pro, but a Lua script for MainStage. The Novation MK3 has a downloadable Lua script for Logic. The Roland A-PRO series and Akai MPK series are apparently supported out of the box through Lua scripts. Finally, there is the Studiologic Mixface SL, which is a controller with faders, knobs and buttons that magnetically attached to the Studiologic SL series of MIDI keyboards and which has a Lua script for Logic. There is also the Roland Fantom 6, a high-end synthesizer, that has a binary plugin for Logic and a Lua script for MainStage.

When you are not recording, but just playing virtual instruments, a DAW like Logic Pro is overkill. That’s what Apple MainStage is for — it hosts Audio Units (virtual instruments and effects), but unlike a DAW it has no concept of recording or timeline. After seeing Roland’s and Nektar’s documentation on their support of MainStage (they display all the on-screen controls on the keyboard display and allow you to interact with them via the knobs, buttons and faders), I wanted to see how much I could do with the Launchkey. It has special MIDI messages for all kinds of things and should thus be able to do most of the same. The Lua scripts that configure MIDI devices are installed into ~/Music/Audio Music Apps/MIDI Device Scripts (for Logic) and ~/Music/Audio Music Apps/MainStage Devices (for MainStage). The Lua API is not documented publicly, but can easily be deduced by poking through Apple’s own scripts, which are in /Applications/MainStage 3.app/Contents/Frameworks/MACore.framework/Versions/A/Resources/MIDI Device Scripts. The basic API is identical between MainStage and Logic, but Logic uses a different parameter feedback mechanism and supports multiple layers (or “modes”), both of which are not used by any of Apple’s scripts.

I am happy to report that I managed to create a complete MainStage integration for the Launchkey that pretty much matches what Roland (Fantom) and Nektar managed to do. Of course, due to lack of a graphical display, it’s not as nice, but it only costs half as much as the Nektar and a tenth of the Roland Fantom. Automatic mapping of knobs, faders, buttons, and drum pads works perfectly. The LEDs of the buttons mirror the state of the UI. The display shows parameter feedback (name and value) when you move a knob or fader. This goes beyond what the Roland A-800 or Akai MPK261 do, which have a similar price as the Launchkey, but cannot display parameter information.

Note that MainStage’s automatic mapping of controls has a few bugs. My device script cannot work around these, but you can manually re-map these controls if you need them:

  • The Keyboard quick-start project does not map Smart Drawbars to MIDI faders. The Tonewheel organ project template does however. You can manually map the Smart Drawbar controls though.
  • Smart Faders are not mapped to MIDI faders. You can manually map the Smart Fader controls.
  • Instruments that have Smart Controls spread across multiple pages only have their first page’s controls mapped. You can manually map the Tab 2 Smart Knobs though.
  • Drumpads on the keyboard trigger notes in the C6-B7 range and are mapped to MainStage’s Drum Pad controls. However, the virtual instruments expect notes in the C1-B2 range. You can manually change the trigger notes on all 24 drum channels.

Check out https://github.com/mkuron/launchkey-mk3-mainstage if you want to use your own Launchkey MK3 with MainStage. The versions for the smaller (25-key, 37-key, 49-key) models are untested, but should work just as well.

Update February 2022: The Novation SL MKIII got its promised Logic Pro integration. MainStage integration could be done in a similar way as I did for the Launchkey MK3. The Novation SL MKIII seems quite comparable to the Nektar Panorama P6, but a bit more modern.

Update March 2022: I uploaded a video to YouTube and tweeted about this, hoping to get it out to more people. Novation even liked my tweet:

Update April 2022: Downloadable installer packages (.pkg files) are now available for release versions at https://github.com/mkuron/launchkey-mk3-mainstage/releases. You will need to right-click to install the package as it is not signed.

Update September 2022: The Novation SL61 MK3 is not currently supported as it has a completely different MIDI protocol is different from the Launchkey MK3. I would gladly add support for it, but don’t own this keyboard, so unless someone ships me one, it won’t happen. The SL61 would be perfect for MainStage with its little displays etc.

Update May 2023: The new Arturia KeyLab Essential 61 mk3 also fulfills my requirements and it has a Lua script for Logic. Writing one for MainStage should also be possible.

Exploring the MoneyMoney database

MoneyMoney is a convenient online banking application for macOS, most useful if you have accounts with multiple different German banks. I wanted to export some of the data I had stored there in a format that the app didn’t support by itself, so I was wondering if I could pull it straight from the database. You can go to the Help menu and click Show Database in Finder and will be led to ~/Library/Containers/com.moneymoney-app.retail/Data/Library/Application Support/MoneyMoney/Database/MoneyMoney.sqlite. If you go to MoneyMoney’s About screen, you’ll see that it attributes SQLCipher.

So, download and compile SQLCipher like this:

git clone https://github.com/sqlcipher/sqlcipher.git
cd sqlcipher
./configure --enable-tempstore=yes CFLAGS="-DSQLITE_HAS_CODEC" LDFLAGS="-L/opt/local/lib -lcrypto" CC=clang CXX=clang++
make -j 4

Now you can open the database using

./sqlcipher "file://$HOME/Library/Containers/com.moneymoney-app.retail/Data/Library/Application Support/MoneyMoney/Database/MoneyMoney.sqlite?mode=ro"

and decrypt and dump it by typing the following commands at the SQLite prompt:

PRAGMA key = '<your database password>';
PRAGMA cipher_compatibility = 3;
.dump

The database password is just what you set in MoneyMoney and I figured out the compatibility level by trial and error. It seems like MoneyMoney didn’t yet get around to upgrading to SQLCipher 4, which was released in late 2018. It’s entirely possible that some older versions of MoneyMoney require a lower compatibility level and that some future version may be using level 4.

Disclaimer: You should not attempt to modify the database as that may cause MoneyMoney’s data to become inconsistent or modified in ways the developer did not anticipate. That’s why I open the file in read-only mode above. If you do modify it, you’re on your own.

Debugging code-signed applications on macOS

To debug a code-signed application on macOS, you need to turn off System Integrity Protection. Some applications however explicitly forbid debugging them. This manifests itself in lldb error messages like

Process 12345 exited with status = 45 (0x0000002d) 

If you google that message, you’ll find that this happens if the application disallows attaching a debugger by calling

ptrace(PT_DENY_ATTACH, 0, 0, 0)

There are many workarounds described around the internet. The one I like using is the following lldb command:

breakpoint set --name ptrace --command "thread return" --command "continue"

It just causes the ptrace call to be skipped. Of course, some applications take more involved measures to prevent attaching a debugger, but often this is sufficient.

MacBook Pro with Thunderbolt 3 and Dell docking stations

I recently got a new MacBook Pro with Thunderbolt 3 ports. These ports are great because they can carry power, USB and output to an external display simultaneously. Not a lot of accessories are available on the market yet though besides simple adapters from USB-C to things like USB, HDMI, VGA, Thunderbolt 2, or Ethernet. Belkin has announced the Belkin Thunderbolt 3 Express Dock HD, but it seems like it will be priced upwards of $300. Dell’s XPS 13 and 15 series however has included Thunderbolt 3 for a year now and Dell makes some nice docking stations for them:

Dell DA200: small portable device with Gigabit Ethernet, USB 3, VGA and HDMI.

Dell WD15: stationary device with a size similar to a paperback book, with a 130W or 180W power brick. Over the DA200, it adds mini-DisplayPort, 2x USB2, 2x USB3, Speaker and Headset outputs. It also passes power through to the computer.

Dell TB15: This model appears to have been recalled because it didn’t run stable and replaced with the TB16.

Dell TB16: stationary device shaped like a stack of a dozen CD cases, with a 180W or 240W power brick. Over the WD15, it adds DisplayPort. Note that it connects to the computer via Thunderbolt 3 instead of USB-C, which means it can deliver higher screen resolutions (see below).


First of all, the DA200 just works. VGA and HDMI run up to a resolution of 2048×1152 pixels at 60 Hz (even though Dell says it only supports 1920×1080), Ethernet works without installing a driver (it contains the same Realtek chip, PCI ID 0bda:8153, that the official Belkin USB-C adapter uses). HDCP-encrypted HDMI works fine, as confirmed by starting a Netflix video.

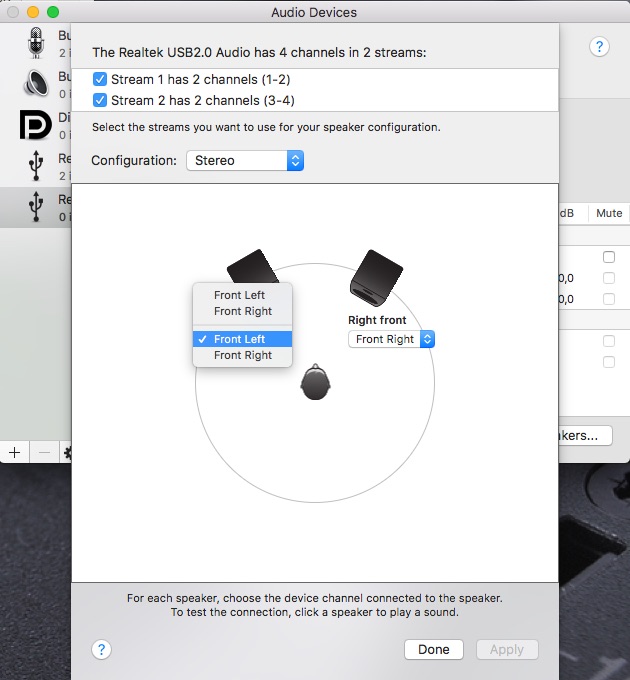
Next up, the WD15. I first hooked it up via mini-DisplayPort and was disappointed to find that it only runs up to 2048×1152 pixels. Switching to HDMI alleviated the problem and my screen ran at its native 2560×1440 pixels — though the colors were all messed up because the computer was outputting YCrCb while the screen was interpreting that as RGB, but that is easily fixed by creating an EDID override. HDCP works just fine — even though Dell says the dock doesn’t support it. Dell also says that the dock can do 4K resolutions (3840×2160 pixel) only at 30 Hz, so if you want to hook up a 4K display, don’t get this dock. The dock has a power button, but it didn’t surprise me to find out that it didn’t power up the Macbook. The Macbook did, however, automatically turn on when plugging in the USB-C cable, even in clamshell mode. One oddity I found was that the front left USB 3 port would only deliver power, not data, while a device was plugged into the rear USB 3 port — while I did not find this documented anywhere, it seems likely that this is a hardware limitation and not a Mac issue — see below for more information. Audio works fine too (it’s a Realtek chip, PCI ID 0bda:4014), but you need to use Audio MIDI Setup and click the “Configure Speakers” to assign left/right either to the first stream (headphone output on front) or the second stream (audio output on the back):


Finally, the Dell TB16. I didn’t have this one for testing because the WD15 suffices for my application. Dell says that you can run two 4K displays or one 5K (5120×2880 pixel) display, all at 60 Hz. I assume everything else will work just as it does with the WD15. For USB purposes however, I believe this dock contains a PCIe-attached USB 3.1 chip as the USB-C Alternate Mode Partner Matrix shows that a superspeed USB signal cannot be carried if high-resolution video is transferred. According to one of my readers, it doesn’t work out of the box unfortunately.


USB 3 problems

It seems like I can’t reliably use all USB 3 ports on the WD15 simultaneously. Sometimes they all work, but after the next reboot or unplug/replug cycle, once ceases to work. I had initially believed this to be a hardware limitation, but it appears to be a bug in Apple’s USB 3 drivers. sudo dmesg shows messages like these:

000069.247426 IOUSBHostHIDDevice: IOUSBHostHIDDevice::interruptRetry: resetting device due to IO failures

000069.551400 AppleUSB20Hub@14440000: AppleUSBHub::deviceRequest: resetting due to persistent errors

So the OS shuts down the USB hub. If you google these messages, you’ll find a large number of reports of it occurring with all kinds of USB hubs, but no solutions. So Apple just needs to get their drivers fixed.

Disabling “secured” IPv6 addresses is macOS 10.12 Sierra

On older macOS versions, every network interface would have one IPv6 address autogenerated from its MAC address, easily identified by the characteristic “ff:fe” bytes in the middle of the host part:
$ ifconfig en0
[...]
ether 10:dd:b1:9f:6b:ba
inet6 fe80::12dd:b1ff:fe9f:6bba%en0 prefixlen 64 scopeid 0x4
inet6 2001:7c0:2012:4a:12dd:b1ff:fe9f:6bba prefixlen 64 autoconf
[...]

Since macOS 10.12 however, these were replaced with randomly-generated “secured” addresses:
$ ifconfig en0
[...]
ether 10:dd:b1:9b:d0:67
inet6 fe80::46:3b36:146:9857%en0 prefixlen 64 secured scopeid 0x4
inet6 2001:7c0:2012:4a:4e6:f1d1:dd90:c6b4 prefixlen 64 autoconf secured
[...]

Very little is known about these, besides a single mailing list post that discovered them. If you are running a server, you’ll want your IPv6 address to be deterministic so you can register it in DNS. Therefore, we need to revert to pre-10.12 behavior:

$ echo net.inet6.send.opmode=0 >> /etc/sysctl.conf
$ reboot

If you look at the source code of the XNU kernel (Search for the IN6_IFF_SECURED flag) and the IPConfiguration service in macOS 10.11 (the 10.12 source code hasn’t been released yet), you can see that the new behavior was already there, just not enabled by default like it is now. Also, we now know that the change wasn’t made to reflect RFC 7217 (Semantically Opaque Interface Identifiers) behavior, but rather implements RFC 3972 (Cryptographically Generated Addresses).

Wiring Fibre Channel for Arbitrated Loop

We have a small Fibre Channel SAN with three servers, a switch and a dual-controller RAID enclosure. With only a single switch, we obviously couldn’t connect all servers redundantly to the RAID system. That meant, for example, that firmware updates to it could only be applied after shutting down the servers. Buying a second switch was hard to justify for this simple setup, so we decided to hook the switch up to the first RAID controller and wire a loop off the second RAID controller. Each server would have one port connected to the switch and another one to the loop.

Back in the old days, Fibre Channel hubs existed for exactly this purpose, but nowadays you simply can’t get them anymore. However, in a redundant setup, you don’t need a hub, you can simply run cables appropriately, i.e. in a daisy-chain fashion. The only downside of not having a hub, the loop going down if one server goes down, is irrelevant here because you have a second path via the switch. For technical details on the loop topology, you can have a look at documentation available from EMC.

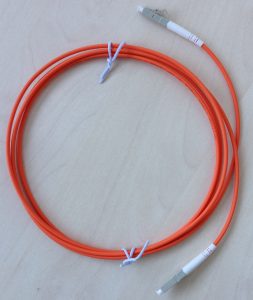
To wire your servers and RAID controllers in a fashion resembling a hub (only without the automatic bypass if a server goes down), you need simplex patch cables. These consist of a single fibre (instead of two, like you are used to) and have a connector that looks like half of a regular LC connector. You can get them in the same qualities as regular (duplex) patch cables and in single- and multi-mode as needed. They look like this:

These cables are somewhat exotic, so your usual cable dealer might not have them, but they exist and are available from specialized fiber cable dealers. As you are wiring in a daisy-chain fashion, you need one simplex cable per node you want to connect.

Once you have the necessary cables, you wire everything by connecting a cable from the output side of the FC port on the first device and connecting it to the input side of the FC port on the second device. The second device’s output side connects to the third device’s input side and so on, until you have made a full loop by connecting the last device’s output side to the first device’s input side, like this:

How can you tell the output side from the input side? Some transceivers have little arrows or have labels “TX” (output) and “RX” (input). If yours don’t, you can recognize the output side by the red laser light coming from it. To protect your eyes, never look directly into the laser light. Never connect two output sides together, otherwise you may damage the laser diodes in both of them. Therefore, be careful and always double-check.

That’s it, you’re done. All servers on the loop should immediately see the LUNs exported to the by the RAID controller.

In my setup however, further troubleshooting was required. The loop simply did not come up. As it turns out, someone had set the ports on one FC HBA to point-to-point-only and 2 Gbit/s mode. After switching both these settings to their default automatic mode, the loop went up and data started flowing. My HBAs are QLogic QLE2462 (4 Gbit/s generation) and QLE2562 (8 Gbit/s generation), and they automatically negotiated the fastest common speed they could handle, which is 4 Gbit/s. Configuring these parameters on the HBA usually requires hitting a key at the HBA’s pre-boot screen to enter the configuration menu and doing it there, or via vendor-specific software. I didn’t have access to the pre-boot configuration menu and was running VMware ESXi 6.0 on the servers. The QConvergeConsole for my QLogic adapters luckily is also available for VMware. It is not as easy to install as on Windows or Linux, unfortunately. You first install a CIM provider via the command line on the ESXi host, reboot the host and then install a plugin into VMware vCenter server.

Triple-booting a Clamshell iBook

I have a first-generation Clamshell iBook, manufactured in January 2000. These shipped with 64 MB of on-board RAM, a 6 GB hard drive and a CD drive.
I got it in summer 2005 when my high school decommissioned these computers. Running Mac OS X 10.3.9 at the time, it was still a very usable computer, especially after I upgraded the RAM to 320 MB. I used it as my main computer for a year and a half, until I replaced it with a new Intel-based Mac.

Now, in 2016, I found a 40 GB IDE laptop hard drive and decided to put that into the Clamshell and try to make it usable again.
As usual, iFixit has a good tutorial. You have to take the entire machine apart and end up with around 50 screws, but it’s surprisingly easy. You only need a Torx T8, a Philips #1 and a 5mm nut driver.
Now, on to putting some operating systems on the hard drive.

Installing Mac OS X 10.4

Here is what you need:

  • Mac OS X 10.4 retail install DVD
  • Mac OS X 10.3 retail install CD (the first one is sufficient). Any other bootable Mac OS X 10.3 CD might also work.
  • USB hard drive

Officially, Tiger is only supported on the latest revision of the Clamshell iBook, which has FireWire and a DVD drive. Mine only has a CD drive and does not support USB booting, which makes things exceedingly difficult.

  1. Take an image of the 10.4 install DVD and save it onto the USB hard drive using a different Mac.
  2. Boot the Clamshell off the 10.3 install CD
  3. Open up Disk Utility. Partition the disk with the following sizes and names: 16 MB linux-boot, 2 GB linux-swap, 12 GB linux, 20 GB Macintosh HD, 6 GB Install. Make sure to select the Install OS 9 drivers checkbox.
  4. Plug in the USB hard drive.
  5. Clone the 10.4 install image onto the Install partition on the internal drive.
  6. Open a Terminal and bless the hard drive: bless --folder "/Volumes/Install/System/Library/CoreServices" --bootinfo "/Volumes/Install/usr/standalone/ppc/bootx.bootinfo".
  7. Using the Terminal, pico /Volumes/Install/System/Installation/Packages/OSInstall.mpkg/Contents/OSInstall.dist and remove the PowerBook2,1 from the badMachines list.
  8. Open Startup Disk and set the iBook to boot from the Install partition.
  9. Reboot
  10. Install 10.4 onto the Macintosh HD partition, deselecting all printer drivers and languages you don’t need in order to save some space.
  11. After the reboot, run Software Update a few times.

Installing Mac OS 9.2.2

Here is what you need:

Mac OS 9 is really easy to install, you just copy it to the hard drive.

  1. Mount the CD or image and copy System Folder and Applications (Mac OS 9) from the root directory to your Macintosh HD.
  2. Open the Startup Disk preference pane and select Mac OS 9.2.2.
  3. Reboot.
  4. If you used the NetBoot image, you will be asked for user name and password. Use NBUser and netboot.
  5. In order to disable the password prompt, go to the hard drive, System Folder and move the contents of Control Panels disabled to Control Panels. Now open the Multiple Users control panel, go to options and set it to local authentication. Then, disable multiple users entirely.
  6. Download and install QuickTime 6.0.3 for Mac.
  7. Open the Startup Disk control panel and select Mac OS 10.4.
  8. After the reboot, open the Classic preference pane and select the system folder on Macintosh HD.

Now you can use Classic and you can also do a native boot.

Installing Debian Linux 8 “Jessie”

Mac OS 9.2.2 hasn’t received updates in almost 15 years, and Mac OS X 10.4 is also 7 years beyond its update cycle. So how about a current operating system?

Here is what you need:

Except for the partitioning, the installation is quite straight-forward.

  1. Insert the CD and boot it by holding the C key while turning on the computer.
  2. Proceed through the installer.
  3. When asked for the partitioning, set the 16 MB partition to be NewWorld Boot and set the bootable flag. Set the 2 GB partition to be swap. Set the 12 GB partition to be ext3 and mounted at /.
  4. When asked for the packages to install, choose the Xfce desktop. It’s lightweight enough to run on this old hardware.
  5. After rebooting, run nano /etc/apt/sources.list and add the non-free repository to all entries in the file. Then, install the AirPort firmware: apt-get install linux-firmware-nonfree.

The resulting Debian install mostly worked for me, except for two things:

  • the AirPort card does not show up in NetworkManager
  • Fonts are a bit messed up. Bitmaps are drawn to the screen just fine.

I’m still looking for solutions to these two things.

Configuring the yaboot bootloader

Right now, your computer will boot into Linux all the time.
While the yaboot loader prompts you to hit x to boot into Mac OS X and m to boot into Mac OS 9, that doesn’t work as expected.
Instead of booting into Mac OS X, my iBook booted into the install partition.
And instead of booting into Mac OS 9, my iBook booted into Mac OS X.

So run nano /etc/yaboot.conf and adjust the macosx= line so that it refers to the same partition as the macos9= line. Exit the editor and run ybin -v to apply the changes. That fixes the first problem.

Now, reboot into Mac OS X and open the Startup Disk preference pane. Select Mac OS 9.2.2 and reboot.
While rebooting, hold down the option key and select the Linux partition at the boot picker.
Run nano /etc/yaboot.conf again and add brokenosx to a new line. Once more, run ybin -v.

Now, each boot loader entry does what you’d expect. The trick here is that brokenosx causes yaboot to directly load the Mac OS X booter for the macosx= entry. The macos= entry, on the other hand, will still cause the blessed system folder to be booted.

Fixing Mac OS 9 after installing Linux

One problem is still there: When you try to boot Mac OS 9, you are greeted by a blinking floppy with a question mark. This happens because the Debian partitioner destroys the Mac OS 9 drivers for the HFS+ partitions. However, the drivers can be reinstalled.

You need:

  • Mac OS 9 install CD. Any other bootable Mac OS 9 CD might also work.

Now,

  1. Insert the CD and reboot the iBook while holding down the C key.
  2. Open Drive Setup, highlight the internal hard drive, go to the Functions menu and click Update Drivers.
  3. Reboot

Resetting the Startup Disk

Whenever you touch the Startup Disk preference pane in Mac OS X or the Startup Disk control panel in Mac OS 9, your system will no longer show the yaboot prompt when you turn it on. To fix that, do the following:

  1. Hold down the option key while booting and select the Linux partition
  2. Run ybin -v

Fixing Linux problems

http://ppcluddite.blogspot.de/2012/03/installing-debian-linux-on-ppc-part-iv.html is an excellent article that explains how to fix most issues that Debian has on PowerPC. For example, to fix the font rendering troubles, create an xorg.conf file (switch to a text terminal, run init 3, Xorg -configure, cp /root/xorg.conf.new /etc/X11/xorg.conf) and insert Option "RenderAccel" "false" into its Device section.

Digest authentication freezes Apache on OS X Server 5.0

When running a web site on OS X Server 5.0 for a while (on OS X 10.10.5 in my case), eventually you’ll notice hundreds of httpd processes in Activity Monitor. One or two might cause a bit of CPU load, while the others don’t do anything. When you try to load the web page, it is insanely slow and often throws a HTTP 500 error, a HTTP 502 Proxy Error, or the connection just times out. /var/log/apache2/error_log reports errors like

[Thu Nov 05 13:15:24.435549 2015] [mpm_prefork:error] [pid 60920] AH00161: server reached MaxRequestWorkers setting, consider raising the MaxRequestWorkers setting.

but that’s the only hint you get. To find out more, add the following lines inside the VirtualHost section of /Library/Server/Web/Config/apache2/sites/0000_127.0.0.1_34580_.conf and restart the Websites service in Server.app:

<Location /server-status>
SetHandler server-status
</Location>

Now, got to http://localhost/server-status and refresh it occasionally while traffic hits your web site. You’ll eventually see dozens of lines like the one below (starting with 52-0 in my case):

Scoreboard Key:
"_" Waiting for Connection, "S" Starting up, "R" Reading Request,
"W" Sending Reply, "K" Keepalive (read), "D" DNS Lookup,
"C" Closing connection, "L" Logging, "G" Gracefully finishing,
"I" Idle cleanup of worker, "." Open slot with no current process
Srv PID Acc M   CPU SS  Req Conn    Child   Slot    Client  VHost   Request

52-0    80825   0/2/2   C   0.45    51  0   0.0 0.02    0.02    ::1

All httpd processes you’re seeing in Activity Monitor are stuck in “Closing connection”, except for those that cause considerable CPU load. If the server were behaving correctly, you wouldn’t have as many processes and those that aren’t currently handling requests would either be “Waiting for Connection” or “Open slot with no current process”.

Let’s fire up a debugger to see what’s causing the processes to get stuck:

$ sudo lldb -p 80825
(lldb) process attach --pid 80825
Process 80825 stopped
* thread #1: tid = 0x3a69d4, 0x00007fff8fe35902 libsystem_kernel.dylib`__wait4 + 10, queue = 'com.apple.main-thread', stop reason = signal SIGSTOP
    frame #0: 0x00007fff8fe35902 libsystem_kernel.dylib`__wait4 + 10
libsystem_kernel.dylib`__wait4:
->  0x7fff8fe35902 <+10>: jae    0x7fff8fe3590c            ; <+20>
    0x7fff8fe35904 <+12>: movq   %rax, %rdi
    0x7fff8fe35907 <+15>: jmp    0x7fff8fe30c78            ; cerror
    0x7fff8fe3590c <+20>: retq   

Executable module set to "/usr/sbin/httpd".
Architecture set to: x86_64-apple-macosx.
(lldb) bt
* thread #1: tid = 0x3a69d4, 0x00007fff8fe35902 libsystem_kernel.dylib`__wait4 + 10, queue = 'com.apple.main-thread', stop reason = signal SIGSTOP
  * frame #0: 0x00007fff8fe35902 libsystem_kernel.dylib`__wait4 + 10
    frame #1: 0x0000000109b3ee95 libapr-1.0.dylib`apr_proc_wait + 70
    frame #2: 0x000000010aa4290c mod_auth_digest_apple.so`cleanup_server_event + 73
    frame #3: 0x0000000109b3627a libapr-1.0.dylib`apr_pool_destroy + 82
    frame #4: 0x0000000109a74ce2 httpd`clean_child_exit + 50
    frame #5: 0x0000000109a74c59 httpd`child_main + 2393
    frame #6: 0x0000000109a73b2e httpd`make_child + 510
    frame #7: 0x0000000109a74181 httpd`perform_idle_server_maintenance + 1265
    frame #8: 0x0000000109a72887 httpd`prefork_run + 2471
    frame #9: 0x0000000109a26328 httpd`ap_run_mpm + 120
    frame #10: 0x0000000109a1185f httpd`main + 4687
    frame #11: 0x00007fff8d7435c9 libdyld.dylib`start + 1
(lldb) continue
Process 82070 resuming
(lldb) exit

Ah, so mod_auth_digest_apple.so is the culprit. So in all *.conf files in /Library/Server/Web/Config/apache2 and its subdirectories, replace every occurrence of AuthType Digest with AuthType Basic and comment out all lines containing mod_auth_digest_apple.so by prepending a # character. Restart the Websites service in Server.app. Watch http://localhost/server-status: everything should be fine now and no more connections stuck on “Closing connection”!

Printer Sharing randomly stops working due to memorystatus_thread killing cupsd

Printers shared in OS X 10.9, 10.10 or 10.11 randomly stop being accessible from remote computers. The system log reports that the cupsd process was terminated by memorystatus_thread:

Oct 26 07:14:33 robert kernel[0]: memorystatus_thread: idle exiting pid 4901 [cupsd]

This can also manually be triggered by executing sudo launchctl stop org.cups.cupsd.plist and manually and temporarily fixed by executing sudo launchctl start org.cups.cupsd.plist.

As a workaround, you can edit the CUPS LaunchDaemon to restart whenever a remote computer attempts to connect. On 10.9 or 10.10:

sudo /usr/libexec/PlistBuddy -c "Delete Sockets:Listeners:0:SockNodeName" /System/Library/LaunchDaemons/org.cups.cupsd.plist
sudo /usr/libexec/PlistBuddy -c "Delete Sockets:Listeners:1:SockNodeName" /System/Library/LaunchDaemons/org.cups.cupsd.plist
sudo launchctl unload /System/Library/LaunchDaemons/org.cups.cupsd.plist
sudo launchctl load /System/Library/LaunchDaemons/org.cups.cupsd.plist

On 10.11, first disable System Integrity Protection in Recovery mode, then run

sudo /usr/libexec/PlistBuddy -c "Add Sockets:Listeners:1 Dict" /System/Library/LaunchDaemons/org.cups.cupsd.plist/org.cups.cupsd.plist
sudo /usr/libexec/PlistBuddy -c "Add Sockets:Listeners:1:SockServiceName String" /System/Library/LaunchDaemons/org.cups.cupsd.plist/org.cups.cupsd.plist
sudo /usr/libexec/PlistBuddy -c "Set Sockets:Listeners:1:SockServiceName ipp "/System/Library/LaunchDaemons/org.cups.cupsd.plist/org.cups.cupsd.plist
sudo launchctl unload /System/Library/LaunchDaemons/org.cups.cupsd.plist
sudo launchctl load /System/Library/LaunchDaemons/org.cups.cupsd.plist