Tag Archives: fc

Wiring Fibre Channel for Arbitrated Loop

We have a small Fibre Channel SAN with three servers, a switch and a dual-controller RAID enclosure. With only a single switch, we obviously couldn’t connect all servers redundantly to the RAID system. That meant, for example, that firmware updates to it could only be applied after shutting down the servers. Buying a second switch was hard to justify for this simple setup, so we decided to hook the switch up to the first RAID controller and wire a loop off the second RAID controller. Each server would have one port connected to the switch and another one to the loop.

Back in the old days, Fibre Channel hubs existed for exactly this purpose, but nowadays you simply can’t get them anymore. However, in a redundant setup, you don’t need a hub, you can simply run cables appropriately, i.e. in a daisy-chain fashion. The only downside of not having a hub, the loop going down if one server goes down, is irrelevant here because you have a second path via the switch. For technical details on the loop topology, you can have a look at documentation available from EMC.

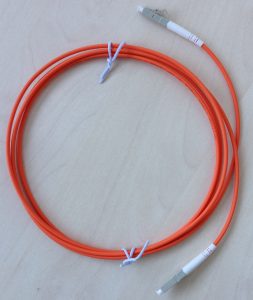
To wire your servers and RAID controllers in a fashion resembling a hub (only without the automatic bypass if a server goes down), you need simplex patch cables. These consist of a single fibre (instead of two, like you are used to) and have a connector that looks like half of a regular LC connector. You can get them in the same qualities as regular (duplex) patch cables and in single- and multi-mode as needed. They look like this:

These cables are somewhat exotic, so your usual cable dealer might not have them, but they exist and are available from specialized fiber cable dealers. As you are wiring in a daisy-chain fashion, you need one simplex cable per node you want to connect.

Once you have the necessary cables, you wire everything by connecting a cable from the output side of the FC port on the first device and connecting it to the input side of the FC port on the second device. The second device’s output side connects to the third device’s input side and so on, until you have made a full loop by connecting the last device’s output side to the first device’s input side, like this:

How can you tell the output side from the input side? Some transceivers have little arrows or have labels “TX” (output) and “RX” (input). If yours don’t, you can recognize the output side by the red laser light coming from it. To protect your eyes, never look directly into the laser light. Never connect two output sides together, otherwise you may damage the laser diodes in both of them. Therefore, be careful and always double-check.

That’s it, you’re done. All servers on the loop should immediately see the LUNs exported to the by the RAID controller.

In my setup however, further troubleshooting was required. The loop simply did not come up. As it turns out, someone had set the ports on one FC HBA to point-to-point-only and 2 Gbit/s mode. After switching both these settings to their default automatic mode, the loop went up and data started flowing. My HBAs are QLogic QLE2462 (4 Gbit/s generation) and QLE2562 (8 Gbit/s generation), and they automatically negotiated the fastest common speed they could handle, which is 4 Gbit/s. Configuring these parameters on the HBA usually requires hitting a key at the HBA’s pre-boot screen to enter the configuration menu and doing it there, or via vendor-specific software. I didn’t have access to the pre-boot configuration menu and was running VMware ESXi 6.0 on the servers. The QConvergeConsole for my QLogic adapters luckily is also available for VMware. It is not as easy to install as on Windows or Linux, unfortunately. You first install a CIM provider via the command line on the ESXi host, reboot the host and then install a plugin into VMware vCenter server.
HP StorageWorks P2000 G3

Hardware

To replace a 2006 Xserve and a 7TB Xserve RAID at the university, we recently got a Mac mini server, an ATTO ThunderLink FC 1082 Thunderbolt to 8Gbit Fibre Channel adapter, and a HP StorageWorks P2000 G3 MSA FC Dual Controller LFF (specifically, model number AP845B).

The P2000 is not explicitly on ATTO’s compatibility matrix, but when I asked their tech support about it, they said it was compatible and provided me with a pre-release version of their Multi Path Director driver for the Thunderlink which is officially compatible.

Evidently, the P2000 G3 is an OEM’d version of the Dot Hill AssuredSAN 3000 Series (specifically, the 3730), which is on ATTO’s compatibility list, so I assume the standard driver would work just as well. Update 2018: Since Dot Hill has in the meantime been sold, their support page has moved to Seagate.

We chose the Thunderlink/P2000 combo over a Promise solution because it was cheaper, fully 8Gbit capable and had four host ports. Also, I know that HP’s tech support is good and they’ll have spare parts around for many years. Plus, the P2000 is VMWare ESXi certified.

The obvious downside to the P2000 is that the disk bays do not have standard SAS connectors but require an interposer board to convert to a SCA-2/SCA-40 connector. The included slot blinds are in fact blinds and cannot be used to mount an actual drive. You can get empty caddies/trays for the P2000 on eBay or from some used SAN equipment dealer for around 100 euros, or buy your hard drives from HP for a premium of around 100-150 euros over the plain drives. (The interposer board itself appears to get sold under the model numbers 371595-001 or 60-272-02 on eBay, but I haven’t found a model number for the caddy frame yet.) If you’re buying plain drives, you can check HP’s hard drive model matrix to see what model of drive an HP part number corresponds to. For example, the 3TB SAS drive QK703A is a Seagate Constellation ES.2 ST33000650SS and the 2TB SAS drive AW555A, which we ordered, is a Seagate Constellation ES ST2000NM0001).

Firmware

I have verified that the firmwares are interchangeable between the AssuredSAN 3000 and the P2000 G3: I downloaded and extracted the TS250R023 from both Dot Hill and HP and both contain a file named TS250R023.bin with an MD5 sum of 7b267cc4178aef53f7d3487e356f8435. I assume that’s the file that can be uploaded through the web interface.

To extract the HP firmware, download the Linux updater (e.g. CP020030.scexe) and use a hex editor to find the offset of the line break after the end of the shell script at the beginning, then use dd to skip the plain text: dd if=CP020030.scexe bs=1 skip=8602 of=scexe_tmp24664.tar.gz. Now you can tar zxf scexe_tmp24664.tar.gz and pull out the TS250R023.bin.

To extract the TS250R023.bin, simply tar xf TS250R023.bin. If you want to poke around the root filesystem of the Management Controller, unsquashfs mc/components/app.squashfs. You may need to compile squashfs-tools yourself to get LZMA support (edit squashfs-tools/Makefile, set LZMA_SUPPORT=1 or LZMA_XZ_SUPPORT=1 and apt-get install liblzma-dev zlib1g-dev liblz-dev).

Setup and configuration

After unpacking the device, I first updated the firmware to the most recent version available from HP. Before you do that (I used the Windows utility), make sure to set static IP addresses or DHCP static mappings (otherwise the update might fail due to changing addresses). After you set the password for the manage user, you’ll need to SSH into the device to change the password on a hidden admin account about which HP issued a security advisory back in December 2010 (but still hasn’t fixed it in the firmware).

I created a RAID5 out of 4x 2TB drives and dedicated a fifth one as a global spare. In the global disk settings, I enabled spindown so the spare would not be running unnecessarily. The RAID initialization took close to two days, but as that runs in the background, you can already start using it.

Then I created a couple volumes (setting the default mapping to not mapped) and mapped two of them to our Mac mini server (on the Thunderlink) and a third to our two VMWare ESXi servers (on Qlogic QLE2460 HBAs). This was much easier to do than on our old Xserve RAID and I love that I can start out with smaller volumes (sized appropriately that they’ll last for the next year) and expand them later on. The P2000 does not do thin provisioning, but you can’t really expect that at this price point.