Category Archives: Windows

Using a BIND DNS server in an Active Directory Environment

Years ago, I posted a script that allowed ISC DHCPd to update a Microsoft DNS server with dynamic records for DHCP clients. I haven’t used that method in a long time and there is a much simpler method: use ISC DHCPd together with the BIND DNS server like everybody else does, and only delegate the _mscds and _sites zones from the BIND server to the Microsoft DNS servers:

_msdcs.example.com. 86400 IN NS dc01.example.com.
_msdcs.example.com. 86400 IN NS dc02.example.com.
_sites.example.com. 86400 IN NS dc01.example.com.
_sites.example.com. 86400 IN NS dc02.example.com.

Then on all your machines, use the BIND server as DNS server (typically set via DHCP option 23). For Windows Domain matters, only records below _msdcs and _sites are ever looked up.

I believe you should even be able to point your domain controllers to the BIND DNS server — they should be able to follow the NS record so that whenever they try to update their own records, they do so on the Microsoft DNS server. As it turns out, the RFC 2136 DNS UPDATE method is used when domain controllers try to register their own records, so you’ll see error messages in your logs if you point your domain controllers to the BIND DNS server (on a Microsoft DC, these would refer to NETLOGON and dynamic DNS registrations, while on a Samba DC they would be about samba_dnsupdate). If you are running Samba 4.5 or higher, you should ensure that samba_dnsupdate is called with the –use-samba-tool flag, which can probably be done by setting the option below in your /etc/samba/smb.conf. If you are running an older Samba version or any Windows Server version, you need to resort to using your domain controllers’ IP addresses as DNS servers on on all domain controllers (Samba: put them into /etc/resolv.conf, Windows: set them in the network interface properties).

dns update command = /usr/sbin/samba_dnsupdate --use-samba-tool

For compatibility with Unix clients (including Mac OS X), you’ll want to add a couple of CNAME records for the SRV records:

_ldap._tcp.example.com. 86400 IN CNAME _ldap._tcp.dc._msdcs.example.com.
_gc._tcp.example.com. 86400 IN CNAME _ldap._tcp.gc._msdcs.example.com.
_kerberos._tcp.example.com. 86400 IN CNAME _kerberos._tcp.dc._msdcs.example.com.
_kerberos._udp.example.com. 86400 IN CNAME _kerberos._tcp.dc._msdcs.example.com.
_kpasswd._tcp.example.com. 3600 IN SRV 0 100 464 dc01.example.com
_kpasswd._tcp.example.com. 3600 IN SRV 0 100 464 dc02.example.com
_kpasswd._udp.example.com. 3600 IN SRV 0 100 464 dc01.example.com
_kpasswd._udp.example.com. 3600 IN SRV 0 100 464 dc02.example.com

The _kpasswd records unfortunately can’t be CNAMEs because they don’t exist in the _msdcs branch, so you manually need to keep them up-to-date when you add and remove domain controllers.

Boot a Windows install disc from the network using iPXE and wimboot

A while ago, I showed how you can use a Linux PXE server along with a tool called Serva to PXE boot a Windows installer DVD. By now, there is a much nicer solution available that doesn’t require any Windows tools: iPXE with wimboot. So go ahead and replace your PXELinux setup with iPXE first. Then copy the contents of a Windows installer DVD to your TFTP server and make sure that the folder is also shared read-only via SMB. Now copy the wimboot binary to your TFTP server and add something like the following to your iPXE config file:
set serverip 192.168.200.29
set tftpboot tftp://${serverip}/
set tftpbootpath /mnt/Daten/tftpboot

:menu
menu iPXE boot menu
item --key w win10de Windows 10 16.07 x64 German
choose os
goto ${os}

:win10de
echo Booting Windows Installer...
set root-path ${tftpboot}/ipxe
kernel ${root-path}/wimboot gui
set root-path ${tftpboot}/Win10_1607_German_x64
initrd ${root-path}/boot/bcd BCD
initrd ${root-path}/boot/boot.sdi boot.sdi
initrd ${root-path}/sources/boot.wim boot.wim
initrd ${root-path}/boot/fonts/segmono_boot.ttf segmono_boot.ttf
initrd ${root-path}/boot/fonts/segoe_slboot.ttf segoe_slboot.ttf
initrd ${root-path}/boot/fonts/segoen_slboot.ttf segoen_slboot.ttf
initrd ${root-path}/boot/fonts/wgl4_boot.ttf wgl4_boot.ttf
boot || goto failed

That’s it. When you boot this boot menu entry, you’ll be presented with the Windows installer, but if you click through it, it will at some point ask you for a driver because it can’t find its installer packages. So before you click through, hit Shift-F10 and execute the following commands to set up the network, mount the SMB share and re-execute the installer:
wpeinit
net use s: \\192.168.200.29\tftpboot\Win10_1607_German_x64 bar /user:foo
s:\sources\setup.exe

If your SMB server is running Samba, the user you specify (foo) must not exist on the server so you force it to use anonymous authentication. With a Windows server, things might be different.

That should give you a working installer that will get your Windows running within a few minutes because Gigabit Ethernet has a much bigger bandwidth than a spinning DVD or a cheap USB flash drive.

Serva did have one advantage, however: when you set it up, you could inject network drivers into the boot image. With Windows 10, luckily, that has become a non-issue: Microsoft releases a new installer ISO for it about once a year, which you can directly download and which should contain all drivers for the latest hardware available when it was released.

Wiring Fibre Channel for Arbitrated Loop

We have a small Fibre Channel SAN with three servers, a switch and a dual-controller RAID enclosure. With only a single switch, we obviously couldn’t connect all servers redundantly to the RAID system. That meant, for example, that firmware updates to it could only be applied after shutting down the servers. Buying a second switch was hard to justify for this simple setup, so we decided to hook the switch up to the first RAID controller and wire a loop off the second RAID controller. Each server would have one port connected to the switch and another one to the loop.

Back in the old days, Fibre Channel hubs existed for exactly this purpose, but nowadays you simply can’t get them anymore. However, in a redundant setup, you don’t need a hub, you can simply run cables appropriately, i.e. in a daisy-chain fashion. The only downside of not having a hub, the loop going down if one server goes down, is irrelevant here because you have a second path via the switch. For technical details on the loop topology, you can have a look at documentation available from EMC.

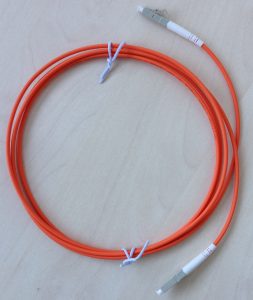
To wire your servers and RAID controllers in a fashion resembling a hub (only without the automatic bypass if a server goes down), you need simplex patch cables. These consist of a single fibre (instead of two, like you are used to) and have a connector that looks like half of a regular LC connector. You can get them in the same qualities as regular (duplex) patch cables and in single- and multi-mode as needed. They look like this:

These cables are somewhat exotic, so your usual cable dealer might not have them, but they exist and are available from specialized fiber cable dealers. As you are wiring in a daisy-chain fashion, you need one simplex cable per node you want to connect.

Once you have the necessary cables, you wire everything by connecting a cable from the output side of the FC port on the first device and connecting it to the input side of the FC port on the second device. The second device’s output side connects to the third device’s input side and so on, until you have made a full loop by connecting the last device’s output side to the first device’s input side, like this:

How can you tell the output side from the input side? Some transceivers have little arrows or have labels “TX” (output) and “RX” (input). If yours don’t, you can recognize the output side by the red laser light coming from it. To protect your eyes, never look directly into the laser light. Never connect two output sides together, otherwise you may damage the laser diodes in both of them. Therefore, be careful and always double-check.

That’s it, you’re done. All servers on the loop should immediately see the LUNs exported to the by the RAID controller.

In my setup however, further troubleshooting was required. The loop simply did not come up. As it turns out, someone had set the ports on one FC HBA to point-to-point-only and 2 Gbit/s mode. After switching both these settings to their default automatic mode, the loop went up and data started flowing. My HBAs are QLogic QLE2462 (4 Gbit/s generation) and QLE2562 (8 Gbit/s generation), and they automatically negotiated the fastest common speed they could handle, which is 4 Gbit/s. Configuring these parameters on the HBA usually requires hitting a key at the HBA’s pre-boot screen to enter the configuration menu and doing it there, or via vendor-specific software. I didn’t have access to the pre-boot configuration menu and was running VMware ESXi 6.0 on the servers. The QConvergeConsole for my QLogic adapters luckily is also available for VMware. It is not as easy to install as on Windows or Linux, unfortunately. You first install a CIM provider via the command line on the ESXi host, reboot the host and then install a plugin into VMware vCenter server.

PHP 5: ldap_search never returns when searching Active Directory

I recently moved a PHP web application from a server running PHP 5.3 on Mac OS X 10.6 to a newer one with PHP 5.4 on Mac OS X 10.9. This caused the following code sample, run against an Active Directory server, to hang at the ldap_search() call:

$conn = ldap_connect('ldaps://' . $LDAPSERVER);
ldap_set_option($conn, LDAP_OPT_PROTOCOL_VERSION, 3);
$bind = @ldap_bind($conn, $LDAPUSER, $LDAPPW);
$result = ldap_search($conn, $LDAPSEARCHBASE, '(&(samaccountname=' . $searchuser . '))');
$info = ldap_get_entries($conn, $result);
ldap_close($conn);

Wiresharking the connection between web server and LDAP server (after replacing ldaps:// with ldap://) showed:

bindRequest(1) "$LDAPUSER" simplebindResponse(1) success searchRequest82) "$LDAPSEARCHBASE" wholeSubtree
searchResEntry(2) "CN=$searchuser,...,$LDAPSEARCHBASE" | searchResRef(2) | searchResDone(2) success [1 result]
bindRequest(4) "" simple
bindResponse(4) success
searchRequest(3) "DC=DomainDnsZones,$LDAPSEARCHBASE" wholeSubtree
searchResDone(3) operationsError (000004DC: LdapErr: DSID-0C0906E8, comment: In order to perform this operation a successful bind must be complete on the connection., data0,

So it’s binding, receiving a success response, searching and then receiving a response and a referrer to DC=DomainDnsZones,$LDAPSEARCHBASE. Next, it opens a new TCP connection and follows the referrer, but does an anonymous bind.

The solution is simple: just add

ldap_set_option($conn, LDAP_OPT_REFERRALS, FALSE);

after line 2. If for some reason you actually need to follow the referrer, have a look at ldap_set_rebind_proc, which lets you specify a callback which then does the authentication upon rebind.

Update August 2015: Same goes when using Net_LDAP3, which is used e.g. by Roundcube’s LDAP integration. Here you need to add the following:

$config['ldap_public']['public'] = array(
[...]
 'referrals' => false,
);

Integrating BIND with AD-integrated Microsoft DNS

I recently set up BIND9 to run secondary zones for an ActiveDirectory-integrated DNS server (the reason being that I hated effectively losing internet access when I rebooted my W2k8R2 server). While that was really easy (add the Linux server to the nameservers tab in DNS Admin, allow zone transfers and notifications, add slave zones in the named.conf), I thought that it shouldn’t be too difficult to also automatically replicate AD-integrated Conditional Forwarders.

While they are easily found in the DC=DomainDnsZones and DC=ForestDnsZones branch inside the AD, it turns out that the server information is stored in dnsproperty attributes containing binary data. However, Microsoft actually provides a specification for their DNS data structures, which is certainly very commendable. But as it turns out, it appears to have been written by someone who had no clue about Endianness or how many bits are in a byte (*).
The essence is: everything is Big Endian, except for IP addresses (the spec claims they are Network Byte Order, but in reality they are Little Endian), and every occurence of “1 byte” in section 2.3.1.1 dnsProperty should be replaced with “4 byte”.

So after taking about two hours for something that I expected would only take a couple minutes to hack together, I ended up with 400 lines of code that generate a file you can include in your named.conf that will look something like this:
zone "google.com" {
type forward;
forward first;
forwarders { 74.82.42.42; 2001:470:20:0:0:0:0:2; };
};

zone “youtube.com” {
type forward;
forward first;
forwarders { 74.82.42.42; 2001:470:20:0:0:0:0:2; };
};
(For those curious, this sample configuration would point google.com and youtube.com at Hurricane Electric’s DNS server so that you get AAAA records, a.k.a. Google over IPv6)

After this worked, I decided to also pull my slave zone definitions through the same mechanism. It only took me a minute to do that.
zone "example.com" {
type slave;
file "slave_example.com";
masters { 10.0.0.1; };
allow-notify { 10.0.0.1; };
};

So here we are: BIND9 as a fully-blown sync partner for AD-integrated DNS zones. To add a zone or conditional forwarder to BIND, add it to AD, set it to replicate to all DNS/domain controllers in this domain or forest, add the BIND server to the nameservers tab and allow zone transfers and notifications, and wait for the cron job to kick in.

I ended up having to write this script in PHP because Python’s LDAP module appears to have a broken SASL implementation, and you need SASL to use Kerberos for an LDAP connection.

The PHP script takes two parameters (1. the AD server’s address or the AD DNS domain name; 2. the AD base DN) and requires a valid Kerberos ticket.
The shell script (which you will most likely want to run from a cron job), which shares much of its code with my script from ISC DHCPd: Dynamic DNS updates against secure Microsoft DNS, needs to be configured with your realm, domain, base DN, user name (principal) and path to a keytab for that user (instruction on how to generate the keytab using ktutil are in the script’s comments).

(*) After doing all this, I figured that people from projects like Samba that write open source software to re-implement or interface with Microsoft products are doing an absolutely amazing job. They most likely aren’t getting any better specs than the one I found on MS DNS (if they get specs at all), and yet still somehow create almost perfect software that is a lot more complex than the simple stuff I did here.

UPDATE 2011-10-30: Apparently, AD refuses all requests from Linux clients that come in via IPv6. To force IPv4, line 7 of the PHP script needs to be changed to $conn = ldap_connect(gethostbyname($adserver), 389);, which is also fixed in the downloadable script.

Xen 4.0 and Citrix WHQL PV drivers for Windows

Xen 4.0 is supposed to be able to use Citrix’s WHQL certified Windows paravirtualization drivers. Their advantage over the GPLPV drivers is that they are code-signed, meaning they run on 64-bit Windows without disabling some of Windows’ security features.

UPDATE 2011-10-17: Signed GPLPV drivers are now available. I have not yet tested them, but I assume the fix below is no longer necessary.

While the Citrix drivers included in XenServer 5.5 work (after making a single registry tweak), the more recent ones included in e.g. Xen Cloud Platform 1.0 do not work right away:

If you install the XCP drivers, make that registry tweak and reboot the DomU, you’ll notice messages like XENUTIL: WARNING: CloseFrontend: timed out in XenbusWaitForBackendStateChange: /local/domain/0/backend/console/[id]/0 in state INITIALISING; retry. in your /var/log/xen/qemu-dm-*.log and Windows just gets stuck during boot and keeps spinning forever. To get it back to work, you’ll need to
xenstore-rm /local/domain/0/backend/console/[id]
xenstore-rm /local/domain/0/backend/vfb/[id]

after starting the VM (thanks to Keith Coleman‘s mailing list post!).

To automatically run these commands upon DomU start, create a script named /usr/lib/xen/bin/qemu-dm-citrixpv with the following contents
#!/bin/sh

xenstore-rm /local/domain/0/backend/console/$2
xenstore-rm /local/domain/0/backend/vfb/$2

sh -c "sleep 10; xenstore-rm /local/domain/0/backend/console/$2; xenstore-rm /local/domain/0/backend/vfb/$2" &

exec /usr/lib/xen/bin/qemu-dm $*
and chmod +x it.

Then, edit your DomU config file and modify the device_model line and point it to your new script:
device_model = '/usr/lib/xen/bin/qemu-dm-citrixpv'

Now your Windows Server 2008 R2 x64 HVM-DomU is all set!

ISC DHCPd: Dynamic DNS updates against secure Microsoft DNS

UPDATE 2016: I have posted a much simpler way that works with DNS delegations so that you can have your domain controllers maintain the records necessary for their discovery in Microsoft DNS, while all your clients are in a BIND DNS server which can be easily interfaced with ISC DHCPd.

ISC DHCPd is capable of Dynamic DNS updates against servers like BIND that support shared-key authentication or any other server that supports unauthenticated updates (such as BIND or Microsoft DNS with secure updates disabled).

So, what to do if you want to run ISC DHCPd on your Windows network, which is obviously running Microsoft’s DNS server? BIND’s nsupdate tool supports Microsoft’s Kerberos authentication scheme when using the -g flag (the -o flag is only necessary for Windows 2000 Server, but not anymore for Windows Server 2008 R2), and DHCPd supports on commit/release/expiry blocks that let you run scripts upon these events. So here is my script:

#!/bin/bash

## CONFIGURATION ##

realm=EXAMPLE.COM
principal=dhcpduser@$realm
keytab=/root/dhcpduser.keytab
domain=example.com
ns=example-domain01.example.com

export KRB5CCNAME="/tmp/dhcp-dyndns.cc"

keytab can be generated using

$ ktutil

ktutil: addent -password -p dhcpduser@EXAMPLE.COM -k 1 -e aes256-cts-hmac-sha1-96

Password for dhcpduser@EXAMPLE.COM:

ktutil: wkt dhcpduser.keytab

ktutil: quit

VARIABLES

action=$1
ip=$2
name=$(echo $3 | awk -F '.' '{print $1}')
mac=$4

usage()
{
echo "USAGE:"
echo $0 add 192.0.2.123 testhost 00:11:22:33:44:55
echo $0 add 192.168.0.127 "" 00:11:22:44:33:55
echo $0 delete 192.0.2.123 testhost 00:11:22:33:44:55
echo $0 delete 192.0.2.127 "" 00:11:22:44:33:55
}

if [ "$ip" = "" ]; then
echo "IP missing"
usage
exit 101
fi
if [ "$name" = "" ]; then
#echo "name missing"
#usage
#exit 102
name=$(echo $ip | awk -F '.' '{print "dhcp-"$1"-"$2"-"$3"-"$4}')

if [ "$action" = "delete" ]; then
name=$(host $ip | awk '{print $5}' | awk -F '.' '{print $1}')

echo $name | grep NXDOMAIN 2>$1 >/dev/null
if [ "$?" = "0" ]; then
exit 0;
fi
fi
fi

ptr=$(echo $ip | awk -F '.' '{print $4"."$3"."$2"."$1".in-addr.arpa"}')

KERBEROS

#export LD_LIBRARY_PATH=/usr/local/krb5-1.7/lib
#export PATH=/usr/local/krb5-1.7/bin:$PATH

klist 2>&1 | grep $realm | grep '/' > /dev/null
if [ "$?" = 1 ]; then
expiration=0
else
expiration=$(klist | grep $realm | grep '/' | awk -F ' ' '{system ("date -d \""$2"\" +%s")}' | sort | head -n 1)
fi

now=$(date +%s)
if [ "$now" -ge "$expiration" ]; then
echo "Getting new ticket, old one expired $expiration, now is $now"
kinit -F -k -t $keytab $principal
fi

NSUPDATE

case "$action" in
add)
echo "Setting $name.$domain to $ip on $ns"

oldname=$(host $ip $ns | grep "domain name pointer" | awk '{print $5}' | awk -F '.' '{print $1}')
if [ "$oldname" = "" ]; then
oldname=$name
elif [ "$oldname" = "$name" ]; then
oldname=$name
else
echo "Also deleting $oldname A record"
fi

nsupdate -g <
server $ns
realm $realm
update delete $oldname.$domain 3600 A
update delete $name.$domain 3600 A
update add $name.$domain 3600 A $ip
send
UPDATE
result1=$?
nsupdate -g <
server $ns
realm $realm
update delete $ptr 3600 PTR
update add $ptr 3600 PTR $name.$domain
send
UPDATE
result2=$?
;;

delete)
echo "Deleting $name.$domain to $ip on $ns"
nsupdate -g <
server $ns
realm $realm
update delete $name.$domain 3600 A
send
UPDATE
result1=$?
nsupdate -g <
server $ns
realm $realm
update delete $ptr 3600 PTR
send
UPDATE
result2=$?
;;
*)
echo "Invalid action specified"
exit 103
;;
esac

result=$result1$result2
if [ "$result" != "00" ]; then
echo "DHCP-DNS Update failed: $result"
logger "DHCP-DNS Update failed: $result"
fi

exit $result

and here is the relevant part of my dhcpd.conf:

on commit {
set noname = concat("dhcp-", binary-to-ascii(10, 8, "-", leased-address));
set ClientIP = binary-to-ascii(10, 8, ".", leased-address);
set ClientMac = binary-to-ascii(16, 8, ":", substring(hardware, 1, 6));
set ClientName = pick-first-value(option host-name, host-decl-name, config-option host-name, noname);
log(concat("Commit: IP: ", ClientIP, " Mac: ", ClientMac, " Name: ", ClientName));

execute("/root/dhcp-dyndns.sh", "add", ClientIP, ClientName, ClientMac);
}
on release {
set ClientIP = binary-to-ascii(10, 8, ".", leased-address);
set ClientMac = binary-to-ascii(16, 8, ":", substring(hardware, 1, 6));
log(concat("Release: IP: ", ClientIP, " Mac: ", ClientMac));

cannot get a ClientName here, for some reason that always fails

execute("/root/dhcp-dyndns.sh", "delete", ClientIP, "", ClientMac);
}
on expiry {
set ClientIP = binary-to-ascii(10, 8, ".", leased-address);

cannot get a ClientMac here, apparently this only works when actually receiving a packet

log(concat("Expired: IP: ", ClientIP));

cannot get a ClientName here, for some reason that always fails

execute("/root/dhcp-dyndns.sh", "delete", ClientIP, "", "0");
}

Figuring this all out took me several afternoons because Kerberos 5 1.8 has a bug where forwardable tickets (which is the default on Debian) are incompatible with nsupdate. Manually compiling 1.7 or getting 1.9 from the experimental Debian branch helps, as does adding the -F flag to kinit (which I did in the script above) to make the ticket non-forwardable.
I filed a bug with Debian (#611906) and Sam Hartman (thanks!) helped me track it down.

EDIT 2011-11-17:
I recently ran into the issue that if the AD server could not be reached, dhcpd would stall (and not respond to DHCP requests during that time) until nsupdate reached its timeout. The fix is simple: rename dhcp-dyndns.sh to dhcp-dyndns-real.sh and create dhcp-dyndns.sh with the following contents to fork off the real script into the background:
#!/bin/bash

$(dirname $0)/dhcp-dyndns.sh $@ 2>&1 | logger &

Also, I updated the on commit section in the dhcpd.conf excerpt above to compose a fallback name from the IP address if the client provides no hostname. This fixes the issue that nsupdate tries to register a record based on the name and fails.
Extending Active Directory for Mac OS X clients

After I wrote about building your own OpenDirectory server on Linux a while back, I decided to do the same thing on Windows Server 2008 R2. The process of extending the AD schema to include Apple classes and attributes is documented by Apple (this is the Leopard version of the document – if you don’t plan on having exclusively Snow Leopard clients, you can follow the newer version of the document that skips a couple of things that Snow Leopard no longer needs).

But since schema extensions are generally frowned upon in the Windows world because they’re irreversible (why the heck, Microsoft…?), I initially tried a dual-directory (golden triangle, magic triangle) type approach where I’d be augmenting my AD with Apple records coming from an AD LDS (Active Directory Lightweight Directory Services, previously called ADAM, Active Directory User Mode, which is basically a plain LDAP server from Microsoft). While this may sound like a great idea, I just couldn’t get it to work. After dozens of manual schema extensions to AD LDS (Microsoft doesn’t include many standard LDAP attributes, so I had to dig through the dependencies of apple.schema and even tried importing a complete OD schema), I gave up because I could not get Workgroup Manager to authenticate against it to allow me to make changes.

So the next thing to do was follow Apple’s AD schema extension guide (linked above) and do what everybody else did. This was rather straight-forward (managed preferences for users, groups and computers worked right away), but when I tried to create a computer list (which is not possible using Snow Leopard’s Server Admin Tools, but requires Tiger’s (which throw loads of errors on Snow Leopard but still get the job done) since Leopard introduced computer groups which however are not supported by the AD plugin), it just said I didn’t have permission to do that. After enabling DirectoryService debug logging (killall -USR1 DirectoryService && killall -USR2 DirectoryService), I traced it down to Active Directory: Add record CN=Untitled_1,CN=Mac OS X,DC=xxx,DC=zz with FAILED – LDAP Error 19 in /Library/Logs/DirectoryService/*. Apparently, that’s caused by some versions of ADSchemaAnalyzer setting objectClassCategory to 0 instead of 1 on all exported classes. Too bad AD schema extensions are irreversible and that’s one of the attributes you can’t change later on… 🙁 Well, with AD Schema Management MMC snap-in, I was able to rename the botched apple-computer-list class, defunct it and add a new one using ldifde. With some really wild hacking in the AD Schema using ADSI Editor, I was then able to  eventually get OS X to no longer look at the renamed attribute, but instead at the new one. To see whether you have been successful, killall DirectoryService, wait a few seconds and grep -H computer-list /Library/Preferences/DirectoryService/ActiveDirectory* will show a line indicating which class in the schema it’s using.

Once you’re there, everything should work as expected. If you don’t want to use Tiger’s Workgroup Manager to create old-style computer lists, you can do that in ADSI Editor and create apple-computer-list objects in the CN=Mac OS X branch by hand.

So, attached is the schema ldif that’s exactly the way it should be. I really wonder why Apple doesn’t provide it themselves – it’s going to turn out exactly like that every time you follow their guide on any Windows server… Apple Schema for Active Directory

I guess that the overall conclusion of this should be that AD schema extensions in general and specifically Mac OS X managed clients in AD environments are a nasty hack. I suppose the dual directory/magic triangle/golden triangle approach with a Microsoft AD and an Apple OD would work, but it requires maintaining two separate directories, which may not be that great in a larger environment either.

If Apple discontinues Mac OS X Server at some point in the near future (which the demise of the Xserve and the lack of announcements regarding Mac OS X 10.7 Server alongside Mac OS X Lion suggest), this is definitely something they need to improve. There are some third-party solutions that store MCX settings outside of AD (similar to Windows GPOs, which are stored on the SYSVOL share) such Thursby ADmitMac – however that’s a rather expensive solution (a dozen client licenses costs about as much as two Mac mini servers) and might break after OS updates (though from what I’ve heard, they’re rather quick at providing updates). If Apple does discontinue Mac OS X Server, they should definitely improve Lion’s AD integration to replicate ADmitMac’s features.