Author Archives: Michael Kuron

Root disk spindown on Debian 9

I recently installed Debian 9 on a Seagate PersonalCloud. Because the device will only get backed up to once every day, I want its disk to be spun down when it’s not needed. Even on a minimal install, you’ll find quite a few background services that access the root disk every few minutes. Here is what I had to do to keep my disk spun down.

hdparm

First, install hdparm (apt-get install hdparm) and configure /etc/hdparm.conf to spin down your disks after 10 minutes:

#quiet
spindown_time = 120

Since hdparm isn’t available in the initrd, when the rule /lib/udev/rules.d/85-hdparm.rules fires, you need to add /etc/systemd/system/hdparm-sda.service:

[Unit]
Description=hdparm sda
ConditionPathExists=/lib/udev/hdparm

[Service]
Type=forking
Environment=DEVNAME=/dev/sda
ExecStart=/lib/udev/hdparm
TimeoutSec=0
StandardOutput=tty
RemainAfterExit=yes

[Install]
WantedBy=multi-user.target

Now systemctl daemon-reload && systemctl enable hdparm-sda && systemctl start hdparm-sda.

cron.hourly

When you look into /var/log/syslog, you see messages like

CRON[393]: (root) CMD (   cd / && run-parts --report /etc/cron.hourly)

Of course, we can’t have these messages written to a log if we want the disk to remain spun down, so edit /etc/crontab and comment out the hourly job. As long as /etc/cron.hourly is empty, this will not do any harm. If you have any hourly jobs, you might want to move them to daily jobs.

systemctl timers

Systemctl has its own cron-like timer mechanism. You can view active timers with systemctl list-timers --all and disable ones you don’t need, especially ones that run more than once a day. systemctl disable snapper-timeline.timer && systemctl stop snapper-timeline.timer.

smartd

If you have smartmontools installed (apt-get install smartmontools), you’ll see lines like the following appear in the syslog when the disk is spun down:

smartd[294]: Device: /dev/sda [SAT], is in STANDBY mode, suspending checks

Writing these messages causes the disk to spin up, so we need to disable smartd: systemctl stop smartd && systemctl disable smartd. To keep monitoring our disks, put the following into /etc/cron.daily/smart-check and then chmod +x /etc/cron.daily/smart-check:

#!/bin/bash

/usr/sbin/smartctl -q errorsonly -A /dev/sda

systemd-tmpfiles-clean

When you run

inotifywait -m -r -e access -e modify -e create -e delete --timefmt '%c' --format '%T PATH:%w%f EVENTS:%,e' --exclude '/(dev/pts|proc|sys|run)' /

to see what is going on on your disk, you’ll see that your temporary directories are being cleaned every couple of minutes. We can reduce that to bi-weekly by running systemctl edit systemd-tmpfiles-clean.timer and pasting

[Timer]
OnBootSec=5min
OnUnitActiveSec=14d

postfix

If you have Postfix installed, inotify will also show you that it periodically checks its queue directories. So uninstall postfix (apt-get remove postfix) and configure a forwarding MTA that does not run as a daemon.

systemd-timesync

This last one was tricky to discover because it doesn’t appear in the logs and inotify doesn’t see it. You can logging of every disk access to the kernel log to see even more, but you need to disable syslog, otherwise you’ll get a self-amplifying write cascade.

systemctl stop syslog.socket
systemctl stop rsyslog.service
dmesg -C
echo 1 | sudo tee /proc/sys/vm/block_dump
dmesg -Tw

Here you’ll see that systemd-timesyncd stores its last sync date by touching a file. It only changes metadata, which is why inotify doesn’t see it happening. My solution was to put the following into /etc/tmpfiles.d/zz-clock.conf:

d /run/systemd/timesync 0755 systemd-timesync systemd-timesync - -
f /run/systemd/clock 0644 systemd-timesync systemd-timesync - -
f /run/systemd/timesync/clock 0644 systemd-timesync systemd-timesync - -
L+ /var/lib/systemd/timesync/clock - - - - /run/systemd/timesync/clock
L+ /var/lib/systemd/clock - - - - /run/systemd/clock

/var/lib/systemd/clock is used by systemd 234 and lower, while /var/lib/systemd/timesync/clock is used by systemd 235 and higher. So the latter will only be needed once you upgrade to Debian 10.

Scientific Article: Toward Understanding of Self-Electrophoretic Propulsion under Realistic Conditions: From Bulk Reactions to Confinement Effects

My colleague Patrick and I published a review article in Accounts of Chemical Research:

Scientific Article: Toward Understanding of Self-Electrophoretic Propulsion under Realistic Conditions: From Bulk Reactions to Confinement Effects
Michael Kuron, Patrick Kreissl, and Christian Holm
Accounts of Chemical Research 51, 2998 (2018)
DOI:
10.1021/acs.accounts.8b00285

Unfortunately there is no open-access version of this article.

USB WLAN adapter for Snom D7x5 VoIP phones

Snom lists a number of supported USB WLAN chipsets and occasionally adds new ones in newer firmwares. I had a BIGtec BIG120, but it died recently (it would overheat after a few days’ use and then fail to see any networks beyond channel 1 until it cooled down). Most of the devices listed by Snom are ancient; my BIG120 is no longer available in the market. Firmware 8.9.3.60 added some new supported WiFi chips, but Snom’s list of supported devices is rather short. There are two additional troubles with USB WiFi adapters: Manufacturers often release new revisions under the same name but with a different chip, so you have to be careful to buy just the right one. And while the phone (or other Linux device) might support that specific chip, its driver needs to actually contain the USB ID of the specific USB adapter. You can find information about revisions and about USB IDs of all kinds of devices at WikiDevi.

Here is a list of all the USB IDs supported by the Snom D715 (and probably all D7X5 and D3X5 phones) that I extracted from firmware 8.9.3.80. I didn’t include the Ralink RT3070/RT2070 that were already supported by the older Snom 7×0 and 8xx series as they are difficult to find nowadays, so unless you have one of the older phones, don’t bother with them.

8192cu.ko

04BB:094C
04BB:0950
04F2:AFF7
04F2:AFF8
04F2:AFF9
04F2:AFFA
04F2:AFFB
04F2:AFFC
050D:1004
050D:1102
050D:2102
050D:2103
0586:341F
06F8:E033
06F8:E035
0789:016D
07AA:0056
07B8:8178
07B8:8189
0846:9021
0846:9041
0846:F001
0B05:17AB
0B05:17BA
0BDA:018A
0BDA:0A8A
0BDA:17C0
0BDA:1E1E
0BDA:2E2E
0BDA:317F
0BDA:5088
0BDA:8170
0BDA:8176
0BDA:8177
0BDA:8178
0BDA:817A
0BDA:817B
0BDA:817C
0BDA:817D
0BDA:817E
0BDA:817F
0BDA:8186
0BDA:818A
0BDA:8191
0BDA:8191
0BDA:8754
0DF6:0052
0DF6:005C
0DF6:0061
0DF6:0070
0E66:0019
0E66:0020
0EB0:9071
103C:1629
1058:0631
13D3:3357
13D3:3358
13D3:3359
2001:3307
2001:3308
2001:3309
2001:330A
2001:330B
2019:1201
2019:4902
2019:AB2A
2019:AB2B
2019:AB2E
2019:ED17
20F4:624D
20F4:648B
2357:0100
4855:0090
4855:0091
4856:0091
7392:7811
7392:7822
CDAB:8010
CDAB:8011

8192eu.ko

0BDA:818B
0BDA:818C
2001:3319
2357:0107
2357:0108
2357:0109

mt7601Usta.ko

148F:6370
148F:7601
148F:7650

rt5572sta.ko

0411:00E8
043E:7A12
043E:7A13
043E:7A22
043E:7A32
043E:7A32
043E:7A42
0471:200F
0471:20DD
0471:2104
0471:2126
0471:2180
0471:2181
0471:2182
04BB:0944
04BB:0945
04BB:0947
04BB:0948
04DA:1800
04DA:1801
04DA:23F6
04E8:2018
050D:8053
050D:805C
050D:815C
050D:815C
057C:8501
0586:3416
0586:341A
0586:341E
0586:343E
0789:0162
0789:0163
0789:0164
0789:0166
07AA:002F
07AA:003C
07AA:003F
07B8:2770
07B8:2870
07B8:3070
07B8:3071
07B8:3072
07D1:3C09
07D1:3C0A
07D1:3C0D
07D1:3C0E
07D1:3C0F
07D1:3C11
07D1:3C16
07D1:3C17
07FA:7712
083A:6618
083A:7511
083A:7512
083A:7522
083A:8522
083A:A618
083A:A701
083A:A702
083A:A703
083A:B511
083A:B511
083A:B522
0846:9012
0930:0A07
0B05:1731
0B05:1732
0B05:1742
0B05:1784
0CDE:0022
0CDE:0025
0DB0:3820
0DB0:3821
0DB0:3822
0DB0:3870
0DB0:3871
0DB0:6899
0DB0:6899
0DB0:821A
0DB0:822A
0DB0:822B
0DB0:822C
0DB0:870A
0DB0:871A
0DB0:871B
0DB0:871C
0DB0:899A
0DF6:0017
0DF6:002B
0DF6:002C
0DF6:002D
0DF6:0039
0DF6:003E
0DF6:003F
0DF6:0041
0DF6:0042
0DF6:0042
0DF6:0047
0DF6:0048
0DF6:0050
0DF6:005F
0DF6:0065
0DF6:0066
0DF6:0067
0DF6:0068
0E66:0001
0E66:0003
0E66:0021
100D:9031
1044:800B
1044:800D
129B:1828
13B1:002F
13D3:3247
13D3:3273
13D3:3305
13D3:3307
13D3:3321
13D3:3329
13D3:3329
13D3:3365
1482:3C09
148F:2770
148F:2870
148F:3070
148F:3071
148F:3072
148F:3370
148F:3572
148F:3573
148F:5370
148F:5372
148F:5572
14B2:3C06
14B2:3C07
14B2:3C09
14B2:3C12
14B2:3C23
14B2:3C25
14B2:3C27
14B2:3C28
157E:300E
15A9:0006
15C5:0008
167B:4001
1690:0740
1690:0740
1690:0744
1690:0761
1690:0764
1737:0070
1737:0071
1737:0078
1737:0079
1740:9701
1740:9702
1740:9703
1740:9705
1740:9706
1740:9707
1740:9708
1740:9709
1740:9801
177F:0302
1875:7733
18C5:0012
1A32:0304
1D4D:000C
1D4D:000E
1D4D:0011
1EDA:2012
1EDA:2012
1EDA:2210
1EDA:2310
2001:3C15
2001:3C19
2001:3C1A
2001:3C1B
2001:3C1C
2001:3C1D
2019:5201
2019:AB25
2019:ED06
2019:ED19
203D:1480
203D:14A9
20B8:8888
5A57:0280
5A57:0282
5A57:0282
5A57:0283
5A57:0284
5A57:5257
7392:4085
7392:7711
7392:7717
7392:7718
7392:7733

My choice fell on the ASUS USB-N10 Nano, which is on the list as 0B05:17BA. It is available for 10 Euro, is so small that it fits into the side USB port without protruding from behind the phone, works stable and does not produce a lot of heat.

AMD Ryzen Threadripper: NUMA architecture, CPU affinity and HTCondor

At the university lab I work at, we usually get desktop computers with Intel Core i7 Extreme CPUs. They have more memory controllers and more cores than Intel’s mainstream CPUs, which is great for us because we do software development and simulations on these machines. Now that it was time to order some new machines, we decided to check out what AMD offers. The last time AMD’s Athlon series was competitive with Intel in the high-end desktop market was probably in the days before the Core i series was introduced a decade ago. Even in the server/HPC market, AMD’s Opteron series hadn’t been a serious Intel competitor after 2012. Now with the Ryzen, AMD finally has something that beats Intel’s high-end offerings both in absolute price and in price per performance.

Today’s high-end CPU market

As prices on Intel’s high-end chips seem to have been increasing with every generation and after Intel didn’t handle the Spectre/Meltdown disaster very well at all earlier this year, we decided that it really was time to break Intel dominance in our lab. I would actually have liked to get something with a non-x86 architecture (because why not), but the requirement of eight CPU cores and four DDR4 memory channels ruled out pretty much everything. The remaining ones were either eliminated based on price (the IBM POWER9 CPU as in the Talos II) or because they are not available in the market (ARM in the form of the Cavium ThunderX2 or Qualcomm Centriq). The POWER9 and ThunderX2 actually have eight memory channels (the Talos’s mainboard only provides access to four though), as does the AMD Epyc (the server version of the Threadripper), so they or their successors might still become interesting options in the future. For comparison, Intel’s current Xeon Scalable series only has six channels, as does the Centriq.

The AMD Ryzen family

We decided to order a Threadripper 1950X with 16 cores. When I unpacked it and started my first benchmark simulation, I was pretty disappointed by the performance though. It turned out that the Threadripper is a NUMA architecture, but you need to toggle a BIOS option (set Memory Interleave to Channel) before it actually presents itself as such to the operating system. In its default mode, memory latencies are very high because a process might be running on a CPU core that is using memory on the other pair of memory controllers. The topology it presents in NUMA mode is roughly like this: out of the 16 cores, four cores each share a common L3 cache to make what AMD calls a core complex (CCX). Two CCXes together share a two-channel memory controller and sit on the same die. Two dies are interconnected with a 50 GB/s link. In NUMA mode and after setting the correct CPU affinity on my simulation processes (which is what the remaining sections of this blog post will be about), I was getting the expected performance — and as you might have expected, the Threadripper really is powerful. You can get something comparable from Intel, the Core i9 Extreme, but these chips are extreme not only in name but also in price. Also, I love the simplicity of AMD’s product lineup: the Ryzen series has two memory channels and 4-8 cores (i.e. one CCX), the Ryzen Threadripper has four memory channels and 8-16 cores (two CCX) and the Epyc has eight memory channels and up to 32 cores. Don’t bother with the second-generation Threadripper that were just announced: the 2920X is almost identical to the 1920X and the 2950X to the 1950X. The 2970WX and 2990WX are really odd chips: they have four CCXes (like the Epyc), but two of them don’t have their own memory controllers. So half of these chips would be as fast as my 1950X in NUMA mode, and the other half would be slower than my 1950X in its default mode.

CPU affinity for MPI

Usually, you only have to worry about CPU pinning and process affinity on servers, high-performance compute clusters and some workstations. Since AMD introduced the Opteron and Intel introduced the Core architecture, machines with multiple processor sockets have been associating memory controllers with CPUs in such a way that memory access within a socket was fast and between sockets was slower. This is called NUMA. To minimize inter-socket memory accesses, you need to tell your operating system’s scheduler to never move threads or processes between cores. This is called pinning or affinity. On servers, it is usually taken care of by the application, while on HPC clusters the admin configures the MPI library to do the right thing. The Threadripper is probably the first chip that brings NUMA to the desktop market. 

If you are using OpenMPI, you just need to set two environment variables

export OMPI_MCA_hwloc_base_binding_policy=numa
export OMPI_MCA_rmaps_base_mapping_policy=numa

so that processes are pinned (bound) to a NUMA domain (usually that’s a socket, but in the Threadripper it’s a die with two CCXes). The second variable tells OpenMPI to create (map) processes on alternating NUMA domains — so the first one is put on the first die, the second one on the second die, the third one on the first die, and so on.

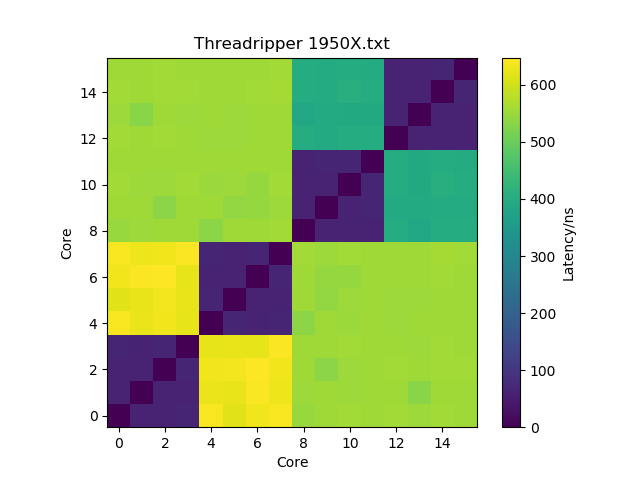
You can also use the -bind-to core and -map-by core command-line arguments to mpiexec/mpirun to achieve the same. Using l3cache  instead of numa may actually get you some even better performance because latencies within a CCX are lower than between CCXes within a die, but that only gains you a few percent and requires that you use more processes and less threads, which may be suboptimal for some software. Below is an interesting figure about latency between cores, as measured with this tool (I’m not sure about the yellow squares though — I would have expected them to be more turquoise, and they don’t seem to match what I observe in actual performance).

If you are using Intel MPI (some commercial software we use does that), you only need

export I_MPI_PIN_DOMAIN=numa

to get pinning. The process creation already happens on alternating domains by default.

I like to put these variables in a file in /etc/profile.d so that they are automatically set for everyone who logs into these machines. I didn’t know this before, but both the GNU and the Intel OpenMP library will only create one thread for each core from their affinity mask, so you don’t even need to set OMP_NUM_THREADS=8 manually if you are running hybrid-parallelized codes.

CPU affinity with HTCondor

Our machines run 24 hours a day, 365 days a year. When nobody is using them locally or via SSH, they run simulation jobs via the HTCondor job scheduler. Of course, we want to make good use of the resources with these jobs too, so we need CPU pinning as well. Usually, we set

NUM_SLOTS = 1
NUM_SLOTS_TYPE_1 = 1
SLOT_TYPE_1 = cpus=100%
SLOT_TYPE_1_PARTITIONABLE = true

in our Condor configuration so that people can decide themselves how many CPUs they want for their jobs. For the Threadripper, it doesn’t make sense to use more than 8 cores per job because we don’t want jobs to cross NUMA domains. This means we need two slots with 50% of the CPU cores, and we want to set SLOT<n>_CPU_AFFINITY to pin the processes to the die. I wrote a Jinja2 template that creates this Condor configuration:

{%- set nodes = salt.file.find('/sys/devices/system/node', name='node[0-9]*', type='d') -%}
NUM_SLOTS = {{ nodes | count }}
ENFORCE_CPU_AFFINITY = True

{% for node in nodes -%}
NUM_SLOTS_TYPE_{{ loop.index }} = 1
{%- set cpus = salt.file.find(node, name='cpu[0-9]*', type='d') -%}
{%- set physical_cpus = [] -%}
{% for cpu in cpus %}
{%- set cpu_id = cpu.replace(node + '/cpu', '') -%}
{%- set siblings = salt.file.read(cpu + '/topology/thread_siblings_list').strip().split(',') -%}
{% if cpu_id == siblings[0] %}
{%- do physical_cpus.append(cpu) -%}
{% endif -%}
{% endfor %}
SLOT_TYPE_{{ loop.index }} = cpus={{ physical_cpus | count }}
SLOT_TYPE_{{ loop.index }}_PARTITIONABLE = true
{%- set cpu_ids = [] -%}
{% for cpu in cpus %}
{%- do cpu_ids.append(cpu.replace(node + '/cpu', '')) -%}
{% endfor %}
SLOT{{ loop.index }}_CPU_AFFINITY = {{ cpu_ids | join(',')}}

{% endfor -%}

If you don’t have a Jinja2-based configuration manager like SaltStack, you can use the following Python script to render the template:

import os, sys
from jinja2 import Environment, FileSystemLoader
import salt
import salt.modules.file

salt.file = salt.modules.file

file_loader = FileSystemLoader(os.path.dirname(__file__))
env = Environment(loader=file_loader, extensions=['jinja2.ext.do'])
template = env.get_template(sys.argv[1])
template.globals['salt'] = salt
print (template.render())

This produces

NUM_SLOTS = 2
ENFORCE_CPU_AFFINITY = True

NUM_SLOTS_TYPE_1 = 1
SLOT_TYPE_1 = cpus=8
SLOT_TYPE_1_PARTITIONABLE = true
SLOT1_CPU_AFFINITY = 0,1,16,17,18,19,2,20,21,22,23,3,4,5,6,7

NUM_SLOTS_TYPE_2 = 1
SLOT_TYPE_2 = cpus=8
SLOT_TYPE_2_PARTITIONABLE = true
SLOT2_CPU_AFFINITY = 10,11,12,13,14,15,24,25,26,27,28,29,30,31,8,9

One additional complication is that some of our users like to set getenv = True in their condor submit file. This means that the variables we set in the global shell profile in the previous section are inherited to the Condor job, overriding the affinity we set for the slots. So we need a job wrapper script that removes these variables if present. Put

#!/bin/bash

for var in $(/usr/bin/env | /bin/grep -E '^(OMPI_|I_MPI_)' | /usr/bin/awk -F = {print $1}'); do
    echo "Removing environment variable $var" >&2
    unset "$var"
done

exec "$@"
error=$?
echo "Failed to exec($error): $@" > $_CONDOR_WRAPPER_ERROR_FILE
exit 1

into /usr/lib/condor/libexec/condor_pinning_wrapper.sh and add

USER_JOB_WRAPPER = /usr/lib/condor/libexec/condor_pinning_wrapper.sh

to your Condor configuration.

Update 2019-01: Updated the Jinja template to work correctly on non-16-core Threadrippers. These have one (12-core, 24-core) or two (8-core) cores disabled on each CCX, which results in non-consecutive core IDs.

Filtering outgoing traffic with VirtualBox’s NAT interface

Hypervisors like VMware Workstation, VMWare Fusion or VirtualBox usually offer three kinds of network interfaces: bridged (to a network on the host), NAT (sharing an IP address with the host via network address translation) and host-only (a connection exclusively between host and guest).

VMWare, at least on Linux, realizes NAT entirely in the kernel, using standard IP forwarding and setting up a DHCP server on the host that gives addresses to the guest. VirtualBox, on the other hand, handles NAT entirely in user-space, meaning all packets entering and leaving the VM really seem to be going to and from a process named VBoxHeadless or similar.

If you want to limit what kinds of connections a guest system can make, VMware lets you do that quite easily by adding rules to the FORWARD chain:

sudo iptables -I FORWARD -i vmnet8 -j ACCEPT -d github.com
sudo iptables -I FORWARD -i vmnet8 -j REJECT

Unfortunately, things are a lot more difficult with VirtualBox. Since there is no dedicated interface, you need to filter based on process. iptables can’t do that directly, but you can use cgroups to add the necessary marks to the packets:

sudo mkdir /sys/fs/cgroup/net_cls/virtualbox
echo 86 | sudo tee /sys/fs/cgroup/net_cls/virtualbox/net_cls.classid
sudo iptables -N VIRTUALBOX
sudo iptables -I OUTPUT -j VIRTUALBOX -m cgroup --cgroup 86
sudo iptables -I VIRTUALBOX -j ACCEPT -d github.com
sudo iptables -I VIRTUALBOX -j REJECT

Of course, you now need to create the VirtualBox process inside that cgroup. One way is

sudo apt-get install cgroup-tools
sudo cgexec -g net_cls:virtualbox vboxmanage startvm WindowsXP --type=headless

or you can use a wrapper script instead of vboxmanage:

#!/bin/sh -e
CGROUP_NAME=virtualbox
CGROUP_ID=86

if [ ! -d /sys/fs/cgroup/net_cls/$CGROUP_NAME/ ]; then
  mkdir /sys/fs/cgroup/net_cls/$CGROUP_NAME
  echo $CGROUP_ID > /sys/fs/cgroup/net_cls/$CGROUP_NAME/net_cls.classid
fi

/bin/echo $$ > /sys/fs/cgroup/net_cls/$CGROUP_NAME/tasks

exec /usr/bin/vboxmanage "$@"

What to do if GitHub only sends emails for a random subset of notifications

For the past few months, it seemed like GitHub wasn’t sending me notification emails for all activity in my watched repositories. I was only getting a random subset of these emails, at most half of what it should have been. I eventually contacted GitHub’s support and they were immediately able to help me. They told me that they send a certain portion of their notifications not directly, but via a third-party service (judging from the message headers, it’s SendGrid).

This third-party service had apprently added me to their suppression list because one email they sent to me months ago had been hard-bounced. There probably was some malfunction on our email server at the time that caused this. I understand why SendGrid does this, but silently discarding any emails GitHub asked them to deliver to me is bad. Really, they should have notified GitHub, which then should have either emailed me at one of the other addresses in my profile or shown a big banner after I log in the next time, asking me to re-confirm my email address to clear the block.

So if this ever happens to you and you’re getting fewer GitHub notification emails than you should be: just email their support and ask them to check. I should have done this sooner, but it really wasn’t clear to me whom to blame (it could just as well have been our mail server’s fault).

MacBook Pro with Thunderbolt 3 and Dell docking stations

I recently got a new MacBook Pro with Thunderbolt 3 ports. These ports are great because they can carry power, USB and output to an external display simultaneously. Not a lot of accessories are available on the market yet though besides simple adapters from USB-C to things like USB, HDMI, VGA, Thunderbolt 2, or Ethernet. Belkin has announced the Belkin Thunderbolt 3 Express Dock HD, but it seems like it will be priced upwards of $300. Dell’s XPS 13 and 15 series however has included Thunderbolt 3 for a year now and Dell makes some nice docking stations for them:

Dell DA200: small portable device with Gigabit Ethernet, USB 3, VGA and HDMI.

Dell WD15: stationary device with a size similar to a paperback book, with a 130W or 180W power brick. Over the DA200, it adds mini-DisplayPort, 2x USB2, 2x USB3, Speaker and Headset outputs. It also passes power through to the computer.

Dell TB15: This model appears to have been recalled because it didn’t run stable and replaced with the TB16.

Dell TB16: stationary device shaped like a stack of a dozen CD cases, with a 180W or 240W power brick. Over the WD15, it adds DisplayPort. Note that it connects to the computer via Thunderbolt 3 instead of USB-C, which means it can deliver higher screen resolutions (see below).


First of all, the DA200 just works. VGA and HDMI run up to a resolution of 2048×1152 pixels at 60 Hz (even though Dell says it only supports 1920×1080), Ethernet works without installing a driver (it contains the same Realtek chip, PCI ID 0bda:8153, that the official Belkin USB-C adapter uses). HDCP-encrypted HDMI works fine, as confirmed by starting a Netflix video.

Next up, the WD15. I first hooked it up via mini-DisplayPort and was disappointed to find that it only runs up to 2048×1152 pixels. Switching to HDMI alleviated the problem and my screen ran at its native 2560×1440 pixels — though the colors were all messed up because the computer was outputting YCrCb while the screen was interpreting that as RGB, but that is easily fixed by creating an EDID override. HDCP works just fine — even though Dell says the dock doesn’t support it. Dell also says that the dock can do 4K resolutions (3840×2160 pixel) only at 30 Hz, so if you want to hook up a 4K display, don’t get this dock. The dock has a power button, but it didn’t surprise me to find out that it didn’t power up the Macbook. The Macbook did, however, automatically turn on when plugging in the USB-C cable, even in clamshell mode. One oddity I found was that the front left USB 3 port would only deliver power, not data, while a device was plugged into the rear USB 3 port — while I did not find this documented anywhere, it seems likely that this is a hardware limitation and not a Mac issue — see below for more information. Audio works fine too (it’s a Realtek chip, PCI ID 0bda:4014), but you need to use Audio MIDI Setup and click the “Configure Speakers” to assign left/right either to the first stream (headphone output on front) or the second stream (audio output on the back):


Finally, the Dell TB16. I didn’t have this one for testing because the WD15 suffices for my application. Dell says that you can run two 4K displays or one 5K (5120×2880 pixel) display, all at 60 Hz. I assume everything else will work just as it does with the WD15. For USB purposes however, I believe this dock contains a PCIe-attached USB 3.1 chip as the USB-C Alternate Mode Partner Matrix shows that a superspeed USB signal cannot be carried if high-resolution video is transferred. According to one of my readers, it doesn’t work out of the box unfortunately.


USB 3 problems

It seems like I can’t reliably use all USB 3 ports on the WD15 simultaneously. Sometimes they all work, but after the next reboot or unplug/replug cycle, once ceases to work. I had initially believed this to be a hardware limitation, but it appears to be a bug in Apple’s USB 3 drivers. sudo dmesg shows messages like these:

000069.247426 IOUSBHostHIDDevice: IOUSBHostHIDDevice::interruptRetry: resetting device due to IO failures

000069.551400 AppleUSB20Hub@14440000: AppleUSBHub::deviceRequest: resetting due to persistent errors

So the OS shuts down the USB hub. If you google these messages, you’ll find a large number of reports of it occurring with all kinds of USB hubs, but no solutions. So Apple just needs to get their drivers fixed.

Scientific Article: Moving charged particles in lattice Boltzmann-based electrokinetics

I’ve published a scientific article in The Journal of Chemical Physics.

Moving charged particles in lattice Boltzmann-based electrokinetics
Michael Kuron, Georg Rempfer, Florian Schornbaum, Martin Bauer, Christian Godenschwager, Christian Holm, and Joost de Graaf
J. Chem. Phys. 145, 214102 (2016)
DOI:10.1063/1.4968596

The journal provides open-access to the article for the first month. After that, you’ll still be able to download it for free from arXiv: arXiv:1607.04572.

Disabling “secured” IPv6 addresses is macOS 10.12 Sierra

On older macOS versions, every network interface would have one IPv6 address autogenerated from its MAC address, easily identified by the characteristic “ff:fe” bytes in the middle of the host part:
$ ifconfig en0
[...]
ether 10:dd:b1:9f:6b:ba
inet6 fe80::12dd:b1ff:fe9f:6bba%en0 prefixlen 64 scopeid 0x4
inet6 2001:7c0:2012:4a:12dd:b1ff:fe9f:6bba prefixlen 64 autoconf
[...]

Since macOS 10.12 however, these were replaced with randomly-generated “secured” addresses:
$ ifconfig en0
[...]
ether 10:dd:b1:9b:d0:67
inet6 fe80::46:3b36:146:9857%en0 prefixlen 64 secured scopeid 0x4
inet6 2001:7c0:2012:4a:4e6:f1d1:dd90:c6b4 prefixlen 64 autoconf secured
[...]

Very little is known about these, besides a single mailing list post that discovered them. If you are running a server, you’ll want your IPv6 address to be deterministic so you can register it in DNS. Therefore, we need to revert to pre-10.12 behavior:

$ echo net.inet6.send.opmode=0 >> /etc/sysctl.conf
$ reboot

If you look at the source code of the XNU kernel (Search for the IN6_IFF_SECURED flag) and the IPConfiguration service in macOS 10.11 (the 10.12 source code hasn’t been released yet), you can see that the new behavior was already there, just not enabled by default like it is now. Also, we now know that the change wasn’t made to reflect RFC 7217 (Semantically Opaque Interface Identifiers) behavior, but rather implements RFC 3972 (Cryptographically Generated Addresses).

Using a BIND DNS server in an Active Directory Environment

Years ago, I posted a script that allowed ISC DHCPd to update a Microsoft DNS server with dynamic records for DHCP clients. I haven’t used that method in a long time and there is a much simpler method: use ISC DHCPd together with the BIND DNS server like everybody else does, and only delegate the _mscds and _sites zones from the BIND server to the Microsoft DNS servers:

_msdcs.example.com. 86400 IN NS dc01.example.com.
_msdcs.example.com. 86400 IN NS dc02.example.com.
_sites.example.com. 86400 IN NS dc01.example.com.
_sites.example.com. 86400 IN NS dc02.example.com.

Then on all your machines, use the BIND server as DNS server (typically set via DHCP option 23). For Windows Domain matters, only records below _msdcs and _sites are ever looked up.

I believe you should even be able to point your domain controllers to the BIND DNS server — they should be able to follow the NS record so that whenever they try to update their own records, they do so on the Microsoft DNS server. As it turns out, the RFC 2136 DNS UPDATE method is used when domain controllers try to register their own records, so you’ll see error messages in your logs if you point your domain controllers to the BIND DNS server (on a Microsoft DC, these would refer to NETLOGON and dynamic DNS registrations, while on a Samba DC they would be about samba_dnsupdate). If you are running Samba 4.5 or higher, you should ensure that samba_dnsupdate is called with the –use-samba-tool flag, which can probably be done by setting the option below in your /etc/samba/smb.conf. If you are running an older Samba version or any Windows Server version, you need to resort to using your domain controllers’ IP addresses as DNS servers on on all domain controllers (Samba: put them into /etc/resolv.conf, Windows: set them in the network interface properties).

dns update command = /usr/sbin/samba_dnsupdate --use-samba-tool

For compatibility with Unix clients (including Mac OS X), you’ll want to add a couple of CNAME records for the SRV records:

_ldap._tcp.example.com. 86400 IN CNAME _ldap._tcp.dc._msdcs.example.com.
_gc._tcp.example.com. 86400 IN CNAME _ldap._tcp.gc._msdcs.example.com.
_kerberos._tcp.example.com. 86400 IN CNAME _kerberos._tcp.dc._msdcs.example.com.
_kerberos._udp.example.com. 86400 IN CNAME _kerberos._tcp.dc._msdcs.example.com.
_kpasswd._tcp.example.com. 3600 IN SRV 0 100 464 dc01.example.com
_kpasswd._tcp.example.com. 3600 IN SRV 0 100 464 dc02.example.com
_kpasswd._udp.example.com. 3600 IN SRV 0 100 464 dc01.example.com
_kpasswd._udp.example.com. 3600 IN SRV 0 100 464 dc02.example.com

The _kpasswd records unfortunately can’t be CNAMEs because they don’t exist in the _msdcs branch, so you manually need to keep them up-to-date when you add and remove domain controllers.