Author Archives: Michael Kuron

How-To: Converting Xen Linux VMs to VMWare ESXi

I have a couple Linux VMs I created on Xen using xen-create-image (as such, they are using pygrub and have one virtual disk file per partition). Now I want to migrate those over to a VMWare ESXi box. To convert your raw Xen disk images to VMWare vmdk files, do this:

1. In VMWare Fusion or Workstation, do a basic install of Debian Squeeze onto a flat-file (not split into 2GB segments and preallocated) VMDK that is slightly larger than your virtual Xen disk with a separate VMDK for swap.
2. Downgrade it to Grub 1 using apt-get install grub-legacy, grub-install /dev/sda, update-grub (as Grub 2 is not compatible with /boot/grub/menu.lst files as generated by xen-create-image).
3. Shut down and make a copy of the VMDK.
4. Boot the VM back up and re-install Grub2 using apt-get install grub.
5. Edit /boot/grub/grub.cfg and replace root=UUID=xxxxxxxxxx in the linux lines with root=/dev/sda1
6. Shut down the VM and attach the VMDK you copied in step 3 as an additional disk (this will be the target disk for our conversion).
7. Boot it up and make sure that you’re getting a Grub2 screen (i.e. it is not booting from the copied VMDK).
8. Using mount, check that your root disk is sda1 (which usually should be the first disk, not the copied disk). Using ls /dev/sd*, make sure it sees the target disk as sdc.
9. dd if=/path/to/xen/vm/disk.img of=/dev/sdc1 bs=1048576
10. mount /dev/sdc1 /mnt; cd /mnt
11. nano etc/fstab: replace swap disk /dev/xvda1 with /dev/sdb1 and root disk /dev/xvda2 with /dev/sda1
12. nano etc/inittab: replace hvc0 with tty1
13. nano boot/grub/menu.lst: replace /dev/xvda2 with /dev/sda1
14. umount /mnt
15. Attach the new virtual disk to a VM and boot a rescue system. There, drop to a shell on /dev/sda1 and apt-get update, apt-get install grub
16. Reboot
17. Done!
Using Intel AMT’s VNC server

Newer Intel Chipsets with vPro/Intel AMT, such as the Q57, Q67 and C206 (as long as they’re paired with a Core i5/i7 or Xeon with integrated graphics), have a feature called Remote KVM.

To use it, press Ctrl-P at the BIOS splash screen to get to the MEBx menu, set a password (minimum 8 characters, mixed case, numbers and special characters are enforced), configure the network settings (they can even match the OS’s IP address), enable Remote KVM and disable User Opt-In.

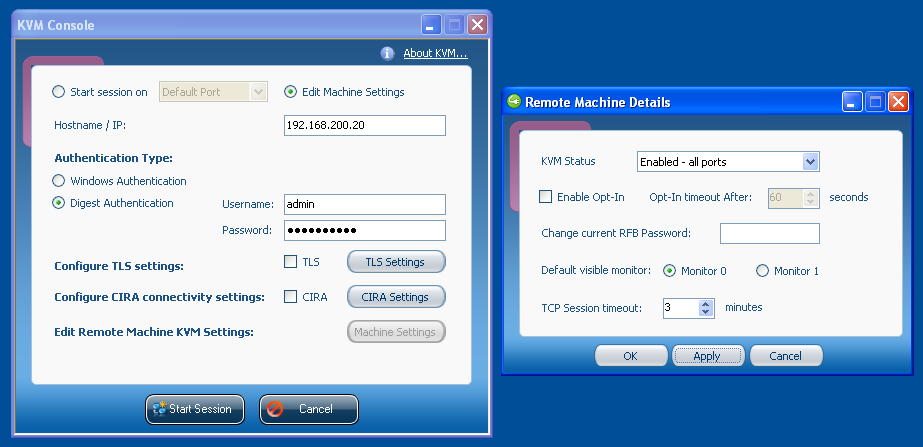
Next, download the Intel AMT SDK, extract the ZIP and open .\Windows\Intel_AMT\Bin\KVM\KVMControlApplication.exe . There, you can enable KVM as seen in the following screenshot:

KVM Status can either be set to “redirection ports” (meaning it will only be accessible to VNC clients that specifically support Intel AMT, such as RealVNC Viewer Plus or Intel’s KVM Console, the former of which costs $100, the latter of which constantly overlays a RealVNC logo on the screen), to “default port” (meaning it will be accessible on TCP port 5900 to any VNC client), or to “all ports” (which is the combination of both).
If you enable VNC access, you will also need to set an RFB Password. As I found out the hard way (Intel actually has it hidden in their documentation as well), it gets truncated at 8 characters and at the same time has the same security requirements as the general AMT password.
If you disabled User Opt-In in the MEBx menu, you can disable it here as well.

So that’s it, now you can use almost any VNC client you like (RealVNC and Chicken of the VNC work fine, while Apple Remote Desktop appears to cause the VNC server to freeze) and control the machine just as if you were sitting in front of it.
Two things I noticed: On my machine, the BIOS splash screen was not visible during a KVM connection (not even on a directly-attached screen), so to get to the BIOS I needed to blindly hit the corresponding key. Also, it is not possible to enter the MEBx menu during a KVM connection (probably for some obscure security reasons): if you hit the corresponding key, it immediately exits and continues normal bot; if you establish a KVM connection while in MEBx, you get disconnected immediately.

After about half an hour of playing with Intel AMT, I have to say it’s really cool. If you’re buying/building a home server, you should definitely consider getting a mainboard with Intel AMT 6.0 or later: You get server-grade remote management capabilities for a very small premium, which are very useful if you ever lock yourself out while remotely connected to the server.

Xen 4.0 and Citrix WHQL PV drivers for Windows

Xen 4.0 is supposed to be able to use Citrix’s WHQL certified Windows paravirtualization drivers. Their advantage over the GPLPV drivers is that they are code-signed, meaning they run on 64-bit Windows without disabling some of Windows’ security features.

UPDATE 2011-10-17: Signed GPLPV drivers are now available. I have not yet tested them, but I assume the fix below is no longer necessary.

While the Citrix drivers included in XenServer 5.5 work (after making a single registry tweak), the more recent ones included in e.g. Xen Cloud Platform 1.0 do not work right away:

If you install the XCP drivers, make that registry tweak and reboot the DomU, you’ll notice messages like XENUTIL: WARNING: CloseFrontend: timed out in XenbusWaitForBackendStateChange: /local/domain/0/backend/console/[id]/0 in state INITIALISING; retry. in your /var/log/xen/qemu-dm-*.log and Windows just gets stuck during boot and keeps spinning forever. To get it back to work, you’ll need to
xenstore-rm /local/domain/0/backend/console/[id]
xenstore-rm /local/domain/0/backend/vfb/[id]

after starting the VM (thanks to Keith Coleman‘s mailing list post!).

To automatically run these commands upon DomU start, create a script named /usr/lib/xen/bin/qemu-dm-citrixpv with the following contents
#!/bin/sh

xenstore-rm /local/domain/0/backend/console/$2
xenstore-rm /local/domain/0/backend/vfb/$2

sh -c "sleep 10; xenstore-rm /local/domain/0/backend/console/$2; xenstore-rm /local/domain/0/backend/vfb/$2" &

exec /usr/lib/xen/bin/qemu-dm $*
and chmod +x it.

Then, edit your DomU config file and modify the device_model line and point it to your new script:
device_model = '/usr/lib/xen/bin/qemu-dm-citrixpv'

Now your Windows Server 2008 R2 x64 HVM-DomU is all set!

Asterisk: Remotely retrieving voicemail by pressing *

Many howtos around the internet on how to remotely access your voicemail box involve a dedicated extension reachable from the outside or an IVR menu entry. But wouldn’t it be much nicer if you could just press the * DTMF key during the announcement? Turns out, this is quite simple:

[incoming-external]
exten => s,1,Dial(SIP/1234,20)
exten => s,n,Voicemail(1234,us)
exten => a,1,VoiceMailMain(1234)
exten => a,n,Hangup()

And it even works when you’re using macros (like I am):

[incoming-external]
exten => 5551234,1,Macro(incoming-plus-voicemail,SIP/1234,20,1234)
exten => 5551337,1,Macro(incoming-plus-voicemail,SIP/1337,20,1337)

[macro-incoming-plus-voicemail] ; SIP/xxx, wait time, voicemail
exten => s,1,Dial(${ARG1},${ARG2}
exten => s,n,Voicemail(${ARG3},us)
;
push * during the announcement to access your mailbox
exten => a,1,VoiceMailMain(${ARG3})
exten => a,n,Hangup()

Asterisk: Compile SRTP Module without recompiling Asterisk

I recently installed Asterisk 1.8.3 (the Asterisk team now provides pre-built Debian packages at http://packages.asterisk.org).
Unfortunately, that package came without the res_srtp SRTP module. (UPDATE: Starting in 1.8.4, it does come with it.) Because I didn’t feel like re-compiling the entire package, I just took the corresponding version of res_srtp.c from the SVN, added the following lines to the beginning of it:

#ifndef AST_MODULE
#define AST_MODULE "res_srtp"
#endif

and compiled and installed it using

gcc -shared res_srtp.c -o res_srtp.so -lsrtp
sudo cp res_srtp.so /usr/lib/asterisk/modules/

You’ll need to have libsrtp0-dev and asterisk-dev installed, otherwise the compile will fail.
Then, you can do sudo asterisk -r and load the module using module load res_srtp (or just restart Asterisk).

I’m still working on getting SRTP working flawlessly both incoming and outgoing and with stuff like transfers. Asterisk Secure Calling Specifics are a good starting point, but I’m also planning to write another post about this in the near future.

Asterisk: Change Callee-ID using CONNECTEDLINE

It’s easy to change your Caller ID (assuming your phone provider doesn’t filter it) in Asterisk using something like Set(CALLERID(name)=blah). This is often used to choose which number to use for an outgoing call if you have multiple on a single SIP or ISDN trunk.

But did you know it’s just as easy to change the Callee ID on an outgoing call, i.e. change what your phone displays during the call? This can be very useful to display on the phone which one of several possible outgoing lines (multiple SIP providers, ISDN, …) was used or at which point in an IVR menu you are at the moment. To do this, use Set(CONNECTEDLINE(name)=blah). Before getting started, set sendrpid = pai in your sip.conf.

To make things easier, I created two macros in my dialplan:

[macro-connectedline-name-number]
exten => s,1,Set(CONNECTEDLINE(name,i)=${ARG1})
exten => s,n,Set(CONNECTEDLINE(number,i)=${ARG2})
exten => s,n,Set(CONNECTEDLINE(pres)=allowed)

[macro-connectedline-name]
exten => s,1,Macro(connectedline-name-number,${ARG1}, ${MACRO_EXTEN})

Now I can do things like

[internal-test]
exten => 101,1,Answer()
exten => 101,n,Macro(connectedline-name,Hello World)
exten => 101,n,Playback(hello-world)
exten => 101,n,Hangup()

in my dialplan (IVR example).

Or how about

[outgoing]
exten => 100,1,Macro(connectedline-name,Mailbox)
exten => 100,n,VoiceMailMain(${CALLERID(num)},s)
exten => _XXX.,n,Macro(connectedline-name,VoIP 1)
exten => _XXX.,n,Dial(SIP/${EXTEN}@voipprovider)

(outgoing line example).

The Asterisk Wiki also has an entire page on Manipulating Party ID Information.

NFS Performance: rsize and wsize

NFS is supposed to be a very simple and fast network file protocol. However, when I tried to use it on my Xen box between a Debian Squeeze DomU and an NFS server running on the Debian Squeeze Dom0, I noticed that write performance was abysmal: any write more than a couple KB in size would not only slow down to a crawl, but also bog down the DomU, making it rather difficult to even cancel the write.

After some researching and testing, I tracked it down to the rsize and wsize mount options: they specify the size of the chunks sent at a single time. Apparently, they are set to 1M if you don’t specify anything else. In my case, wsize=131072 and rsize=262144 showed the highest write and read speeds respectively. However, wsize=131072 is not too far away from the cliff after which writing drops to a crawl, so I decided to back it down to 65536.

Patching DSDT in recent Linux kernels without recompiling

Up until a year or two ago, the Linux kernel let you replace the ACPI DSDT by adding a customized version to the initrd. However, more recent versions disable that by default. If you’re using Grub2 as your bootloader though, the alternative is simple: just add acpi /boot/dsdt.aml to your Grub config. If you prefer a more elegant solution, just add the attached 01_acpi.txt to /etc/grub.d, renamed it to 01_acpi and chmod +x it; then run update-grub2 to rebuild your Grub config. It originally came from ubuntuforums.org and I removed the -e flag in the acpi line, which caused the new DSDT only to be visible to Grub, but not to the OS.

I believe the acpi command in Grub2 originally came from the Hackintosh community – messing around with DSDTs is a lot more common there because Mac OS X is rather picky.

For those of you who don’t know what I’m talking about: the DSDT describes certain hardware features your PC has, such as buttons, CPU power save modes, and lots of other things. Some mainboards have very poorly done BIOSes that have equally messed up DSDT tables. I won’t go into a lot of detail regarding how to fix those here though (it’s as simple as cat /proc/acpi/dsdt > dsdt.dat; iasl -d dsdt.dat; editing dsdt.dsl to your liking; iasl -tc dsdt.dsl (this last step will probably produce a number of errors that can be solved by googling for the error number and making the appropriate changes in dsdt.dsl)).

Another valuable hint for people messing around with DSDTs: the DSDT is not the only place that can contain this kind of information, the other place would be the SSDT and possibly additional SSDTs. You can find them in /sys/firmware/acpi/tables and decompile them just like the DSDT as described above. Instead of recompiling the SSDT by itself, you could probably also consider merging it into your custom DSDT at the appropriate places.

Using motd to warn you of upcoming fsck

Has it ever happened to you that you remotely rebooted a Linux server and wondered why after 10 minutes you still couldn’t Ping or SSH into it? Quite often, this is caused by a lengthy run of fsck on one of your ext3 file systems (on current multi-TB disks, they can take an hour or longer). They usually get triggered automatically around every six months or 30 mounts, and there’s no easy way of knowing when it will happen.

My solution to this is rather simple: tune2fs -l tells you when the next fsck is coming up, so why not run a script upon every boot and have it write that information into /etc/motd so that you can see it every time you SSH in? The script is below (as a bonus, drives being fscked in less than 5 mounts or a week are printed in red), so all you need to do is put it somewhere on your hard drive and add something like
# Add FSCK status to MOTD
[ -f /root/fsck_stats.sh ] && bash /root/fsck_stats.sh >> /var/run/motd

to the init script that generates your motd (on Debian Squeeze, that would be /etc/init.d/bootlogs).

#!/bin/bash

echo

for disk in /dev/sda1 /dev/mapper/vm--storage-vms /dev/sdb1
do
cur_mounts=$(tune2fs -l $disk | grep "Mount count:" | awk '{print $3}')
max_mounts=$(tune2fs -l $disk | grep "Maximum mount count:" | awk '{print $4}')
diff_mounts=$(echo $max_mounts-$cur_mounts | bc)
last_check=$(tune2fs -l $disk | grep "Last checked:" | awk '{print $3}')
next_check=$(tune2fs -l $disk | grep "Next check after:" | awk '{print $4" "$5" "$6" "$7" "$8}')
next_check_timestamp=$(date -d "$next_check" "+%s")
cur_timestamp=$(date "+%s")
diff_next=$(echo $next_check_timestamp-$cur_timestamp | bc)

color=""
[ $diff_mounts -lt 5 ] && color="\033[31m"
[ $diff_next -lt 604800 ] && color="\033[31m"

echo -e "$color Next FSCK on $(basename $disk): $next_check or in $diff_mounts mounts\033[0m"

IPv6 router on Linux

Setting up Linux as an IPv6 router is really easy. Even if your ISP doesn’t do IPv6 yet (like mine), there’s no reason not to get an IPv6 tunnel from Tunnelbroker.net and be IPv6-ready within minutes.

  1. Do a basic install of your favorite Linux distribution.
    Since my server runs Xen, I just did xen-create-image –ip=192.168.200.5 –netmask=255.255.255.0 –gateway=192.168.200.1 –nameserver=192.168.200.23 –mirror=http://ftp.de.debian.org/debian/ –passwd –hostname=router-ipv6 –dist=squeeze –arch=i386 –size=4G –swap=1G –dir=/data/vms/router-ipv6 –memory=64M –role=udev –pygrub and ran ln -s /etc/xen/router-ipv6.cfg /etc/xen/auto to have it automatically start upon reboot. To start the VM, do xm create router-ipv6.cfg
  2. SSH into the virtual machine and configure the LAN and the WAN interface. Since I’m using a tunnel, my WAN interface is a 6in4 interface; if you’re using a physical one you’ll need to manually edit the Xen VM config file to add the physical interface to the VM. So we’re adding the following lines to /etc/network/interfaces
    iface eth0 inet6 static
    address 2001:470:xxxb:xxxx::1
    netmask 64

    auto 6in4
    iface 6in4 inet6 v4tunnel
    address 2001:470:xxxa:xxxx::2
    netmask 64
    endpoint 216.66.80.30
    gateway 2001:470:xxxa:xxxx::1
    up ip route add ::/0 dev 6in4

  3. Next, edit /etc/sysctl.conf and set net.ipv6.conf.all.forwarding=1 by removing the comment sign from the beginning of the line.
  4. apt-get install radvd and then edit /etc/radvd.conf to look like this:
    interface eth0
    {
    AdvSendAdvert on;
    AdvLinkMTU 1280;
    prefix 2001:470:xxxb:xxxx::1/64
    {
    AdvOnLink on;
    AdvAutonomous on;
    };
    RDNSS 2001:470:xxxb:xxx:yyyy:yyyy:yyyy:yyyy
    {
    };

    Most of this is pretty self-explanatory (the prefix line should contain the address of the router’s network interface and everything else just enables router advertisements), however the RDNSS line needs to point to the IPv6 address (it will automatically get one after you finish step 6) of your local DNS forwarder.
  5. Next, you’ll probably want to configure the firewall so that your computers can’t be accessed from outside (remember, with IPv6 every device gets a publicly routable address). apt-get install shorewall6 and then edit the following files to configure it:
    In /etc/default/shorewall6: startup=1 (enables the firewall) and wait_interface="6in4" (your WAN interface)
    In /etc/shorewall6/zones: Add the lines fw firewall, net ipv6 and loc ipv6
    In /etc/shorewall6/interfaces: Add the lines net 6in4 detect and loc eth0 detect
    In /etc/shorewall6/policy: Add the lines net all REJECT notice, loc all ACCEPT, fw all ACCEPT and all all REJECT notice
    In /etc/shorewall6/rules: Configure the firewall rules to your liking. I added Ping(ACCEPT) all all to allow incoming pings (I don’t believe in this security-by-obscurity stuff). I also added ACCEPT all loc:2001:470:xxxb:xxxx:zzzz:zzzz:zzzz:zzzz because that machine has its own IPv6-configured firewall.
  6. Reboot the VM.

All your IPv6-ready clients should start picking up addresses automatically. Linux, Mac OS X and iPhones do as expected and base their IP on the MAC address. Windows 7 does the same, but also makes up a random IP which gets used by default for all outgoing connections due to privacy reasons. On Windows XP, you need to manually add IPv6 to the network protocols in the network connection properties, after which it’ll behave similarly to Windows 7.
The DNS server announced by radvd however only gets picked up by the iPhone. Mac OS X only supports manually-configured IPv6 DNS servers as far as I can tell. Windows automatically configures fec0:0:0:ffff::1, fec0:0:0:ffff::2 and fec0:0:0:ffff::3 as its DNS servers; you could add one of these addresses to your DNS server (and add some other address in the fec0:0:0:ffff::/64 range to your IPv6 router VM’s LAN interface so that clients can actually find a route to it), but unfortunately the site-local prefix fec0::/10 has been deprecated for more than half a decade and should no longer be used. But fear not, it’s perfectly fine to talk to your DNS server using IPv4 – it will still resolve AAAA (IPv6 A) queries without issues. And I expect IPv4 to stay around for at least another decade, so you’re not likely to run into trouble for a long time.