Category Archives: Linux

Snom VoIP phones: OpenVPN and multicast audio

Snom voice-over-IP phones have a built-in OpenVPN client, and they can also have audio transmitted to them via multicast. However, in my case a phone logged into OpenVPN did not play back audio received from the local ethernet network

I had multicast reception configured correctly on the phone:

multicast_listen=on
mc_address=239.255.255.245:5555

(Remember that you need to push the Apply button at the bottom of the page and then the Save button at the top of the page for the setting to actually take effect.)

To diagnose the problem, you can use multicast pings. Running

ping -I eth0 -t 2 239.255.255.245

on the local network showed no reactions from the phone. However, running

ping -I tun2 -t 2 239.255.255.245

on the VPN server showed responses from the phone. So clearly the phone wanted to do multicast exclusively via VPN. The cause of this was the following line in my OpenVPN config on the server:

push "redirect-gateway def1"

The obvious solution was to replace this line with routes that excluded the multicast IP addresses:

push "route 0.0.0.0 128.0.0.0"
push "route 128.0.0.0 192.0.0.0"
push "route 192.0.0.0 224.0.0.0"

While this worked, the phone wouldn’t complete booting up the next time I power-cycled it. So I switched back to the old OpenVPN config and instead turned on multicast routing on the VPN server:

apt-get install smcroute
echo 'mgroup from eth0 group 239.255.255.245' >> /etc/smcroute.conf
echo 'mroute from eth0 group 239.255.255.245 to tun0 tun1 tun2' >> /etc/smcroute.conf
service smcroute restart

Multicast audio now works and it even goes across the VPN.

Below you can find some commands that use FFMPEG to send the multicast audio:

ffmpeg -re -i song.mp3 -filter_complex 'aresample=16000,asetnsamples=n=160' -acodec g722 -ac 1 -vn -f rtp udp://239.255.255.245:5555
ffmpeg -re -i song.mp3 -filter_complex 'aresample=8000,asetnsamples=n=160' -acodec pcm_mulaw -ac 1 -vn -f rtp udp://239.255.255.245:5555
ffmpeg -re -i song.mp3 -filter_complex 'aresample=8000,asetnsamples=n=160' -acodec pcm_alaw -ac 1 -vn -f rtp udp://239.255.255.245:5555

Interestingly, you don’t even need to set the rtp_codec_type setting — the phone automatically determines the codec from the stream. I wasn’t able to get the Opus codec working though, the phone just makes crackling noises when I tried.
OpenMPI and SLURM CPU pinning

The SLURM scheduling and queueing system pins processes to CPUs. This worked great with OpenMPI 1.6, but OpenMPI 1.8 introduced its own pinning policy. As a result, our jobs ended up running very slowly because all jobs that used less than a whole machine ended up getting pinned to cores 0 through n, where n is the number of cores requested by a job.

Fixing this is pretty simple: just disable OpenMPI’s pinning so that the MPI processes inherit the scheduler’s pinning. To do that, add the following to your job script:

export OMPI_MCA_hwloc_base_binding_policy=none

Obviously, as a more permanent and more fool-proof solution, set that setting in the OpenMPI config file on all of your compute nodes, have the scheduler set that environment variable, or put it into your module file for OpenMPI.

Triple-booting a Clamshell iBook

I have a first-generation Clamshell iBook, manufactured in January 2000. These shipped with 64 MB of on-board RAM, a 6 GB hard drive and a CD drive.
I got it in summer 2005 when my high school decommissioned these computers. Running Mac OS X 10.3.9 at the time, it was still a very usable computer, especially after I upgraded the RAM to 320 MB. I used it as my main computer for a year and a half, until I replaced it with a new Intel-based Mac.

Now, in 2016, I found a 40 GB IDE laptop hard drive and decided to put that into the Clamshell and try to make it usable again.
As usual, iFixit has a good tutorial. You have to take the entire machine apart and end up with around 50 screws, but it’s surprisingly easy. You only need a Torx T8, a Philips #1 and a 5mm nut driver.
Now, on to putting some operating systems on the hard drive.

Installing Mac OS X 10.4

Here is what you need:

  • Mac OS X 10.4 retail install DVD
  • Mac OS X 10.3 retail install CD (the first one is sufficient). Any other bootable Mac OS X 10.3 CD might also work.
  • USB hard drive

Officially, Tiger is only supported on the latest revision of the Clamshell iBook, which has FireWire and a DVD drive. Mine only has a CD drive and does not support USB booting, which makes things exceedingly difficult.

  1. Take an image of the 10.4 install DVD and save it onto the USB hard drive using a different Mac.
  2. Boot the Clamshell off the 10.3 install CD
  3. Open up Disk Utility. Partition the disk with the following sizes and names: 16 MB linux-boot, 2 GB linux-swap, 12 GB linux, 20 GB Macintosh HD, 6 GB Install. Make sure to select the Install OS 9 drivers checkbox.
  4. Plug in the USB hard drive.
  5. Clone the 10.4 install image onto the Install partition on the internal drive.
  6. Open a Terminal and bless the hard drive: bless --folder "/Volumes/Install/System/Library/CoreServices" --bootinfo "/Volumes/Install/usr/standalone/ppc/bootx.bootinfo".
  7. Using the Terminal, pico /Volumes/Install/System/Installation/Packages/OSInstall.mpkg/Contents/OSInstall.dist and remove the PowerBook2,1 from the badMachines list.
  8. Open Startup Disk and set the iBook to boot from the Install partition.
  9. Reboot
  10. Install 10.4 onto the Macintosh HD partition, deselecting all printer drivers and languages you don’t need in order to save some space.
  11. After the reboot, run Software Update a few times.

Installing Mac OS 9.2.2

Here is what you need:

Mac OS 9 is really easy to install, you just copy it to the hard drive.

  1. Mount the CD or image and copy System Folder and Applications (Mac OS 9) from the root directory to your Macintosh HD.
  2. Open the Startup Disk preference pane and select Mac OS 9.2.2.
  3. Reboot.
  4. If you used the NetBoot image, you will be asked for user name and password. Use NBUser and netboot.
  5. In order to disable the password prompt, go to the hard drive, System Folder and move the contents of Control Panels disabled to Control Panels. Now open the Multiple Users control panel, go to options and set it to local authentication. Then, disable multiple users entirely.
  6. Download and install QuickTime 6.0.3 for Mac.
  7. Open the Startup Disk control panel and select Mac OS 10.4.
  8. After the reboot, open the Classic preference pane and select the system folder on Macintosh HD.

Now you can use Classic and you can also do a native boot.

Installing Debian Linux 8 “Jessie”

Mac OS 9.2.2 hasn’t received updates in almost 15 years, and Mac OS X 10.4 is also 7 years beyond its update cycle. So how about a current operating system?

Here is what you need:

Except for the partitioning, the installation is quite straight-forward.

  1. Insert the CD and boot it by holding the C key while turning on the computer.
  2. Proceed through the installer.
  3. When asked for the partitioning, set the 16 MB partition to be NewWorld Boot and set the bootable flag. Set the 2 GB partition to be swap. Set the 12 GB partition to be ext3 and mounted at /.
  4. When asked for the packages to install, choose the Xfce desktop. It’s lightweight enough to run on this old hardware.
  5. After rebooting, run nano /etc/apt/sources.list and add the non-free repository to all entries in the file. Then, install the AirPort firmware: apt-get install linux-firmware-nonfree.

The resulting Debian install mostly worked for me, except for two things:

  • the AirPort card does not show up in NetworkManager
  • Fonts are a bit messed up. Bitmaps are drawn to the screen just fine.

I’m still looking for solutions to these two things.

Configuring the yaboot bootloader

Right now, your computer will boot into Linux all the time.
While the yaboot loader prompts you to hit x to boot into Mac OS X and m to boot into Mac OS 9, that doesn’t work as expected.
Instead of booting into Mac OS X, my iBook booted into the install partition.
And instead of booting into Mac OS 9, my iBook booted into Mac OS X.

So run nano /etc/yaboot.conf and adjust the macosx= line so that it refers to the same partition as the macos9= line. Exit the editor and run ybin -v to apply the changes. That fixes the first problem.

Now, reboot into Mac OS X and open the Startup Disk preference pane. Select Mac OS 9.2.2 and reboot.
While rebooting, hold down the option key and select the Linux partition at the boot picker.
Run nano /etc/yaboot.conf again and add brokenosx to a new line. Once more, run ybin -v.

Now, each boot loader entry does what you’d expect. The trick here is that brokenosx causes yaboot to directly load the Mac OS X booter for the macosx= entry. The macos= entry, on the other hand, will still cause the blessed system folder to be booted.

Fixing Mac OS 9 after installing Linux

One problem is still there: When you try to boot Mac OS 9, you are greeted by a blinking floppy with a question mark. This happens because the Debian partitioner destroys the Mac OS 9 drivers for the HFS+ partitions. However, the drivers can be reinstalled.

You need:

  • Mac OS 9 install CD. Any other bootable Mac OS 9 CD might also work.

Now,

  1. Insert the CD and reboot the iBook while holding down the C key.
  2. Open Drive Setup, highlight the internal hard drive, go to the Functions menu and click Update Drivers.
  3. Reboot

Resetting the Startup Disk

Whenever you touch the Startup Disk preference pane in Mac OS X or the Startup Disk control panel in Mac OS 9, your system will no longer show the yaboot prompt when you turn it on. To fix that, do the following:

  1. Hold down the option key while booting and select the Linux partition
  2. Run ybin -v

Fixing Linux problems

http://ppcluddite.blogspot.de/2012/03/installing-debian-linux-on-ppc-part-iv.html is an excellent article that explains how to fix most issues that Debian has on PowerPC. For example, to fix the font rendering troubles, create an xorg.conf file (switch to a text terminal, run init 3, Xorg -configure, cp /root/xorg.conf.new /etc/X11/xorg.conf) and insert Option "RenderAccel" "false" into its Device section.

ARP and multicast packets lost with OpenVPN in tap mode

After upgrading our OpenVPN server VM from Debian 7 to Debian 8 (moving us from OpenVPN 2.2 to OpenVPN 2.3 and Linux kernel 3.2 to Linux kernel 3.16) and upgrading our virtualization from VMware ESXi 5.5 to ESXi 6.0 and moving the VM to a different host, the VPN got really unreliable: the VPN connection itself worked fine, but any connections established across the VPN were very slow to get established. Once they were established, everything worked fine and you could even create new connections to the same host across the VPN and they would be established quickly.

I wasn’t sure which one of the many changes caused the issue, but luckily Wireshark quickly revealed the problem: As we are using OpenVPN in layer 2 mode (i.e. with tap interfaces), ARP packets are quite important. While I could see the ARP requests making it across the interface bridge from tap0 to eth0, I saw the ARP replies going into eth0 and not making it to tap0. The server-side fix is easy, just disable the MAC table on the bridge completely and simply lets all packets pass:

brctl setageing br0 0

Now that ARP was working, I noticed that VPN clients also did not get IPv6 addresses. Evidently, the ICMPv6 multicasts weren’t making it across the bridge either. To fix that, enable multicast snooping on the bridge:

echo 1 > /sys/devices/virtual/net/br0/bridge/multicast_querier

Update March 2016: A recent kernel update in Debian Jessie appears to have changed the multicast bridging behavior. I now need to disable multicast snooping:

echo 0 > /sys/devices/virtual/net/br0/bridge/multicast_querier

Fixing OpenMPI over InfiniBand on Rocks Cluster Linux

We recently got a new small compute cluster at the university, running Rocks Clusters Linux 6.1.1, a CentOS 6 derivative. The nodes are interconnected via an InfiniBand network. Unfortunately, the default configuration of OpenMPI 1.6.2 in the HPC roll wastes a significant amount of performance: it communicates using TCP, which is run over a load-balanced combination of IP over InfiniBand and IP over Ethernet.

Switching to DMA over InfiniBand is simple: just run the following command on all compute nodes and the head node:

sed -i 's/add rocks-openmpi/add rocks-openmpi_ib/g' /etc/profile.d/rocks-hpc.*sh

Now however, you get a message like this when you run an MPI job:

--------------------------------------------------------------------------
WARNING: It appears that your OpenFabrics subsystem is configured to only
allow registering part of your physical memory.  This can cause MPI jobs to
run with erratic performance, hang, and/or crash.

This may be caused by your OpenFabrics vendor limiting the amount of
physical memory that can be registered.  You should investigate the
relevant Linux kernel module parameters that control how much physical
memory can be registered, and increase them to allow registering all
physical memory on your machine.

See this Open MPI FAQ item for more information on these Linux kernel module
parameters:

    http://www.open-mpi.org/faq/?category=openfabrics#ib-locked-pages

  Local host:              bee.icp.uni-stuttgart.de
  Registerable memory:     32768 MiB
  Total memory:            130967 MiB

Your MPI job will continue, but may be behave poorly and/or hang.
--------------------------------------------------------------------------

To fix that, run

echo "options mlx4_core log_num_mtt=24" >> /etc/modprobe.d/mlx4.conf

on all nodes and reboot. log_mtts_per_seg defaulted to 3 on our kernel and did not need tweaking. To check your current values, run

grep . /sys/module/mlx4_core/parameters/*mtt*

One warning message that still comes up when running an MPI job is the following:

--------------------------------------------------------------------------
WARNING: Failed to open "OpenIB-cma-1" [DAT_INVALID_ADDRESS:]. 
This may be a real error or it may be an invalid entry in the uDAPL
Registry which is contained in the dat.conf file. Contact your local
System Administrator to confirm the availability of the interfaces in
the dat.conf file.
--------------------------------------------------------------------------
bee.icp.uni-stuttgart.de:30104:  open_hca: getaddr_netdev ERROR: No such device. Is ib1 configured?
bee.icp.uni-stuttgart.de:30104:  open_hca: device mthca0 not found
DAT: library load failure: libdaplscm.so.2: cannot open shared object file: No such file or directory

As UDAPL is removed in newer OpenMPI versions anyway, this is fixed by running

echo "btl = ^udapl" >> /opt/openmpi/etc/openmpi-mca-params.conf

on all compute nodes and the head node.

So all in all, you can simply add the following lines to /export/rocks/install/site-profiles/6.1.1/nodes/extend-compute.xml and rebuild your compute node image:

echo "btl = ^udapl" >> /opt/openmpi/etc/openmpi-mca-params.conf
sed -i 's/add rocks-openmpi/add rocks-openmpi_ib/g' /etc/profile.d/rocks-hpc.*sh
echo "options mlx4_core log_num_mtt=24" >> /etc/modprobe.d/mlx4.conf
dracut -f 2.6.32-504.16.2.el6.x86_64 # may need to rebuild the initrd so it picks up the modprobe parameters

Crossflashing Dell PERC H200 to LSI 9211-8i

OEM version of the LSI SAS 9211-8i, such as the Dell H200, H310 or IBM M1015 are quite popular for use with FreeNAS. However, they need to be flashed with a regular LSI firmware to disable their RAID capabilities in order to passthrough the drives directly to the OS.

Here’s how I upgraded my Dell PERC H200, which came with Dell’s A10 firmware (equivalent to LSI SAS 2008 P07 firmware), to LSI P20 firmware. The newer version also has the advantage that drives larger than 2TB are supported. Also, re-flashing allowed me to not flash a boot ROM to the card, speeding up the boot process of my server as my boot disk is connected to the Intel AHCI controller on the mainboard.

Please note that this operation is not supported by Dell or LSI, may void your warranty and could potentially damage the controller. So proceed at your own risk.

Step 1: Downloading old firmware

  1. Download the firmware for the Dell 6Gbps SAS HBA (this is a variant of the H200 with 8 external ports instead of 8 internal ports) and extract 6GBPSAS.FW from SASHBA_Firmware_6GBPS-SAS-HBA_07.03.06.00_A10_ZPE.exe.
  2. Download the P07 firmware for the LSI SAS 9211-8i and extract the file 2118it.bin from 9211_8i_Package_For_P7_Firmware_BIOS_Upgrade_on_MSDOS_and_Windows.zip.
  3. Download the P05 UEFI flasher for the LSI SAS 9211-8i and extract the file sas2flash.efi from EFI_Installer_P5.zip.
  4. Place these three files into a directory named P07 on a FAT32-formatted USB flash drive.

Step 2: Downloading current firmware

  1. Download the current firmware for the LSI SAS 9211-8i and extract the file 2118it.bin from 9211_8i_Package_P20_IR_IT_Firmware_BIOS_for_MSDOS_Windows.
  2. Download the current UEFI flasher for the LSI SAS 9211-8i and extract the file sas2flash.efi from Installer_P20_for_UEFI.zip.
  3. Place these two files into a directory named P20 on the USB flash drive.

Step 3: Downloading UEFI shell

  1. Download an x86_64 UEFI shell. I had to use the v1 shell because my server would only show error messages (about failed assertions and files not found).
  2. Rename the shell to BOOTX64.efi and place it into a directory named BOOT inside a directory named EFI on the USB flash drive.

Step 4: Flashing

  1. UEFI boot your server off the flash drive
  2. Type map -b to find the flash drive
  3. Switch to it, e.g. by entering fs1:
  4. cd P07
  5. sas2flash.efi -listall should show you your controller
  6. sas2flash.efi -c 0 -list shows you details on the controller. Note down the SAS address in case something goes wrong and you need to reprogram the SAS address.
  7. Erase the old firmware and boot ROM: sas2flash.efi -o -e 6
  8. Write the Dell 6Gbps firmware: sas2flash.efi -o -f 6GBPSAS.FW
  9. Write the LSI P07 firmware: sas2flash.efi -o -f 2118it.bin
  10. cd ..\P20
  11. Write the LSI P20 firmware: sas2flash.efi -o -f 2118it.bin

Notes

At the end of every command (before I rebooted before step 10), I got the message “Failed Reconnecting the EFI Driver. (EFI Error: Not Found)”. It did not seem to affect anything.

Step 7 showed “Erasing Flash Region” and then after a while “ERROR: Erase Flash Operation Failed!”. I simply proceeded and the error did not appear to affect anything.

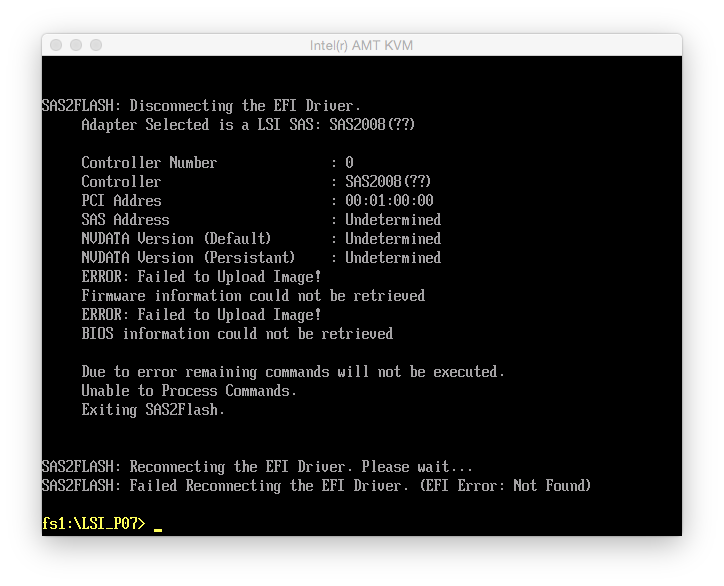
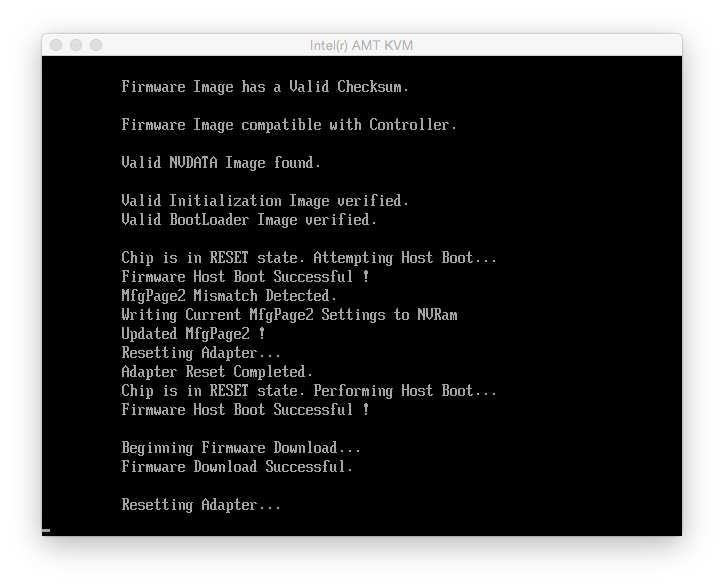
Step 8 looked like this:

Screen Shot 2014-11-29 at 10.02.09

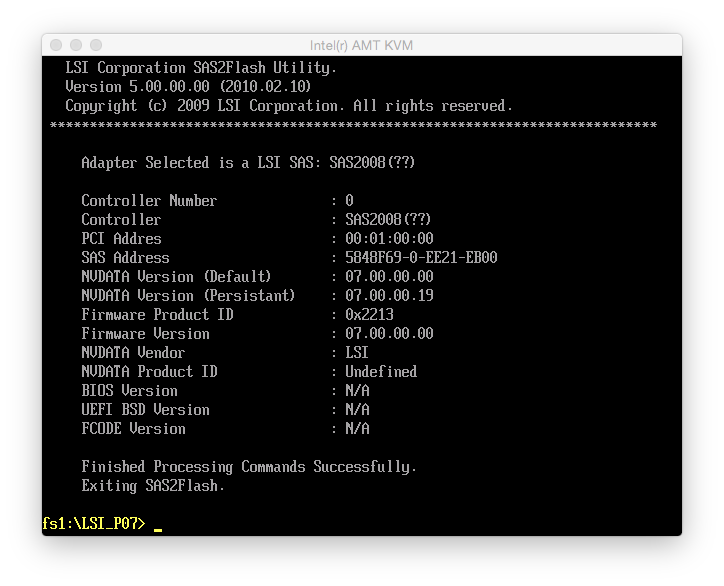
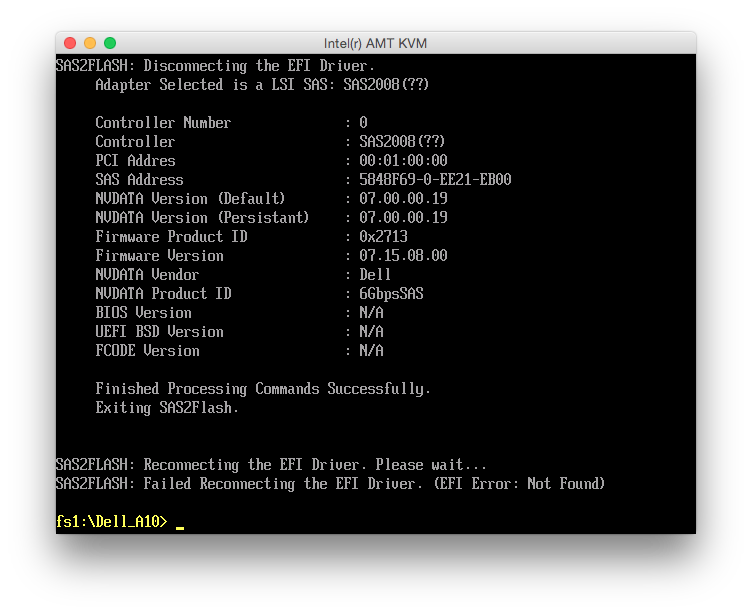
and the controller details after the flash looked like this:

Screen Shot 2014-11-29 at 10.03.04

During step 9, I received the message “NVDATA Versions Compatible. NVDATA Product ID and Vendor ID do not match. Would you like to flash anyway [y/n]?”, where I simply hit y and it proceeded flashing. At the end, it said “Firmware Flash Successful! Resetting Adapter… Adapter Reset Failed!”. Looking at the controller details showed lots of errors:

Screen Shot 2014-11-29 at 10.06.34So at this point, I rebooted the machine. Now the details looked all right:

Screen Shot 2014-11-29 at 10.09.54

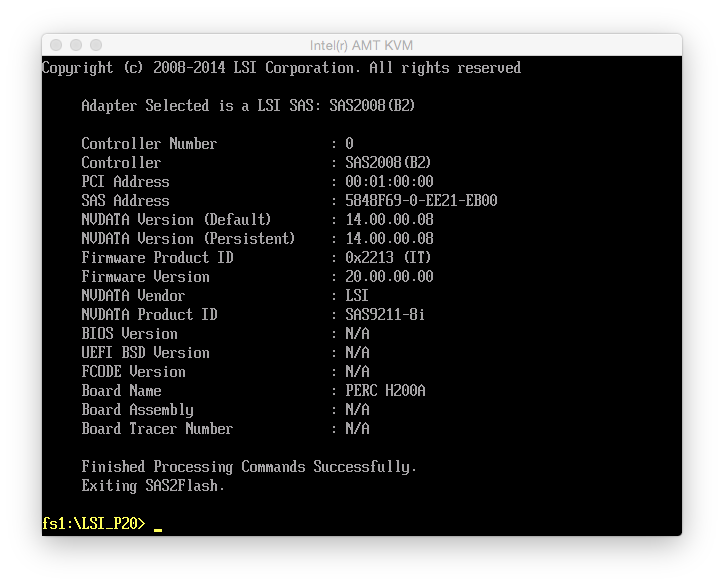
Step 11 worked without a hitch and afterwards the controller details looked like this:

Screen Shot 2014-11-29 at 10.11.38


Booting up the server, I now had a Dell H200 that behaved exactly like a LSI SAS 9211-8i. The only difference was that it still reported its name and PCI ID (1028:1f1c) as a Dell 6Gbps SAS Card. FreeNAS didn’t care about that though.

Addendum: Matching firmware and driver versions

I was using this controller with FreeNAS 9.2.1.9 and kept on getting kernel messages like

Nov 30 19:49:55 file02 kernel: (da1:mps0:0:0:0): READ(10). CDB: 28 00 a1 ea 00 58 00 01 00 00 length 131072 SMID 609 terminated ioc 804b scsi 0 state 0 xfer 0
Nov 30 19:49:55 file02 kernel: (da1:mps0:0:0:0): READ(10). CDB: 28 00 a1 e9 ff 58 00 01 00 00 
Nov 30 19:49:55 file02 kernel: (da1:mps0:0:0:0): CAM status: SCSI Status Error
Nov 30 19:49:55 file02 kernel: (da1:mps0:0:0:0): SCSI status: Check Condition
Nov 30 19:49:55 file02 kernel: (da1:mps0:0:0:0): SCSI sense: ABORTED COMMAND asc:47,3 (Information unit iuCRC error detected)
Nov 30 19:49:55 file02 kernel: (da1:mps0:0:0:0): Retrying command (per sense data)

It turns out that these are due to a mismatch between firmware and driver version. FreeBSD 9 ships with driver version 16 and FreeBSD 10 includes version 19. Linux currently has version 18. So make sure that in step 11, you always flash the version that matches your operating system’s driver version, don’t blindly go with version P20 or the latest version. On FreeNAS, you can determine the driver version using dmesg | grep “mps0: Firmware”:

mps0: Firmware: 20.00.00.00, Driver: 16.00.00.00-fbsd

In this case, I had no data loss whatsoever and the person who reported this on the FreeBSD mailing list didn’t either, but both LSI and FreeBSD recommend to keep driver and firmware in sync.

Downgrading firmware

As I had to downgrade the firmware, I needed to do sas2flash.efi -o -e 6 before the flashing. Of course, this means that the crossflashing is undone and you’ll have to start over, flashing Dell 6GPBSAS.FW, flashing LSI P07 IT, and finally flashing the version matching your driver.

6GBPSAS.FW and LSI P07 need to be flashed with the LSI P05 sas2flash.efi because later versions will simply refuse when they encounter a NVDATA mismatch. Once that’s done, you can use the latest (P20 at the moment) sas2flash.efi to flash your final firmware version. This also has the advantage that you don’t get these “Adapter Reset Failed” warnings.

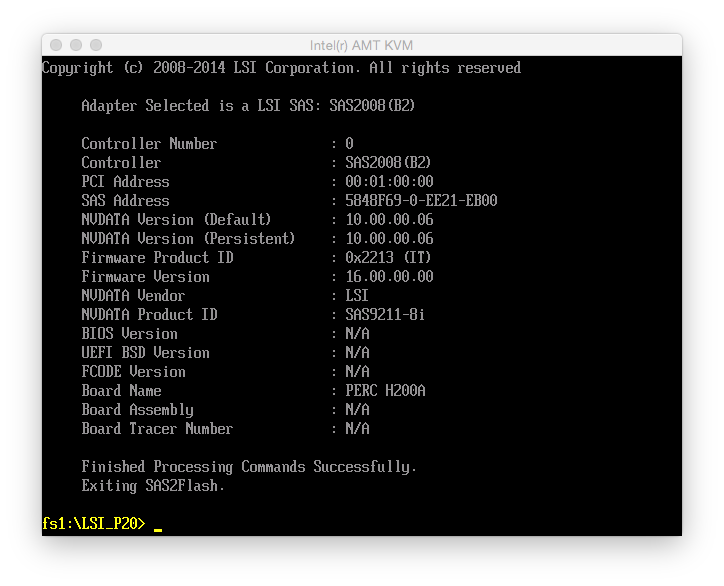
Below is a screenshot of the details of the P16 firmware:

Screen Shot 2014-12-03 at 09.11.40

Update 2021: Over the years, LSI was taken over by Broadcom, Broadcom was taken over by Avago, and Avago renamed itself back to Broadcom. As a result, none of the download links above work anymore. The files are still available from Broadcom though: go to https://www.broadcom.com/support/download-search, select “Legacy Products”, “All Legacy Products”, search for 9211-8i.

CUPS-to-CUPS printing with server-side processing and page_log

Printer sharing on Windows is easy: the client receives the driver from the server, presents the driver GUI and passes on an intermediate format along with the options selected in the driver to the server, which then renders the print job for the printer (usually into PostScript).

In the Unix (Mac OS X in my case, but Linux would be the same) world, CUPS is commonly used for printing. It’s very powerful, but I find the documentation severely lacks details about the exact way something is implemented in the code. Luckily, the code is open-source and Michael Sweet, the developer of CUPS who now works at Apple and still maintains CUPS, managed to create a very structured piece of software with code that’s reasonably easy to understand.

If you just add a CUPS server’s print queue as a new printer on a CUPS client, it will work fine, but you might run into some inconveniences:

Problems

  1. The job might get run through a vendor-supplied filter twice, once on the server and once on the client. This usually works fine, but the print job might significantly increase in size (observed on an HP LaserJet).

  2. The page_log on the server might not contain the number of pages and copies a job consisted of and list 1 for both instead.

  3. The page_log on the server might not contain things like page format, duplex status or attributes you manually added to PrintLogFormat.

Reasons

  1. This happens if the PPD both on the client and on the server contains a line starting with *cupsFilter, which links to a vendor-supplied filter. Such a filter usually produces a MIME type of application/postscript.

  2. This happens if the job does not get run through the pstops filter by CUPS. CUPS bypasses that filter if the client submits the job with a MIME type of application/vnd.cups-postscript, i.e. it was already run through pstops on the client.

  3. This is either caused by the same things as (1) or (2), but I’m not sure which one.

Solution

Simply add the following lines to the PPD on the client. That way, it passes the job straight to the server for server-side processing.

*cupsFilter: "application/pdf 0 -"
*cupsFilter: "image/* 0 -"
*cupsFilter: "application/postscript 0 -"
*cupsFilter: "application/vnd.cups-postscript 0 -"
*cupsFilter: "application/vnd.cups-command 0 -"

By the way, if you use Mac OS X and let the “Add Printer” wizard automatically add a print queue from a remote CUPS server discovered via Bonjour, this is exactly what it does.

Notes

If you append something like %{SelectColor} to your PageLogFormat because that’s the attribute your printer uses to determine whether it should print in color or grayscale and you’d like to log that, please note that the default value (either as specified by the PPD or as specified by you via lpadmin -d printername -d SelectColor=Grayscale or via the CUPS web interface’s “Set Printer Defaults”) will never be written to the page_log. Only deviations from the default value will be logged. The defaults set on the server-side CUPS do not matter here, this is determined by the client-side CUPS.

Per the filter(7) documentation (italic comments were added by me):

Options passed on the command-line typically do not include the default choices the printer’s PPD file. […] use the ppdMarkDefaults [which sets all options to the defaults specified inside the PPD] and cupsMarkOptions [which sets the options to the values specified in the driver GUI] functions in the CUPS library to use the correct mapping, and ppdFindMarkedChoice [which reads from the options array composed from the defaults and the selected options] to get the user-selected choice.

SSDs with TCG Opal or IEEE-1667 support

Recently, a few SSD models have been introduced that support Full-Disk Encryption per the TCG Opal standard. Many older SSDs already support AES encryption and use the ATA password for this, which is settable in the BIOS. The advantage of Opal is that it divides the drive into a small read-only segment (technically not a partition) with a special boot loader (which prompts you for the encryption password and passes it to the drive) and the encrypted segment which contains your traditional OS and data partitions. These special boot loaders can do much more than a BIOS: for example, they can provide means for key reset and they can talk to a server on the network. They can also have multiple passwords for multiple users and they can be configured entirely from within the OS, which also allows for central management in enterprise environments.

The downside of course is that you need a piece of software to use Opal. This includes WinMagic SecureDoc (for Windows and Mac), Wave Systems Embassy Security Center (for Windows only) and several others, but also BitLocker/eDrive in Windows 8 (however, this requires IEEE-1667 support as well). This is also an advantage as it does not require hardware or OS support; so even Macs could use them:

WinMagic SecureDoc already supports supported Macs until October 2013, but a version for OS X 10.9 was never released. Secude has announced FinallySecure Enterprise Full Disk Encryption with support for OS X and Opal; it hasn’t been released yet and was recently sold to a company named EgoSecure.

Probably the first drive to support Opal was the Seagate Momentus FDE, which was a spinning disk. Toshiba, Hitachi and a few others also made HDDs with Opal support.

Later, the Samsung PM830 (but not the Samsung SSD 830) and the Micron C400 SED (but not the Micron C400 or the Crucial m4) came, which were only available to OEM.

The first Opal-compliant mass-market SSD was the Crucial M500 (it’s also OEM’d as Micron M500), which is also IEEE-1667 compliant. As the M500 currently offers the best GB/$ ratio of all SSDs on the market, it’s been selling superb in the five months it’s been on the market and I hope this drives more software companies to support Opal.

The just-announced Intel SSD Pro 1500 will also support Opal, but apparently not IEEE-1667.

As far as I know, these really are all TCG Opal drives on the market, currently and previously. I expect there will be more coming, but I am kind of surprised that it took this long.

If you know of any others, let me know in the comments.

Update Dec 2013: The Samsung 840 EVO also does Opal.

Update Jan 2014: Wave Systems has a list of Opal drives that work with their software. It lists some Adata XPG SX900 models, the Kingston KC300 (only certain part numbers) and some LiteOn models.

Update Mar 2014: The just-announced Crucial M550, which is very similar to the popular M500, still supports Opal 2.0 and IEEE-1667, and is explicitly advertised as Microsoft eDrive compatible. Same goes for the almost identical ADATA SP920.

Update May 2014: The SanDisk X300s also has both and includes a license for Wave Embassy in case your computer does not support eDrive. Glad to see that Opal and IEEE-1667 are finally making it into a significant proportion of new midrange mass-market SSD models.

Update June 2014: The Crucial MX100 is similar to the M550 with cheaper NAND and supports the same encryption standards. The ADATA Premier SP610 is supposed to get Opal 2.0 through a firmware update later this year, but not IEEE-1667.

Update July 2014: The Samsung SSD 850 Pro has TCG Opal and IEEE-1667. The Intel SSD Pro 2500 has TCG Opal 2.0 and IEEE-1667.

Update September 2014: The Crucial M600 has Opal 2.0 and IEEE-1667, just like its predecessors M500, M510, MX100, M550.

Update October 2014: The Adata SR1010 has Opal 2.0 and IEEE-1667.

Update December 2014: Samsung SSD 850 EVO has Opal 2.0 and IEEE-1667.

Update January 2015: The Crucial MX 200, which is quite similar to the MX 100, has Opal 2.0 and IEEE-1667. The BX 100 does NOT have encryption and is based on a different controller.

Update October 2015: The Samsung SSD 950 Pro is supposed to get Opal and IEEE-1667 with a firmware update at some point.

Update January 2016: The SanDisk X400 is supposed to get a firmware update for Opal in April.

Update February 2016: The Samsung SSD 750 EVO, apparently intended to replace the 850 EVO, has Opal and IEEE-1667.

Update April 2016: The Crucial MX 300 does TCG Opal 2.0, IEEE-1667 and thus also Microsoft eDrive.

Update June 2016: The Micron SSD 1100 was announced with TCG Opal 2.0 and eDrive support.

PXE-booting Knoppix 7.2

I have a PXE server on my network so I can easily boot Linux live images and tools when fixing computers. Knoppix 7.2 however is unable to load a network driver on most PCs (it only works with Intel E1000 NICs) after following the standard procedure:

  1. Copy the DVD image’s contents to an NFS server
  2. Boot the DVD
  3. sudo knoppix-terminalserver, follow the assistant and select all network drivers
  4. Copy the contents of /tftpboot to your PXE server and add something like this to your pxelinux config:
    DEFAULT knoppix
     TIMEOUT 2
     PROMPT 2
    
     LABEL knoppix
     MENU LABEL Knoppix 7.2
     kernel knoppix72/boot/pxelinux/linux
     append nfsdir=192.168.200.25:/data/shares/tftpboot/knoppix72 nodhcp lang=de ramdisk_size=100000 init=/etc/init apm=power-off nomce loglevel=1 initrd=knoppix72/boot/pxelinux/miniroot.gz libata.force=noncq tz=localtime lang=de apm=power-off nomce libata.force=noncq hpsa.hpsa_allow_any=1 loglevel=1 BOOT_IMAGE=knoppix

To fix the network driver issue, apply the following diff before running sudo knoppix-terminalserver:

--- /KNOPPIX/usr/sbin/knoppix-terminalserver 2013-02-12 04:21:16.000000000 +0000
 +++ /usr/sbin/knoppix-terminalserver 2013-09-30 18:52:16.055233746 +0000
 @@ -281,8 +281,7 @@
 mkdir -p "${MINIROOT}/static"

 # Check if we need the Kernel 2.6 insmod
 -INSMOD=""
 -case "$KERNEL" in 2.6.*) INSMOD=/sbin/insmod ;; esac
 +INSMOD=/sbin/insmod

 # Unfortunately, these are not integrated in ash-knoppix yet, so we need some shared
 # libs. :-(
 @@ -326,6 +325,7 @@
 for i in $MODULES; do
 awk -F: '{if($1~/'"$i"'/) {print $2}}' /lib/modules/$KERNEL/modules.dep
 done | sort | uniq | while read module relax; do [ -n "$module" ] && cp /lib/modules/$KERNEL/"$module" "${MINIROOT}/modules/net/00_${module##*/}"; done
 +cp /lib/modules/$KERNEL/kernel/drivers/pps/pps_core.ko "${MINIROOT}/modules/net/00_0_pps_core.ko"

 #umount "${MINIROOT}"
 #dd if="$RAMDISK" bs=${MINISIZE}k count=1 | gzip -9v > "${MINIROOT}.gz"

Using Serva with an existing PXE server

A long time ago, I set up a PXE server on my network from which I can boot all kinds of Linux tools. It uses the PXELinux boot loader to provide a menu etc. When I came across an article on how to PXE boot a Windows 7 installer using Serva, I looked for a way to integrate that into my existing PXELinux configuration.

Serva takes a Windows installer CD, patches a few files, injects a small tool into the WIM, and fires up a TFTP server and DHCP proxy. It also supports Microsoft’s BINL protocol, which lets the boot loader find out which one of boot menu entries was chosen.

I went to my Linux server and created a folder named Serva in /srv/tftp and Samba shared that. I then mapped it to Z: on a Windows machine, fired up Serva, pointed it at Z: as its TFTP root and checked the TFTP, proxyDHCP and BINL check boxes. After copying the contents of the Windows 7 ISO to a subfolder of /srv/tftp/Serva/WIA_WDS and restarting Serva, the Windows side of it all was done already.

Next, I upgraded my PXELinux to version 6.0.1 and put the following files into my tftp folder: ldlinux.c32 libcom32.c32 libutil.c32 memdisk  menu.c32 netbootme.0 pxechn.c32 pxelinux.0. Then I added the following entry to my pxelinux.cfg/default:

LABEL win7-32-de-install
MENU LABEL Windows 7 i386 DE Installer
KERNEL pxechn.c32
APPEND Serva\WIA_WDS\W7_32_DE\_SERVA_\pxeboot.0 -p Serva\WIA_WDS\W7_32_DE -o 252.s=Serva\WIA_WDS\W7_32_DE\_SERVA_\boot\bcd

-p sets the PXE root path to the install ISO root and -o 252.s sets DHCP option 252 to the full path to the BCD (making all the BINL stuff unnecessary). Two more symlinks and we’re all set:

cd /srv/tftp
ln -s Serva/WIA_WDS .
cd WIA_WDS/W7_32_DE/_SERVA_
ln -s pxeboot.n12 pxeboot.0

Now the only issue that I still have is that the network share path still contains the name of the computer that originally ran Serva. This can be fixed in the BCD using a hex editor.